Competition Electronics Pro Timer CEI 4730 Manuel utilisateur

Model # CEI 4730

PRO TIMER
Table of Contents
Battery Installation...........................
Power ON/OFF..................................
Home Screen Information................
Control Button Functions..................
LED and Beeper Alerts......................
Headset Jack...................................
Basic Operation................................
Shot Detection..................................
Menu Flow List.................................
1
1
2
3-4
4
5
5
5
6
7-13
Individual Screen Detail...........................
Review Shot String................
Par Time................................
Start Delay Type....................
Backlight ON time..................
Start Signal LED.....................
Beeper/Headset Volume........
Home Screen Type.................
Shot Dead Time.....................
Shot Sensitivity.....................
Date and Time.......................
Hit Factor Scoring.................
Clear Data.............................
Review Previous string..........
Battery Status, info, and warning
screens....................................................
Memory Info............................................
Resetting to Factory Defaults..................
Specifications..........................................
Warranty..................................................
7
8
8
9
9
9
9-10
11
11
11
12
13
13
13-14
14
14
15
16

PRO TIMER
It is important to read and understand this manual before trying
to use your new shot timer. We are here to help, if you have any
questions or comments, please contact us at 815-874-8001 or
www.competitionelectronics.com.
The ProTimer is designed and built in the USA.
With proper use and care it will give you many years of
trouble-free service.
Thank you for purchasing our product!

ProTimer
PRO TIMER
Battery Installation
Power ON/OFF
The ProTimer operates using a 9 volt battery for power. It is
important to use Alkaline or Lithium batteries (not carbon) due
to the power demand of the buzzer and display backlighting.
Install the battery in the compartment on the rear of the unit.
Once installed, the ProTimer will briefly display a sign-on
message, followed by the home screen.
Note: If at any time you suspect the unit is not functioning
properly, try resetting it (see page # 14).
To turn the unit ON, press the SET DECR/ON button.
After 10 minutes of inactivity, the ProTimer will turn off
automatically.
You may also turn it OFF by pressing the MENU REV/OFF
button for approximately 3 seconds.

PRO TIMER
PRO TIMER
2
Home Screen
This screen is the default style which shows the time to last shot, time to the
first shot, current split time, shot number, and date/time.
Note: You can choose from two other screen configurations as shown on page # 10
5.82SPL 1.00
1st 0.78
SHOT# 5 3:30PM
PRO TIMER
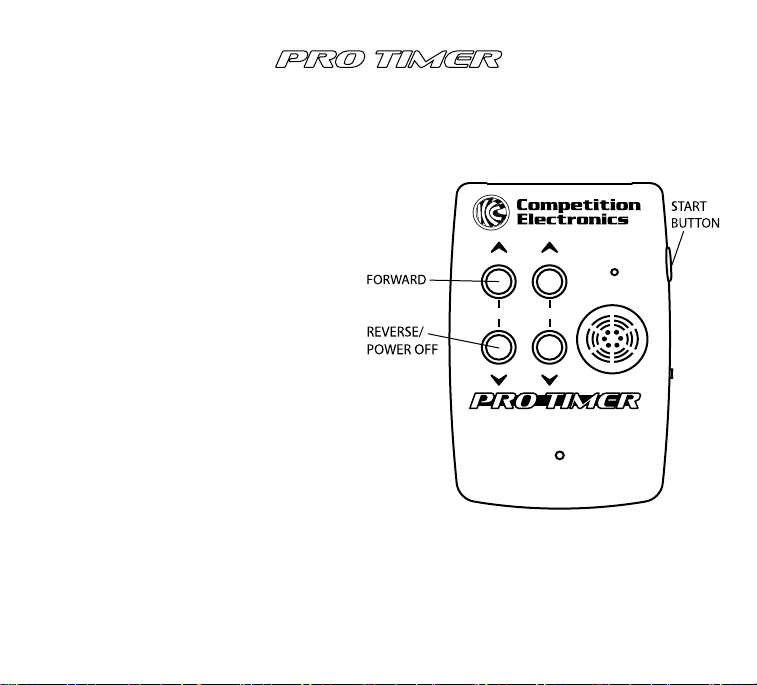
Control Button Functions
FWD INCR
REV/OFF DECR/ON
MENU SET
START BUTTON
(Located on the side of the unit), Press to
start a new timing event. The timing begins
from the moment the beeper sound is
activated.
MENU BUTTONS
(Marked on the front of the unit FWD and
REV), these buttons navigate back and
forth through the continuous menu loop.
From the HOME screen, the FWD button
will advance to the more commonly used
features, and the REV button will advance
to the less common features. Once you
become familiar with the MENU navigation,
you will learn which direction is the fastest
route to find a particular setting.
3

SET BUTTONS
(Marked on the front of the unit INCR and
DECR), these buttons change a setting
that is flashing on one of the menu
screens.
Note: On screens that have large settable
range, you can hold down the button to
automatically advance the digits, and
press both SET buttons simultaneously to
clear the setting.
4
LED & Beeper Alerts
The ProTimer has two indicators for
signaling an event. They are both active
with the default settings, but can be turned
off if desired within the menu settings.
FWD INCR
REV/OFF DECR/ON
MENU SET
PRO TIMER

PRO TIMER
Basic Operation
If you haven’t done so already, advance through the 14 menu screens and make any
adjustments to the default settings to suit your needs.
• The active settable value will be flashing.
• Some of the screens have more than one settable value, which will require
multiple presses of the menu button to advance.
• When changing a setting with the SET buttons, if you hold the button, it will
advance the digits automatically.
• Settings are automatically saved.
Pressing the START button from all screens (except Clear Data) will return to the
home screen and begin a new string.
5
Headset Jack
A standard 3.5mm stereo headset jack is located on the side of the unit. The Piezo
beeper is disabled when a headset is connected for a private practice session. The
beeper volume control will also change the headset volume level.
Shot Detection
Each time a shot is detected, it will be added to the shot string. The timer will
automatically calculate the split time, which is the time between the current shot
and the previous shot. The ProTimer can store up to 70 shots per string. Subsequent
shots will be stored by overwriting the previous value of shot number 70. If a shot is
detected after 199.9 seconds, the display will “wrap-around” and start over, so the
actual time would be 199.9 + the displayed value.

PRO TIMER
Menu List
Moving forward from the home screen, here is the order of menu screens and a brief
description. More detail for each is provided later in this manual.
• Review shot string: shot number, time, and split information
• Par time: settable for up to 5 par time beeps
• Start Delay Type: Instant, fixed, or random
• Backlight ON time: LCD backlight duration
• Start signal LED: enable/disable the start LED
• Beeper volume: adjust headset and beeper volume
• Home screen type: select from three configurations
• Shot dead time: used for echo control indoors
• Shot sensitivity: increase or decrease the shot sensitivity
• Date: setting for review direct screen and time stamp of shot strings
• Time: setting for review direct screen and time stamp of shot strings
• Hit Factor Scoring: enter target points for hit factor
• Clear data: erase unwanted strings
• Review previous string: recall up to 50 previous strings
6

PRO TIMER
Individual Menu Screen Detail
Review Shot String
From the home screen, pressing MENU/FWD, SET/INCR, or SET/DECR will advance
to the review screen. Shots will be displayed on the shot review screen in a “one
shot per line” format. Reading from left to right, the shot time appears first,
followed by the shot number, and finally the split time.
When navigating to the review shot screen after the completion of an event, the
first shot will appear on the 3rd line, and the last shot will appear on the 2nd line - if
there are 4 or more shots in the string. This is intended for the user to quickly
locate the first and last shot information without keystrokes.
Use the SET-INCR/DECR buttons to scroll through the shot string to review if there
are more than 4 shots in the list.
7
4.00 # 5 SPL 0.25
4.35 # 6 SPL 0.35
1.84 # 1 SPL 1.84
2.68 # 2 SPL 0.84
Table des matières
Autres manuels Competition Electronics Minuteur


