
Comfort audio DS10 Manuel utilisateur

SecureStream
Technology
Comfort Digisystem User Manual
Speaker
DS10/DS20
English

2
Speaker DS10/DS20
User Manual
Contents Page
Introduction to Comfort Digisystem 3
Introducing Speaker DS10/DS20 3
Functions – Speaker DS10/DS20 4
Connection options – Speaker DS10/DS20 5
First use 6
Menu 8
More functions 16
Radio range and channels 18
Accessories included 19
Other original accessories 19
Troubleshooting 20
Service and warranty 21
Technical data 21
Important safety instructions 22

3
Speaker DS10/DS20
Introduction to Comfort Digisystem
Thank you for choosing Comfort Digisystem. The products are easy to
use, irrespective of whether or not you have a hearing aid.
Before using the product, please read through the User Manual.
Speaker DS10/DS20 is equipped with SST technology – SecureStream
Technology – digital technology that allows interception-proof radio
transmission in real time. SST provides very good interference-free
audio.
Introducing Speaker DS10/DS20
Speaker DS10/DS20/DS05 is a very flexible family of speakers that can
be used in virtually all instances where acoustic enhancement of speech
is required. It can be used as a permanently installed and/or portable
speaker system, and is particularly suitable for classrooms or other
large rooms.
Speaker DS20 contains two SST diversity receivers, while Speaker DS-10
contains one SST diversity receiver, which guarantees the best possible
reception.
This means that no other equipment is needed to use the speakers with
an existing solution such as a school or accessibility system based on
Comfort Digisystem products.
Speaker DS05 is also available as an accessory for Speaker DS20/DS-10.
Speaker DS05 can be easily connected to the DS20 or DS10 using the
cable supplied.
Speaker DS20/DS10 is equipped with a range of inputs and outputs for
connecting, for example, a wired microphone or loop amplifier.

4
Speaker DS10/DS20
Functions – Speaker DS10/DS20
Display
Carrying handle
WR1 – starts
radio channel 1/
adjusts volume
Pairing buttons
WR1 and WR2*
MIC – Volume
control for wired
microphone
Treble control
AUX – Volume
control for exter-
nal audio source,
e.g. TV
Bass control
Mic in – for
connection of e.g.
an external wired
microphone
Aux in – for con-
nection of exter-
nal audio source,
TV, etc.
Aux out – for
connection of e.g.
loop amplifier Ext spkr –
Socket for ex-
ternal speaker
Menu control/OK
Function button
WR2 – starts
radio channel 2/
adjusts volume*
Battery cover
On/Off
Socket for mains op-
eration and charging
Function
indicators
WR1 and WR2
Battery status indicator
Charge indicator
Function button
* Controls for Radio Channel 2 (WR2) are
for use with Speaker DS20 only

5
Speaker DS10/DS20
Connection options – Speaker DS10/DS20
The following connection options are on the back of Speaker DS10/
DS-20.
Speaker DS20/DS10 has a wide range of connection options.
MIC IN: A microphone with cable can be connected here. Volume
strength from the microphone is adjusted using volume control MIC.
AUX IN: Here external audio sources such as a CD/DVD/Blueray player,
etc. can be connected. The volume strength from the external source is
adjusted using volume control AUX.
AUX OUT: The mixed sound (both from the built-in receivers and from
other audio sources used) can be diverted to, for example, loop ampli-
fiers, PA systems or additional speakers with built-in amplifiers.
EXT SPKR: Here Speaker DS05, which is an original accessory for DS-20
and DS10, can be connected.
6
Speaker DS10/DS20
First use
Positioning of speakers
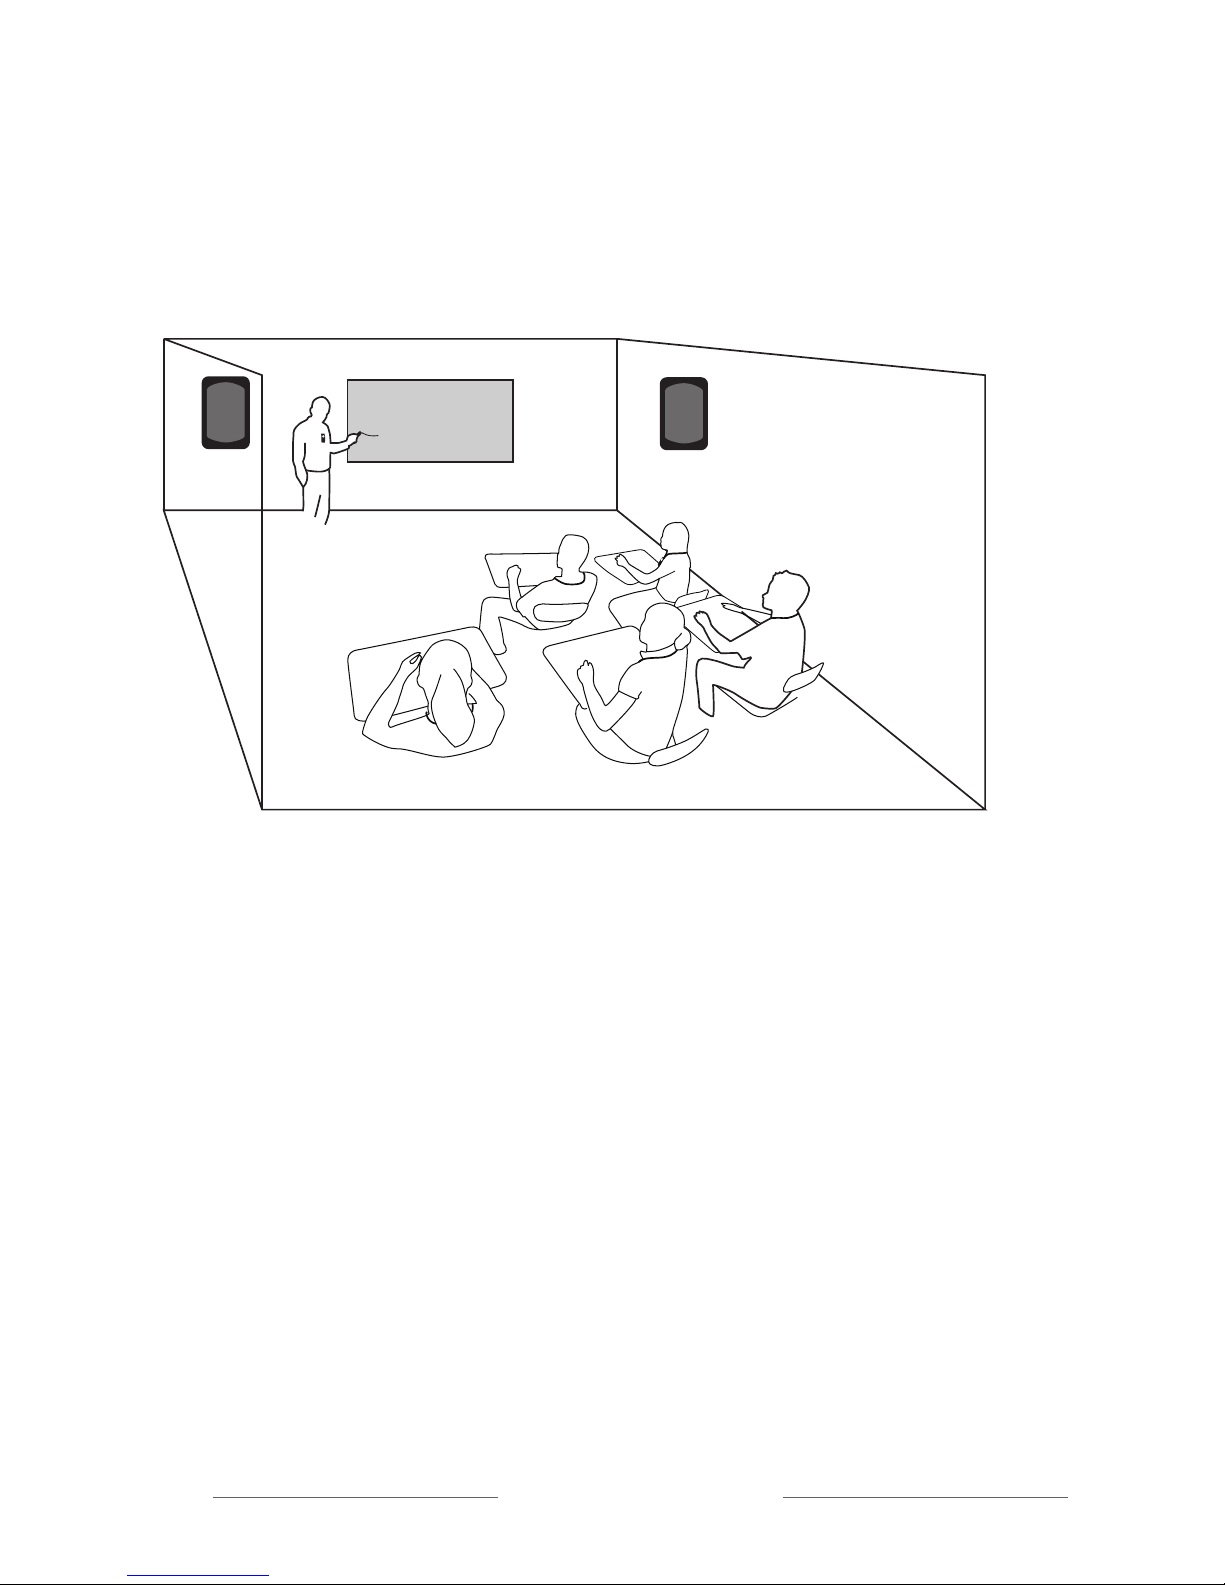
Speakers should preferably be positioned at the very front of the class-
room and high up towards the ceiling; see the example below with two
speakers.
A wall bracket and a floor stand for Speaker DS05/DS10/DS20 are avail-
able as original accessories.
Passive speaker Speaker DS05 can be connected via the supplied cable
to the socket marked EXT SPKR on the back of DS10/DS20.
Start
Start Speaker DS10/DS20 by pressing the On/Off button on the back of
the active speaker.
Receiver 1 and 2 (DS20 only) are started from the back of DS10/DS20,
using the controls marked WR1 or WR2.
Before adjusting the volume, the receivers in DS10/DS20, as well as the
wireless microphones, must be set to the right channel and code key;
see menu sections Receiver WR1 and Receiver WR2.

7
Speaker DS10/DS20
Adjusting the volume of the receivers
Start the transmitters to be used.
Ask someone to help you adjust the volume to a comfortable level. In
volume settings, adjust the volume for each receiver separately (WR1 &
WR2).
The speaker begins to speak into the microphone in a normal voice. The
person who is listening makes the necessary volume adjustments. Test
all parts of the room to check that the sound is distributed in a good way.
If any problems with the sound distribution are revealed, the speaker
positions may need to be changed. Take room acoustics into account.
Sound distribution can also be improved by using multiple speakers
in the room. Using two speakers instead of one typically improves the
sound distribution substantially in a “classroom-like” room.
The speakers should be a support and not drown out the direct sound
from the person speaking.
A common description of how the volume should be set is that it should
feel like a greater change if the speakers are turned off than when they
are being used. This requires that the speakers only be there as an aid
and do not drown out the direct sound from the person spreaking.
If any problems with feedback occur, this may be due to the high volume
set on the speaker.
When using speakers in, for example, a classroom where “push-to-talk
microphones” are used by students, it is especially important to ensure
that the speakers are not positioned too close to the students. This is to
avoid feedback when the student microphones are activated.
A good solution is often to position the speakers high up, at the very
front of the classroom, as shown in the illustration.
In instances where a higher volume is required, for example, if speakers
are used in a large room, the use of a boom microphone is recommend-
ed to avoid feedback. In these cases, the speaker should be positioned
between the speaker and the audience, directed towards the audience in
order to avoid feedback.
8
Speaker DS10/DS20
Menu
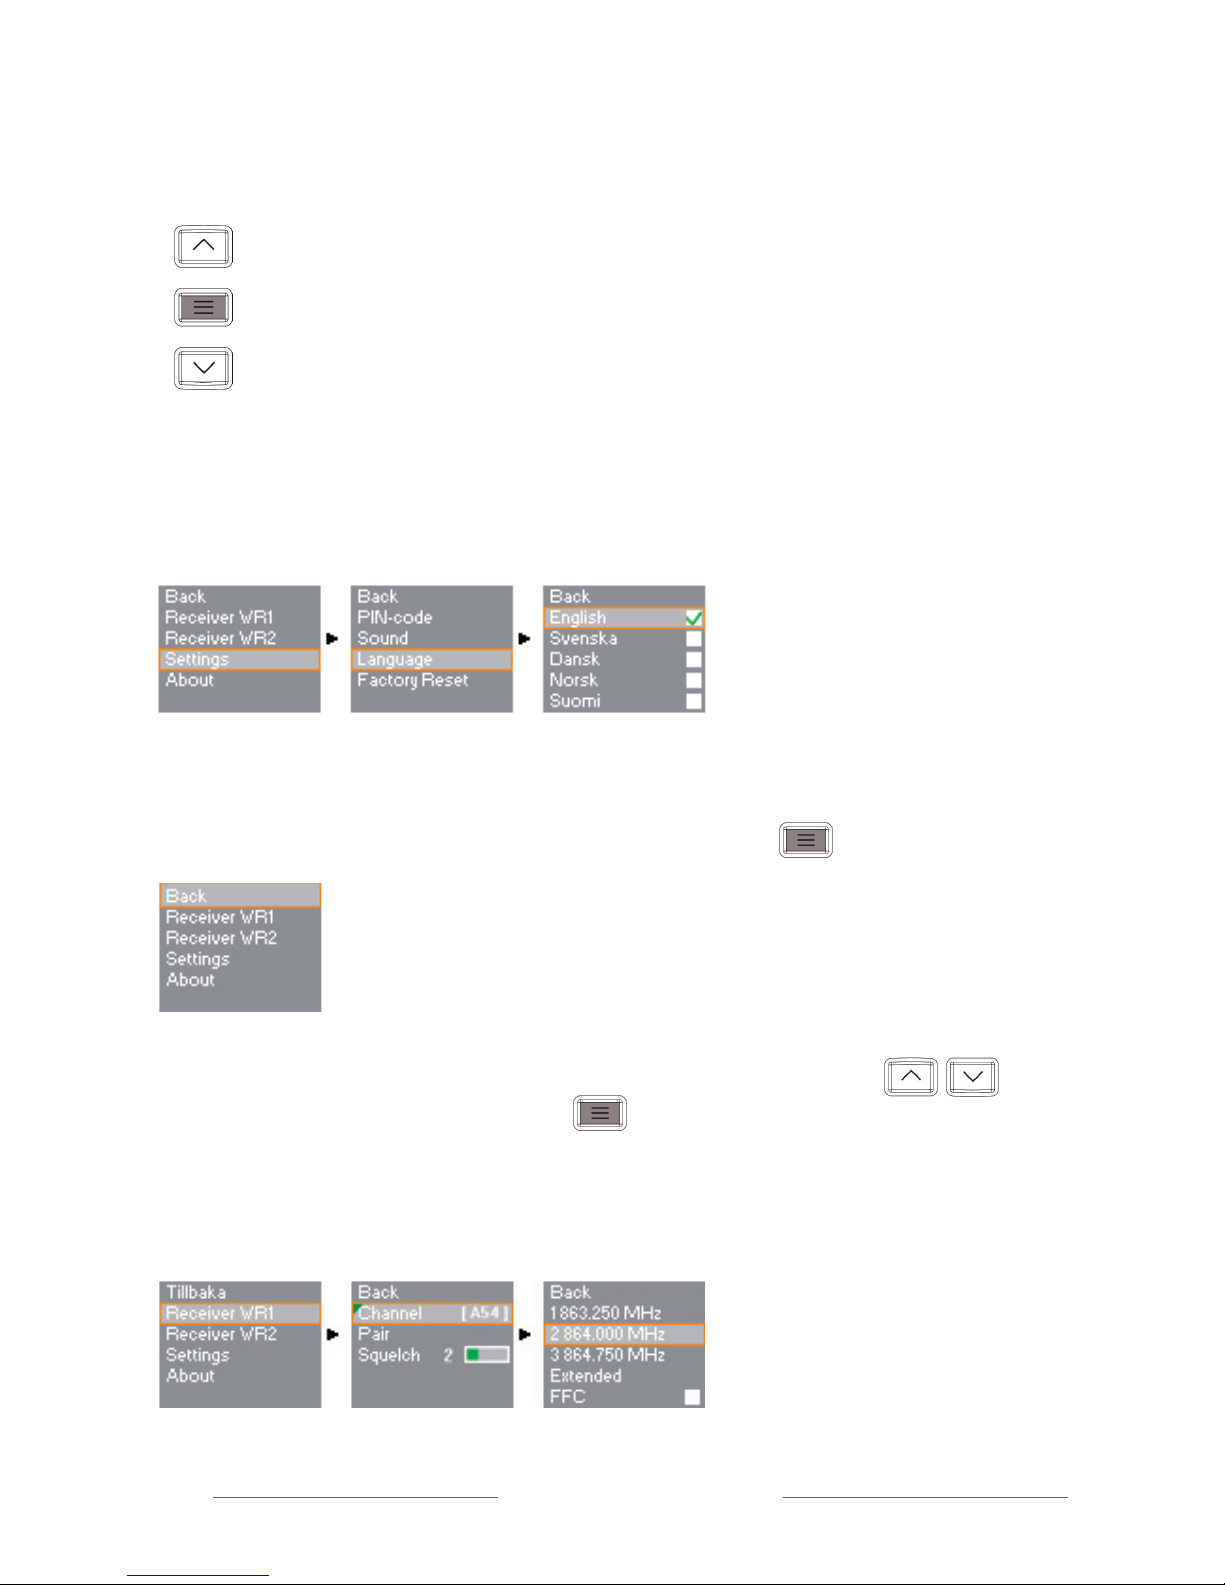
To enter the main menu, press the Menu button.
Below is a description of each menu.
Use the function buttons to move the marker up or down.
Press the Menu button to select.
Channels WR1
Setting Receiver Channel 1
Function button (moves the marker up)
Menu button (opens the menu/used for selection)
Function button (moves the marker down)
Menu control
It is possible to make the following choices using the menu controls:
Change language
On delivery the menu language is set to English.
Press the Menu button to enter the menu and
use the function buttons to navigate up and down:

9
Speaker DS10/DS20
In most European countries, channels 1, 2 and 3 are free channels that
do not require a licence.
Under Increased range more channels can be selected. These channels,
however, often require licences; see
Radio range and channels
.
When the FFC box is ticked, the colour green indicates which channels
have a low noise level and are suitable for use in the current environment.
Check that no transmitters in the system are started when using FFC.
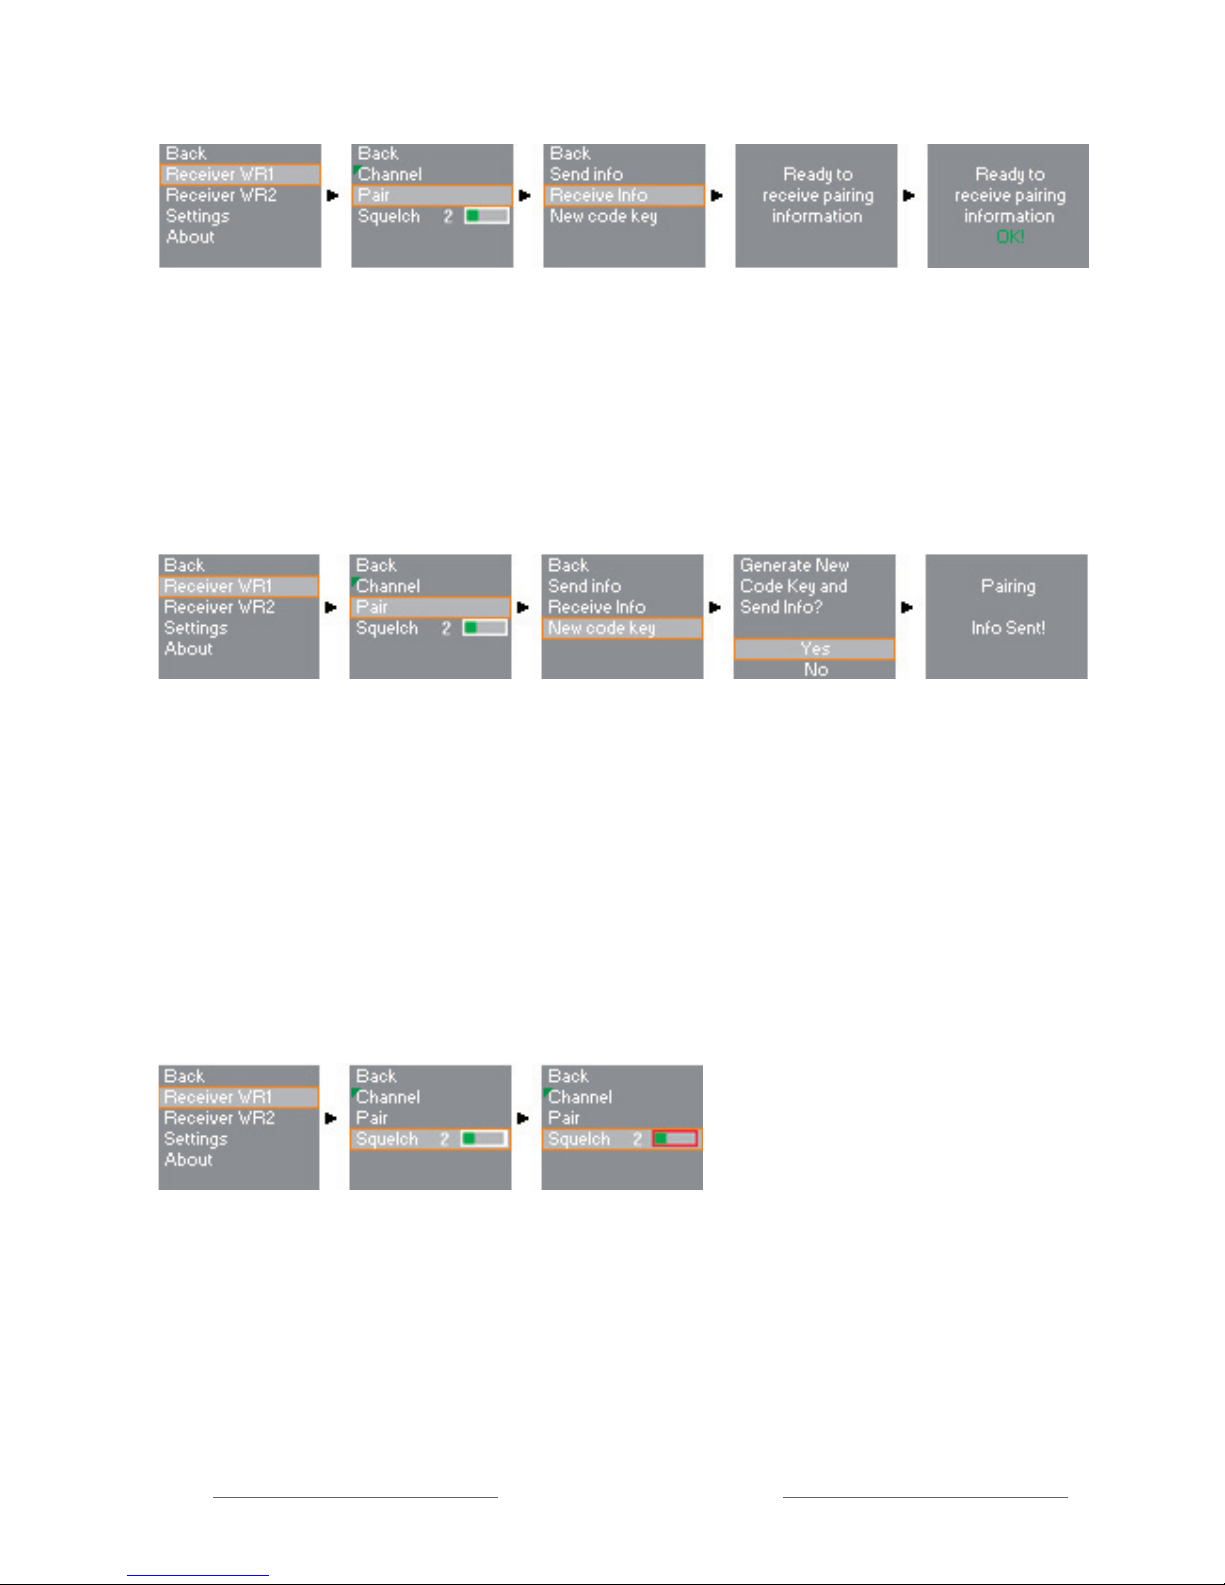
The option Send info sends information about both the code key and the
channel from Speaker DS10/DS20 to Comfort Digisystem units that have
been activated to receive info. Example: On Microphone DM-10 select
Communication – Pairing – Receive info. Then carry out Send info as in
the illustration above. DM-10 shows that pairing was carried out when
the text OK! appears in the display. The sound is then transferred from
Microphone DM-10 to Speaker DS10/DS20.
Pairing of Receiver WR1
Send pairing information
10
Speaker DS10/DS20
The squelch level can be adjusted from 0-10. The higher the squelch
value, the stronger the radio signal required for the receiver to work.
The receivers in Speaker DS10/DS20 are extremely sensitive and are
thus able to receive weak signals. Raise the squelch value if the receiver
is open to radio channels from other transmitters that must not be
intercepted. With weaker radio signals (possible interference), the
receiver will be silent. The default setting for the squelch level is 2.
Squelch WR1
Receive pairing information
The option Receive info makes receiver no. 1 (WR1) ready to receive
pairing information from any Comfort Digisystem unit that sends info.
Example: Speaker DS10/DS20 must reproduce the sound picked up by
an existing Microphone Mini DM-05. Get Speaker DS10/DS20 ready to re-
ceive info as above. Then press the pairing button on DM-05 quickly twice
to Send info. OK! now appears in the display on DS10/DS20.
New code key
For Comfort Digisystem to be interception-proof, a unique code key needs
to be used in the system. The option New code key makes it possible to
generate a new code key and send info from Speaker DS10/DS20 to any
Comfort Digisystem unit. Example: A Microphone DM-10 is used together
with a Speaker DS20 and the system must be interception-proof. Hold the
pairing button on DM-10 in for a few seconds to make the unit ready to
receive pairing information. Then send the new code key from DS20 as in
the menu picture above.
Ce manuel convient aux modèles suivants
1
Table des matières
Autres manuels Comfort audio Intervenants

Manuels Intervenants populaires d'autres marques


Bowers & Wilkins
Bowers & Wilkins 4 Manuel utilisateur

Sonance
Sonance SONOS OUTDOOR Series Manuel utilisateur

Electro-Voice
Electro-Voice EVID FM4.2 Manuel utilisateur

Pioneer
Pioneer XW-HTD630 Manuel utilisateur

Onn
Onn BWA16AA002 Manuel utilisateur

HP
HP GL313AA - USB Speakers PC Multimedia Manuel utilisateur