Clear One UNITE 100 Manuel utilisateur

UNITE™ 100 - PTZ Camera
User ManUal

INTRODUCTION
Preface..................................................................................................................................................................... 1
Warning Notes......................................................................................................................................................... 1
Features................................................................................................................................................................... 2
Parts Included ......................................................................................................................................................... 2
INSTALLATION
Connections ............................................................................................................................................................ 3
Setup .................................................................................................................................................................................3
CAMERA PHYSICAL DESCRIPTION
Camera Specifications............................................................................................................................................ 6
Dimensions.............................................................................................................................................................. 7
RS232/DB9 Interface............................................................................................................................................... 7
CAMERA OPERATION USING THE REMOTE
Remote Controller Explanation .............................................................................................................................. 8
MENU CONTROL OF THE CAMERA
Main Screen............................................................................................................................................................. 9
System Option.................................................................................................................................................................10
Camera Option................................................................................................................................................................11
PT Option.........................................................................................................................................................................13
Reset Option....................................................................................................................................................................14
Help Option .....................................................................................................................................................................14
Exit Option .......................................................................................................................................................................14
COM CONTROL OF THE CAMERA
VISCA Protocol...................................................................................................................................................... 15
Part 1: Camera Return Command...................................................................................................................................15
Part 2: Camera Control Command .................................................................................................................................16
Part 3: Inquiry Command ................................................................................................................................................19
Pelco-D: Protocol Command List....................................................................................................................................20
Pelco-P: Protocol Command List....................................................................................................................................21
TROUBLESHOOTING THE CAMERA CONTROL OF THE CAMERA
Camera Maintenance ............................................................................................................................................ 23
Camera Misuse ..................................................................................................................................................... 23
Troubleshooting .................................................................................................................................................... 23
COMPLIANCE
SERVICE AND SUPPORT
Table of Contents

UNITE 100 UsEr MaNUal 1
Introduction
PREFACE
Thanks for using the UNITE 100 PTZ (Pan-Tilt-Zoom) HD camera.
This manual introduces the functions, installation, and operation of the HD camera. Please read the
manual thoroughly before installation and usage.
WARNING NOTES
Use this product only under the specified conditions to avoid any damage or danger.
Moisture - Do not expose the camera to rain or moisture.
Shock Hazard - Do not perform any unauthorized modification or dismantling. To reduce the risk
of electric shock, do not remove the cover. Refer servicing to qualified personnel. ClearOne is not
responsible for any unauthorized modification or dismantling.
Environmental - Never operate the camera when the temperature, humidity, or power are out of
the authorized ranges. Do not expose the camera to corrosive materials, liquids or gasses.
Cleaning - To avoid scratching, use only a soft cloth and mild cleansers to clean the camera.
Magnetism - Strong electromagnetic fields near the camera may affect the image quality.
Electrical Safety - Installation and operation must comply with electrical safety standards.
Transport - Avoid stress, vibration, and moisture in transport, storage, and installation.
Placement - The camera must be placed on a level desk or platform, and it must not be installed
on a slant. No object should restrict the camera range of motion.
Power Supply Polarity - The power supply is rated ±12 VDC at 2 Amps. The polarity of the power
supply as shown in the following drawing:

2 TEchNIcal sUpporT: 800.283.5936
FEATURES
The UNITE 100 camera has the following features.
1. Easy to use menu operation.
2. High-speed USB 3.0 interface, DVI-I interface (including HDMI and YPbPr).
3. Includes IR remote controller. The camera can receive both its own remote controller signals,
and signals from terminal equipment through the VISCA IN to the terminal equipment IR receiver.
PARTS INCLUDED
The UNITE HD Camera includes the following:
• Camera.
• Power adapter
• Power cable
• USB 3.0 data cable or DVI Cable
• RS232 cable
• Remote controller
• User manual
• Four double-side adhesive strips
Please check if your order is complete. Contact ClearOne if there is any question about your
shipment.

UNITE 100 UsEr MaNUal 3
Installation
When setting up the camera, never move the camera by seizing the camera head. Don’t rotate
camera head by hand; otherwise, mechanical trouble will occur.
Observe all warnings listed at the beginning of this manual
For stability, the base can be fixed in place by the double-sided adhesive strips.
To prevent damage to the camera, never turn the camera power on before installation is completed.
CONNECTIONS
The connections to the camera are as illustrated below:
sETUp
Perform the following:
1. Make the power connection, but don’t plug in the supply to turn the camera power on.
»Note: You will connect the USB or DVI cable depending on which is sent with your
equipment.

4 TEchNIcal sUpporT: 800.283.5936
Switch Position
1 ON
2 ON
3 OFF
4 ON
2. Set the Working Mode switch setting at the bottom of the camera as shown in the following
illustration:
Dial Position Video Setting
0 1080P60
1 1080P50
2 1080P30
3 1080P25
4 720P60
5 720P50
6 720P30
7 720P25
8 --------
9 --------
A --------
B --------
C --------
D --------
E --------
F Video format set via OSD menu
3. Plug in the power supply to turn the supply on, the camera indicator light illuminates red.
4. Confirm that in the computer the camera is attached to, the computer device manager has
universal serial bus (usb) controller are “USB3.0 Root Hub”and“USB3.0 eXtensible Host
Controller.” If not, please install the Intel(R)_USB_3.0_extensible_Host_Controller_Driver.

UNITE 100 UsEr MaNUal 5
5. When the camera is powered-on and begins to initialize, it will first rotate horizontally to the left
limit position, then down to the bottom limit; finally it will move both horizontally and vertically to
the middle position. The motor then stops running, and initialization is completed.
»Note: If the power-on mode is opened and saved at preset position 0 or 1, then the
pan/tilt will be set to the 0 or 1 preset position.
6. Test the remote functionality with the camera by resetting the camera to it’s factory
settings through the On-Screen-Display (OSD) with the menu key of remote controller,
[MENU] -><RESET> -> <ALL RESET>, moving the left/right keys to select <Yes>,
then confirm by [HOME] key as the following:

6 TEchNIcal sUpporT: 800.283.5936
Camera Physical Description
The following illustration shows the various features, controls, and connections:
1. Camera Lens 7. Video Output Format Selection Switch
2. Camera Base 8. RS232 Control Interface
3. Power Indicator Light 9. USB3.0 B Male Interface
4. Working Mode Selection Switch 10. DVI-I Video Output
5. Tripod Screw Hole 11. 12VDC Input Power Supply Jack
6. Mounting Holes (currently not used) 12. Power Indicator Light
CAMERA SPECIFICATIONS
Video Format 1080P60/50/30/25 720P60/50/30/25
Video Output Interfaces USB3.0, DVI-I (including the HDMI and YPbPr signal)
Image Sensor 1/2.8 inch 2 Megapixels high quality HD CMOS Sensor
Lens 3.92mm ~ 47.3 mm, F1.8 - 2.8, angle of view: 72.5°- 6.3°
Rotation ±170° for pan rotation, and -30°~+90° for tilt rotation,
support upside down installation
Speed 0.1°-180°/sec for pan rotation, 0.1°-80°/sec for tilt rotation
Presets 10 preset positions (up to 128 presets by serial
command), precision error less than 0.2°
White Balance, Exposure, Focus Auto/Manual white balance/indoors/out doors/ Controller
Auto/Auto-track white balance , Auto/Manual exposure
(iris, shuttle), Auto/Manual/One Push focus
Wide Dynamic Range (WDR) SupportWDRfunctionwithperformance≥100dB
Control Interface 8 pins mini DIN, RS232, VISCA/Pelco-D/Pelco-P protocol
Power Interface HEC3800 power jack , Power supply adapter: 12VDC/2A
Max Power Consumption 12W
Working Temperature 23°F to 113°F (-5°C to +45°C)
Storage Temperature -4°F to -140°F (20°C to +60°C)
Weight 1.3 Kg

UNITE 100 UsEr MaNUal 7
DIMENSIONS
RS232/DB9 INTERFACE
Note the required connections:
Camera Pinout
RS232 Interface DB9 Interface
Camera
Pin/Function
Mini DIN
Pin/Function
Camera
Pin/Function
DB9
Pin/Function
1. DTR 1. DTR 1. DTR 1. CD
2. DSR 2. DSR 2. DSR 2. RXD
3. TXD 3. TXD 3. TXD 3. TXD
4. GND 4. GND 4. GND 4. DTR
5. RXD 5. RXD 5. RXD 5. GND
6. RS485-A 6. GND 6. RS485-A 6. DSR
7. IR OUT - 7. IR OUT 7. RTS
8. RS485-B - 8. RS485-B 8. CTS
8 TEchNIcal sUpporT: 800.283.5936
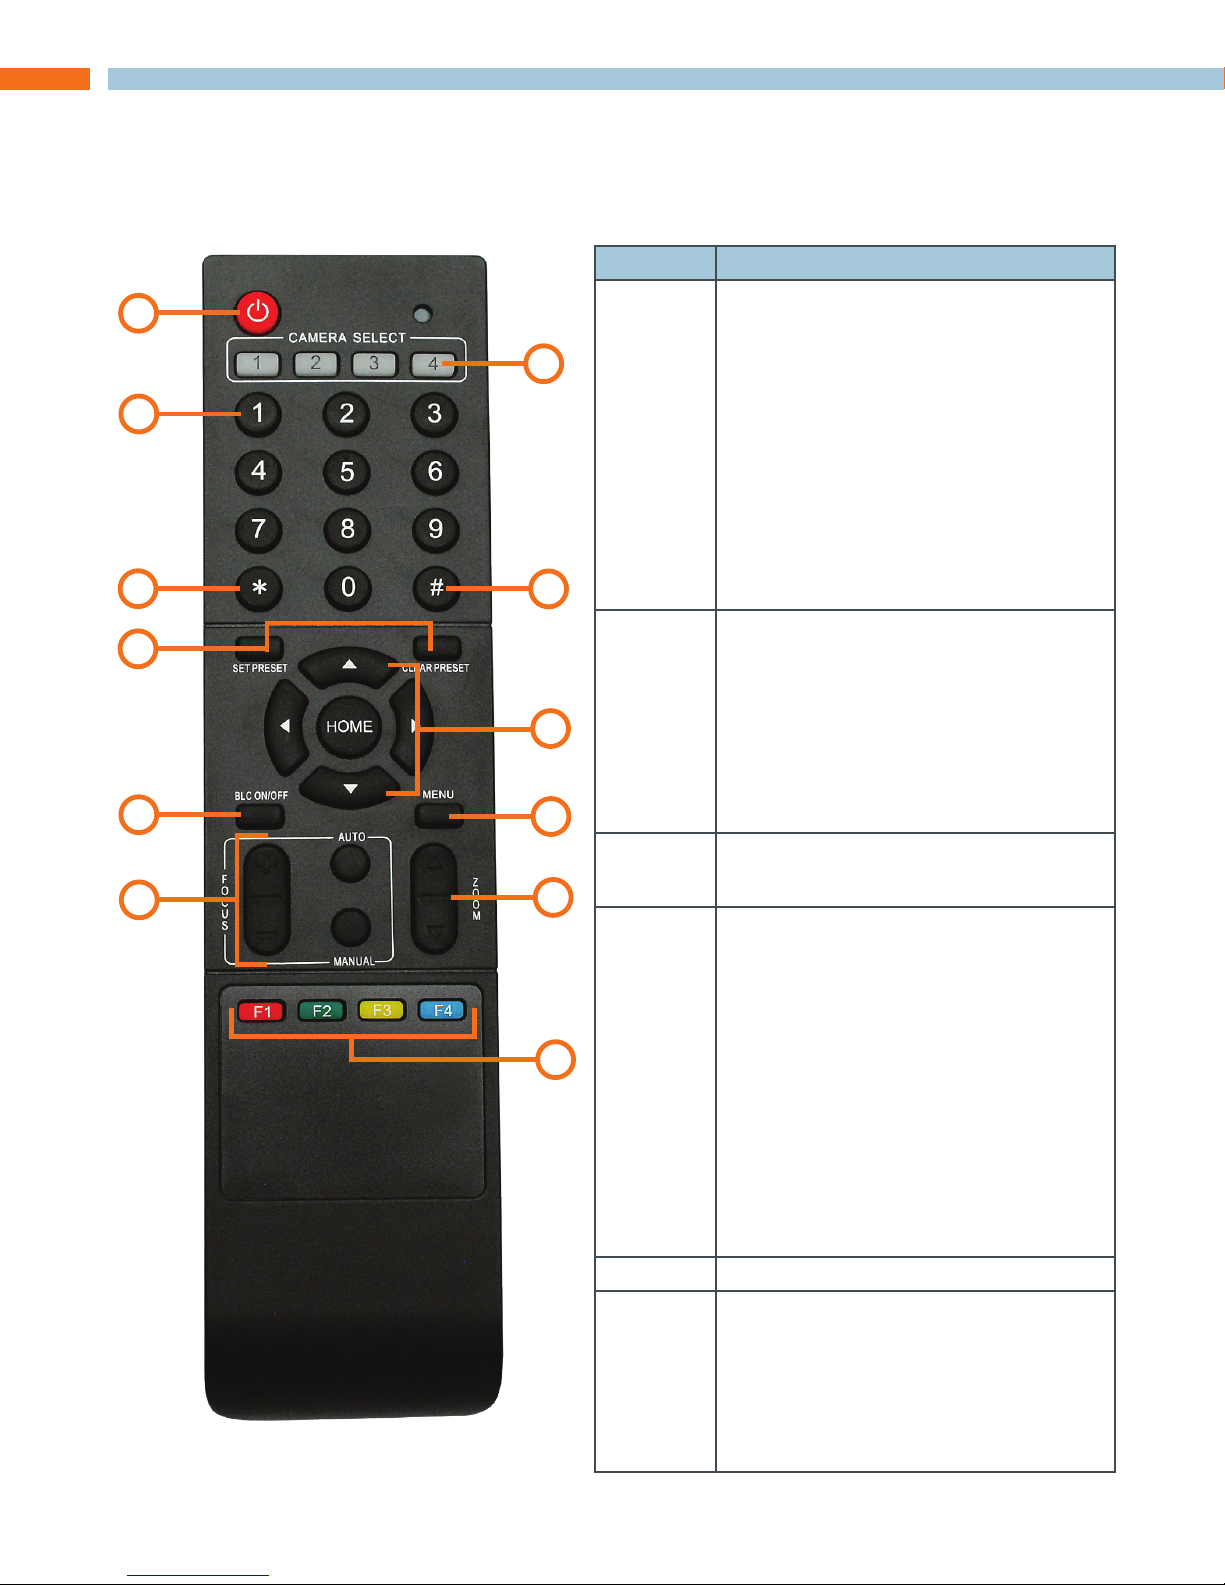
Camera Operation Using the Remote
This section describes the IR Remote Controller and its use with the Unite Camera.
REMOTE CONTROLLER EXPLANATION
Control Description
0 Standby Key
After pressing the Standby Key, the
camera will go into standby mode.
The front indicator light is off, but
blinks every 20 sec. Press the
Standby Key again and the camera
will perform a self-check and
return back to the home position.
If the power on mode is set, it will
automatically run to the preset
position.
1 Number Keys
Used for setting or moving to
presets.
If a preset has been established
for a number, pressing that number
key will move the camera to the
assigned preset position.
2*Key
Used in key combinations
3 Set Preset/Clear Preset Position
Keys
Set a Preset Position Key:
Move camera to desired position,
Set Preset + 0-9 number key:
Clear a Preset key:
Clear Preset key + 0-9 number
key
Clear all the Preset Position Keys:
#+#+#
4- Unavailable -
5 Focus Control Keys
Automatic focus: Auto
Manual focus: Manual
Focus +: Adjust focus near to far
Focus -: Adjust focus far to near
0
1
2
3
4
510
9
8
7
6
11
Table des matières
Autres manuels Clear One Caméra de sécurité

Clear One
Clear One Unite 200 Manuel utilisateur

Clear One
Clear One Unite 200 Manuel utilisateur

Clear One
Clear One UNITE 160 4K Manuel utilisateur

Clear One
Clear One Unite 150 Manuel utilisateur

Clear One
Clear One COLLABORATE SD PTZ Manuel utilisateur

Clear One
Clear One Flexible Camera Series Manuel utilisateur

Clear One
Clear One UNITE 200 Pro Manuel utilisateur

Clear One
Clear One FlexCam USB Manuel utilisateur

Clear One
Clear One COLLABORATE FHD/HD Camera Manuel du système

Clear One
Clear One Aura VERSA 50 Manuel utilisateur


