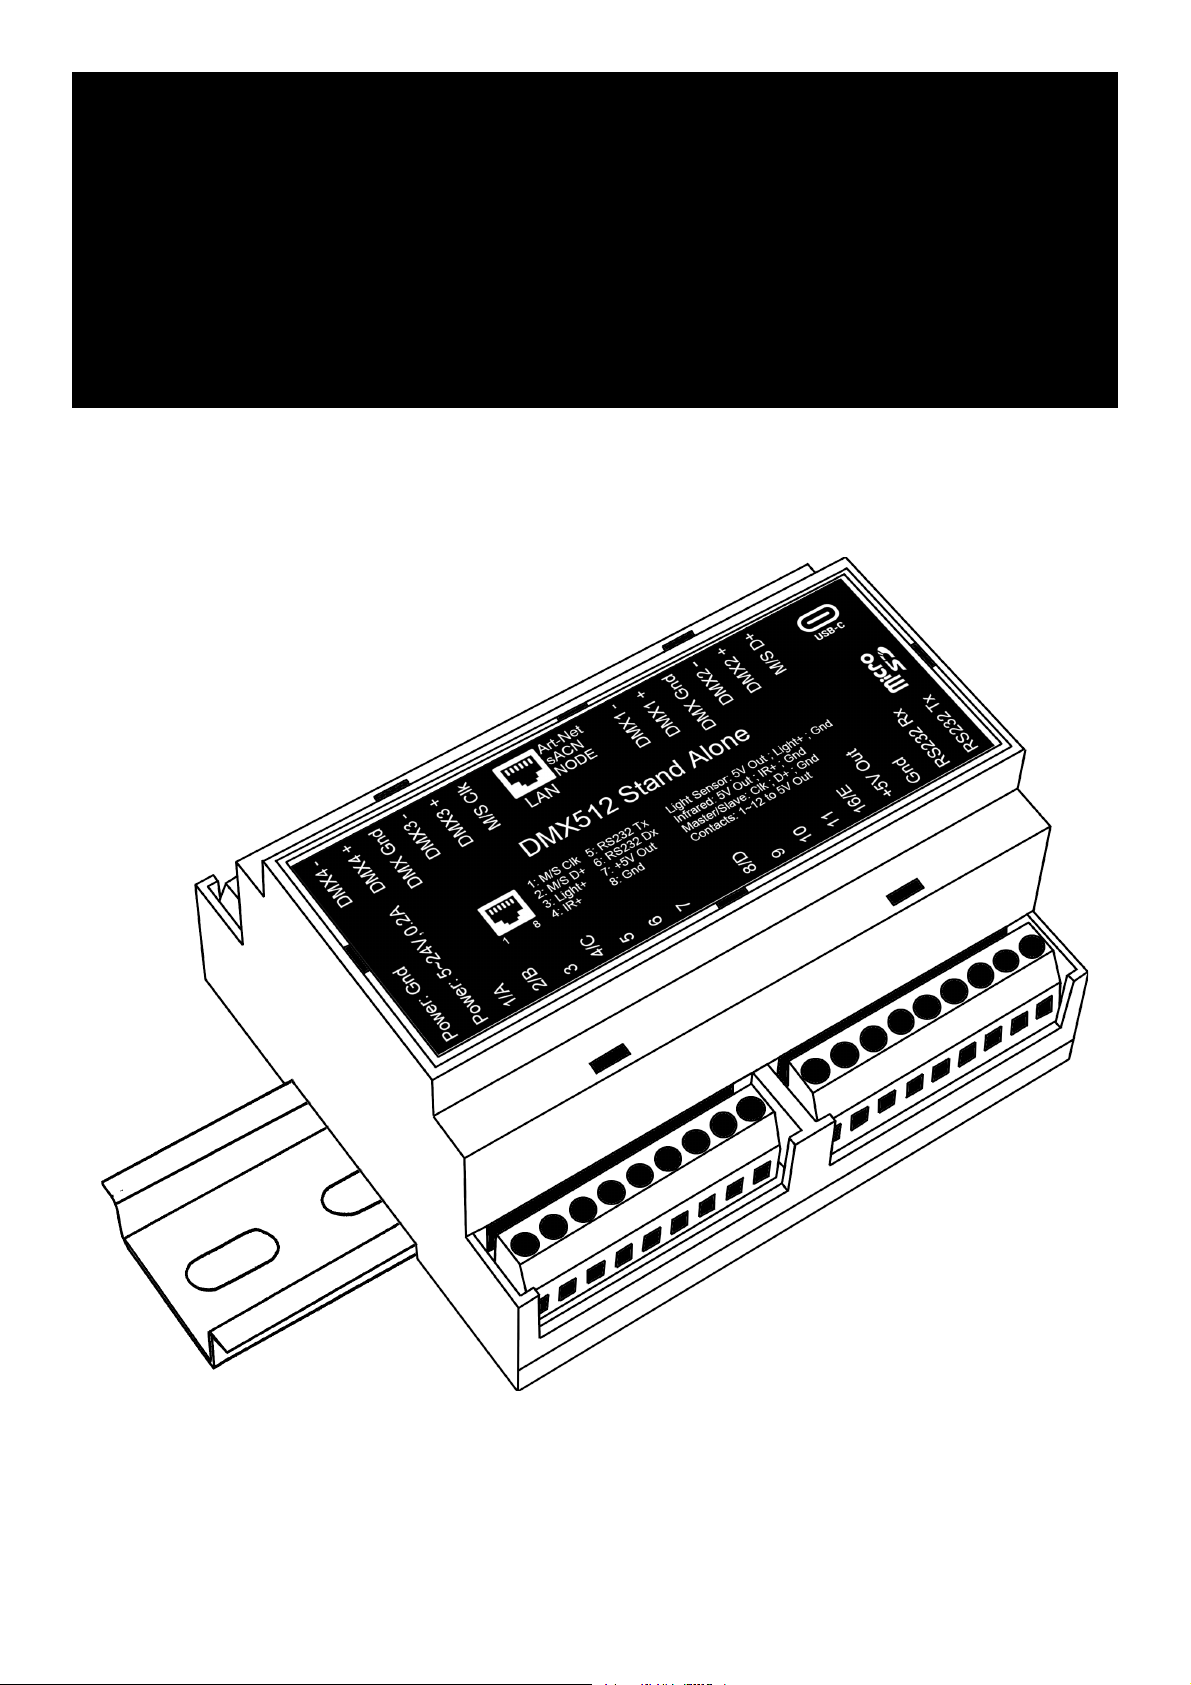
CHROMATEQ DIN-E 512 Manuel utilisateur

DIN-E
512/1024/2048
EthernettoDMXStand-Aloneinterface
Datasheet&
QuickstartGuide

CongratulationsonyourpurchaseofaCHROMATEQcontroller.
PleasereadthismanualcarefullyandthoroughlybeforeusingtheDIN-EChromateq.
Theinformationpresentedhereprovidesausefulintroductiontothewiderangeoffeatures,settingsandfunctionsavailableinthis
compactandversatileDIN-E
TheDIN-ETechnicalManualiswritteninEnglishandFrench.
(LemanueltechniqueduDIN-Eestrédigéenanglaisetenfrançais.)
AllproductsandsoftwarearedevelopedanddesignedinFrance.
CHROMATEQSARL
191AlléedeLauzard34980StGélyduFescFRANCEVAT:FR18521458034Siret:52145803400027Web&E-mail:
www.chromateq.comPhone:+33952210755/+8613422062209Whatsapp:+8613422062209Wechat:ChromateqQQ:
2908265661
Twitter:https://twitter.com/Chromateq
Facebook:https://www.facebook.com/ChromateqCompany/
YouTube:https://www.youtube.com/c/chromateq
----------------------
CopyrightInformationandDisclaimer
Copyright©2021-CHROMATEQ.Allrightsreserved.
Nopartofthispublicationmaybereproduced,distributedortransmittedinanyformorbyanymeanswhatsoever,including
photocopying,recordingorotherelectronicormechanicalmethods,withoutthepriorwrittenpermissionofthepublisher,exceptin
thecaseofbriefquotationsincriticismsandcertainothernon-commercialusespermittedbycopyrightlaw.
Foranyrequestforauthorization,writetothepublisherattheaddressabove.
Trademarkcredits
MicrosoftandWindowsareU.S.registeredtrademarksofMicrosoftCorporations.Art-NetTM-DesignedbyandCopyrightArtistic
LicenseHoldingsLtd.Allotherproductsmentionedhereinmaybetrademarksoftheirrespective®companies.
PackageContents
1xDIN-E
1xUSBcable
1xPowersupply9-12VDC(Euro/USsocket)
1xsoftwaredownloadlinkandtechnicaldocumentation
2
TechnicalManual&QuickStartGuide
Caution:Checkthecontentsofthepackageandtheconditionofthedeviceafterunpacking!Contactyoursupplierifsomethingis
missingorisdamaged.Donotusethedeviceifitappearstobedamaged!

Tabledesmatières
Introduction 5
Technical 5
devicefeatures 6
Softwareoption 6
Connectivity 7
USBdriversinstallation 8
MultipleUSBconnections 8
Ethernetconnectionandconfiguration 9
DHCP/IPStatic 9
DHCPconnection 9
StaticIPconnection 9
ResetoftheIPaddress 10
Connectingtoawifirouter 10
Standalonemodesettings 11
Deviceconfiguration 11
IN/OUTtab 11
"MergeDMXIn/DMXOut"option 12
Art-Net/sACNuniverserange: 13
Clocktab 13
Optionstab 13
Master/Slavetab 14
Master/Slavemode"bydefault" 15
Commandstab 16
Zonestab 16
Scenesselectionandconfiguration 17
Choiceoftriggers 17
InfraredTrigger 18
RS232trigger 19
ExternalcontactsTrigger: 20
TriggersbyDMX-IN 21
TriggersviaWi-light2appandUDPcommands 21
Advancedtriggeroptions. 22
Restoreafterpoweroff 22
Playinpriority 22
Timetriggers 22
Singletrigger 22
Permanenttrigger 23
Lightintensitytrigger 23
Priorityofhourlytrigger 24
Saveinmemoryoption 25
Basicbackup 25
SavetoaninternalandexternalmicroSDcard 26
3

BackingupArt-NetorsACNtoanexternalSDcard 26
Standaloneuse 27
Switchtostand-alonemode 27
ExternalandUSBpowersupply 27
Chargingtheclockbattery 27
PlayashowviaaMicroSDCard 27
HowtouseIRRemote 28
PreviousRemoteControlUnit(Before2022) 28
FunctioningfordeviceswithoutModeandolderdevices. 28
FunctioningfordeviceswithModes 28
NewRemoteControlUnit(2022) 29
FunctioningfordeviceswithoutModeandolderdevices. 29
FunctioningfordeviceswithModes 29
Functionsdescriptions 30
IRCodes 30
IRreceiverbox 31
NODEmodeconfigurations 32
Setupwiththesoftware 32
Networksetup 32
NODEArt-NetorsACNmode 32
SetupwiththeDeviceTool 33
Networksetup 33
NODEArt-NetorsACNmode 33
ConfigurationwithaWebBrowser 34
Udp,Broadcast,Unicast,Multicast 34
NODEwiringdiagram 35
Resetdefaultdevice 35
NetworkNODEsdetection 35
Dimensions 37
WiringDiagram 38
Generalwiringdiagram 38
StandaloneArt-Netwiringdiagram 38
Master/SlaveStandalonewiringdiagram 38
Troubleshooting 39
4

Introduction
DIN-EistheidealDMXstandalonedeviceforinstallationinelectricalDINcabinetswithDIN
RAILS.TheUSBtoDMXstandaloneEthernetDMXdevicecancontrolfrom512to2048channels
on1,2or4DMXuniverses.
Featuringarobuststandalonemodeandawiderangeoftriggerpossibilities(RS232,Contacts,
Clock,NODEx4ports,Master/SlaveonLAN),thiscompetentdeviceisasmartsolutionforeasy
andquickarchitecturalinstallationsandlargeintegrationprojects.
Objectives
Thepurposeofthistechnicalmanualistodeveloptheoptionsmanagedbythedevicein
standalonemode,forsoftwareoptions,pleaserefertothesoftwaremanuals.
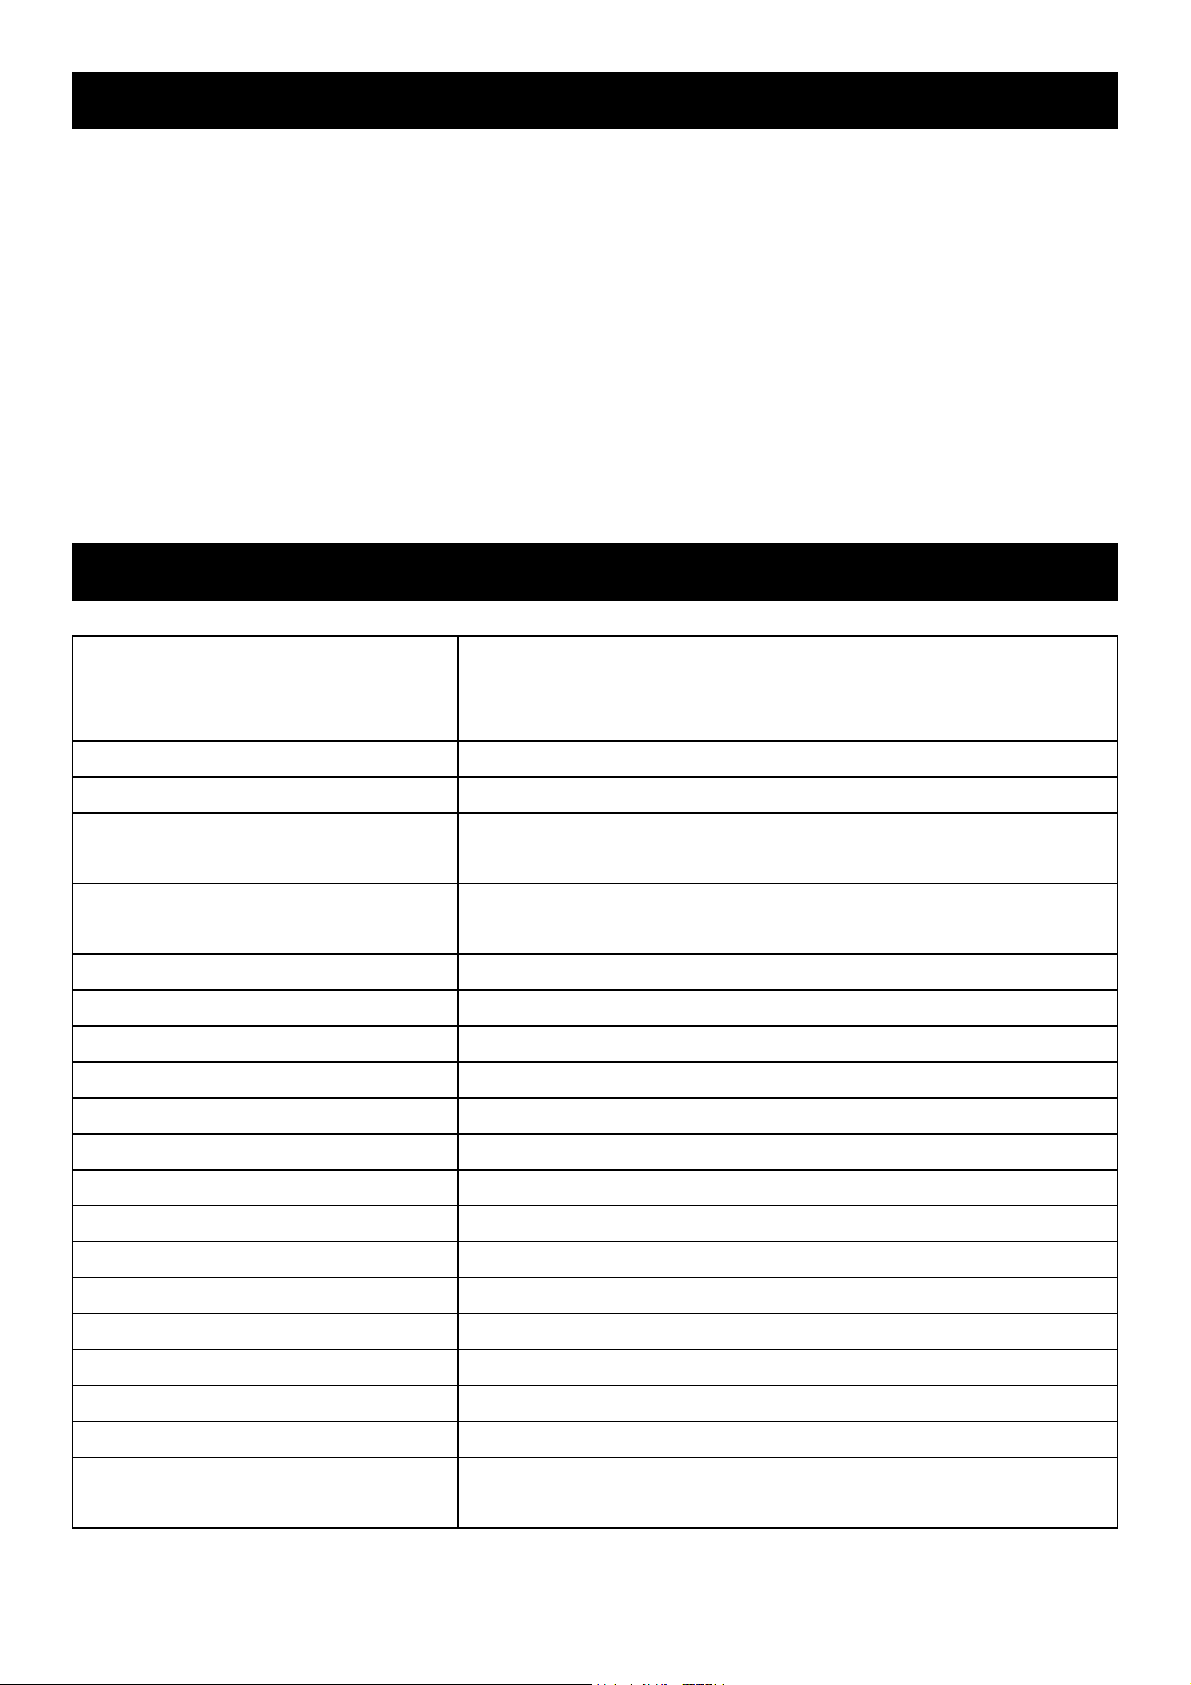
Technicalfeatures
Connectors
USB-C,Screwterminal(2x9+2x6pins)EthernetandRJ45
(Externalcontactx12,Master/Slave,Infrared,LightSensor,
5S232in/out)
DMXlines
Upto4x512channels8and16-bitDMXchannels
Internalmemory
yes,4MB(noSDcardrequired)
Internalmemorycapacity
20000stepswith16hp.,6000stepswith512hp.,3000
stepswith1024hp.
Externalmemory
MicroSDcard(acceptsFAT,FAT32,Class10SDcardupto
256GB)
CPU
32-bitprocessor
Powersupply
5Vto24VDC,0.2A/5VviaUSB-C
Power/Consumption
0.3~0.5W
IPrating
IP20
Dimensions(mm)
H:106mm,W:90mm,D:59mm(pcb:103/87/19)
Netweight(device)
170Gr.(0.37lbs)
Grossweight(fullcost)
0.3Kgs(0.66lbs)
Highvoltageprotection
Yes,fusesanddiodes
Color
Beige
Environmentofuse
Interior
Storage
Storedry
Temperatureofuse
-25to+70C°
Certifications
CE,RoHS
Internationalguarantee
Yes,5years
Compatibilityofsystems
Windows(7andhigher),MACOSX(10.13andhigher)and
Linux(64Bits,Debian,Redhat,Archlinux,RaspberryPi)
5

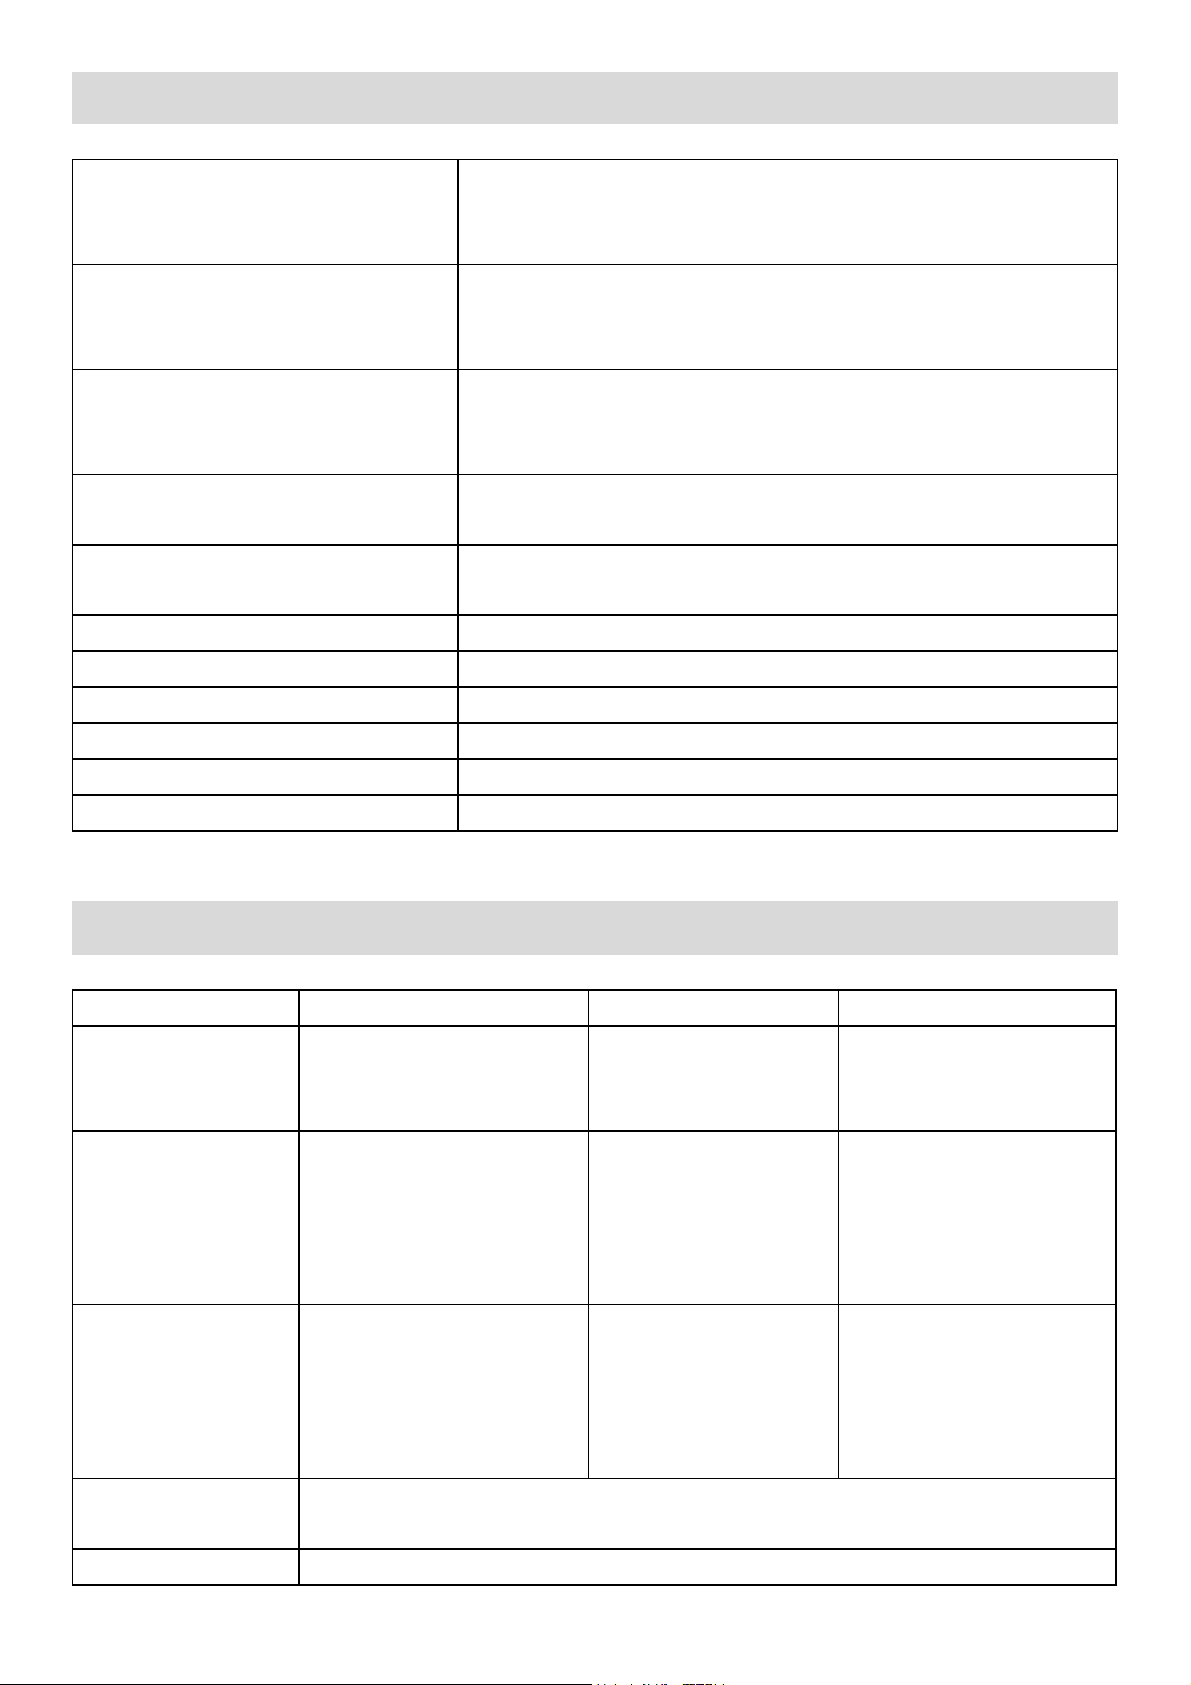
devicefeatures
DMX512
4x512output(Splitter,PC+standalone)or512outputand
512ininput(PConly,DMXrecording,DMXINtrigger,DMX
merge)
DMX1024
2x512output,1024inoutputor512outputand512ininput
(PCandstandalonemode,DMXrecording,DMXINtrigger,
DMXmerge)
DMX2048
4x512output,2048inoutputor1024outputand512in
inputor1536outputand512input(PCandstandalone
mode,DMXrecording,DMXINtrigger,DMXmerge)
Multiplezones(DMX1024/2048
modeonly)
5zones,playsupto5scenessimultaneously
Combinedareas(DMX1024/2048
modeonly)
yes
Clockinrealtime-RTC
Timeandcalendartriggering
Smartcontacts
12(31maximum)
Master/Slavesynchro
Yes,32maxperwiring/128maxLAN
RS232In/out
Triggers+commands
Infraredremote/Lightsensor
Optional(RequirestheIRKit)15m.distancemax.
UDP
Ethernettriggersandcommands
Softwareoption
LineDMX
Art-Net
Options
SoftwarePlayer
512/1024/2048DMX
channels
1universe(512)
2universes(1024)
16universes(2048)
LiveBoardmode
SoftwareProDMX
512/1024/2048DMX
channels
1universe(512)
2universes(1024)
16universes(2048)
Normalmode,
30minaudioandvideo
timelineloop(512/1024)
24haudioandvideo
timelineloop(2048)
Pixelmapping
software
512/1024/2048DMX
channels
4universes(512)
8Universe(1024)
64universes(2048)
Normalmode,
30minaudioandvideo
timelineloop(512/1024)
24haudioandvideo
timelineloop(2048)
StudioDMX3D
viewer
Fullmode
Wi-Light2App
ControlsPlayer,ProandPixxemsoftwareoveralocalWiFinetwork
6

Freesoftware
updates
Yes
Connectivity
LEDsignalcorrespondence
OFF
deviceisnotpowered(checkthepower)orhaveaproblem.
NormalBlinking
USBcommunicationwithsoftwareisenabled.
SlowBlinking
deviceisinstandalonemode.
7
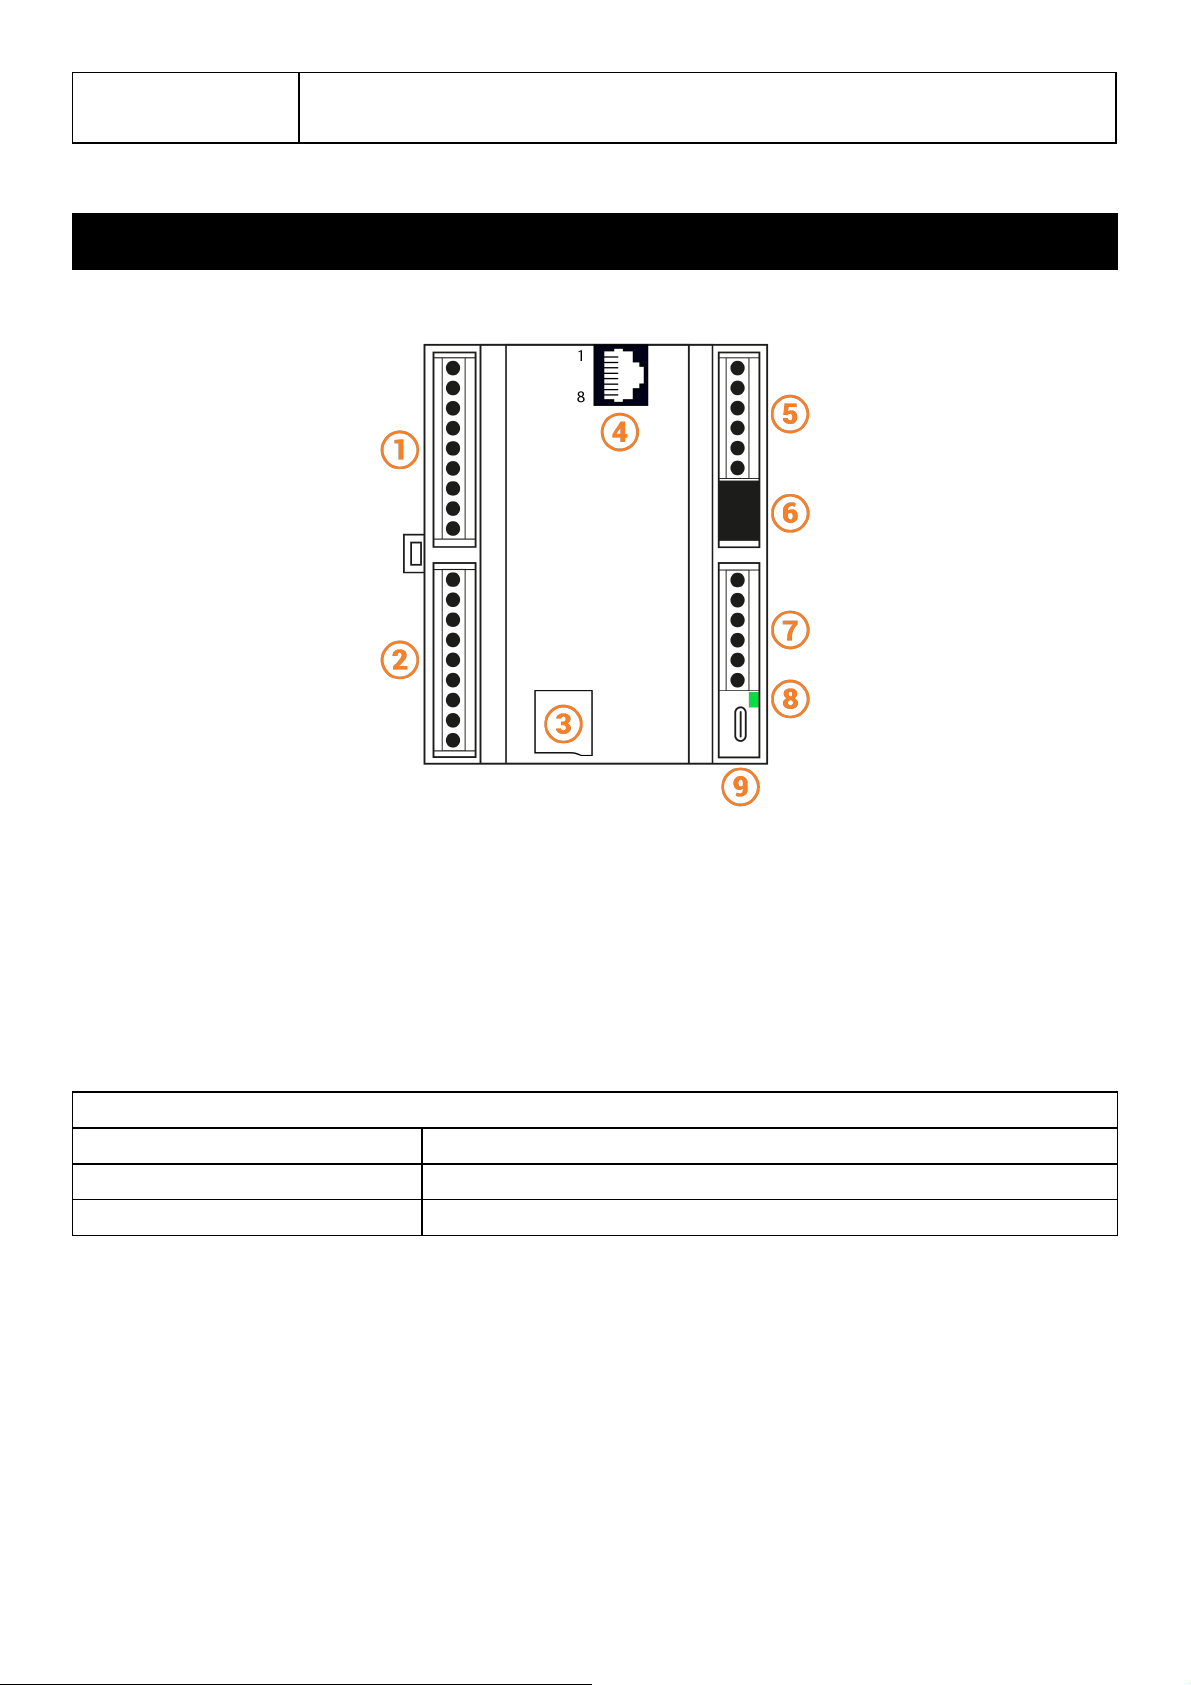
1-9PinsTerminalBlock
●GND
●VCC9-24V
●TRIGA/1,B/2,3,C/4,5,
6,7
4-9PinsTerminalBlock
●TRIGD/8,9,10,11,E/16
●5VOUT
●GND
●RS232Rx
●RS232Tx
3-MicroSDClass10
4-RJ45Pinout
1. M/SClock
2. M/SData+
3. Light+
4. IR+
5. RS232Tx
6. RS232Rx
7. 5V
8. GND
5-6pinsTerminalBlock
●DMX4-
●DMX4+
●DMXGND
●DMX3-
●DMX3+
●DMXM/SClock
6-RJ45Ethernet
2-6pinsTerminalBlock
●DMX1-
●DMX1+
●DMXGND
●DMX2-
●DMX2+
●M/SData+
8-LED
9-USB-C

USBdriversinstallation
InstallUSBdriverstocommunicatewiththedeviceandchangesettings.
InstallationofUSBdriversisrequiredonlyforWindowsattheendofinstallation.
DriversforMacandLinuxsystemsareinstalledautomatically.
USBdriversverification:
IntheWindowsDeviceManager.Checkthatthedeviceiconisvisiblein"USBBusControllers".
Ifdriversarenotinstalled,theWindowsDeviceManagerlistsadevicewithayellowwarning.
OnMacOS,simplychecktheUSBdevicetreetoview"DMX512standaloneDevice".OnLinux,use
the"lsusb"commandtoview"DMX512standaloneDevice"asalist.
AftercontrolsoftwareinstallationandUSBdrivers
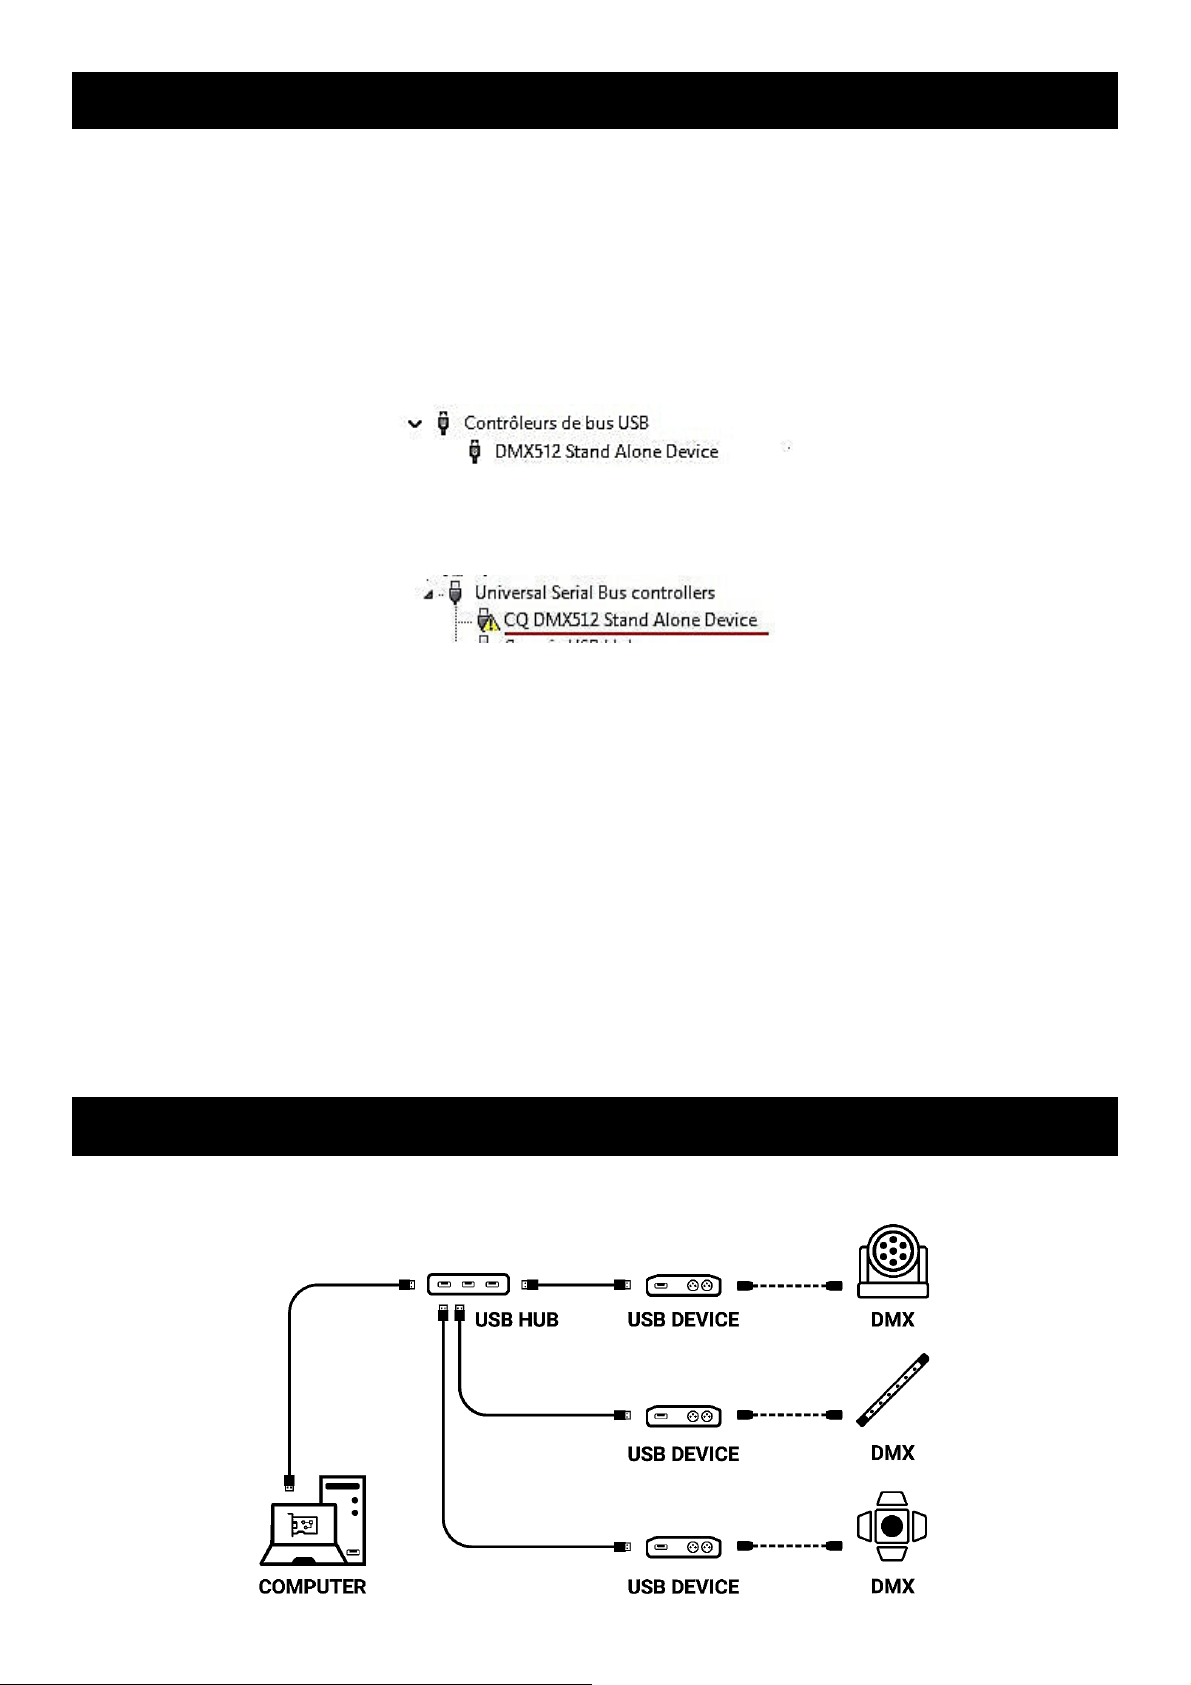
●ConnectthedevicewiththeUSBcable.
●StarttheDEVICETOOLorthesoftwareandselect"OpenUSBDevice"or"USB"tocheckthe
successofdriversinstallation.
Allconnectedanddetecteddevicesarelisted.
MultipleUSBconnections
8

Ethernetconnectionandconfiguration
EstablishEthernetcommunicationwiththedevicetochangeitssettingsinthesoftwareoptions
windoworviatheDEVICETOOL.
Itcanbedoneinseveralways:Live,viaanIPSwitchoraWifirouter.ThedeviceisinDHCPmode
bydefault.
Initialstepsrequired
●ConnectthedevicetotheLANorcomputerviaanRJ45Ethernetcable.
●PowerthedeviceviaUSBcable(5VDC,0.3A).
●Connectthecomputertothesamenetwork(LAN)ordeviceviaanRJ45Ethernetcable.
DHCP/IPStatic
InDHCPmode,withoutresponsesfromaDHCPserverafterashorttime,thedevicewillusestatic
IPmodewithitsdefaultIPaddressandwaitforthenextDHCPrequesttouseDHCPmode.Itwill
thereforealwaysbepossibletoconnectdirectlytothecomputerinstaticIPMODE.Thedeviceisin
DHCPmodebydefault.
DHCPconnection
DHCPmode,allowsyoutocommunicatewithdevicesthroughaDHCPserverthatautomatically
assignsandmanagestheIPaddressesofeachdevice.TheDHCPservercanbeofSwitchIPor
Routertypeorother.
ThedeviceisinDHCPmodebydefault.
ItisdetectedbysoftwareautomaticallywhenthecomputerisalsoconnectedinDHCPtothe
samenetworkorwithastaticIPaddressofthesamerange.
DHCPbenefitisthattheDHCPserverautomaticallymanagestheIPaddressesofconnected
devices.SoitisnotnecessarytoknowexactlytheIPofyourdevicetoconnecttoit.However,IPs
areregularlymodifiedandcanmaketheinstallationlessreliable.
SettinguptheDHCPconnection
●Aftertherequiredinitialstepsarecompleted.
●IfthedeviceisinDHCPmode(defaultmode).
●AlsoconfigurethecomputerinDHCPmode.
●StartthesoftwareorDEVICETOOLbyselecting"OpenEthernetDevice"
StaticIPconnection
9

StaticIPmode,allowsyoutocommunicatedirectlywithandevicewithoutnecessarilygoing
throughanotherdevicesuchasIPswitchorrouteroraccesspoint.ItisalsousedonLANswithout
DHCPserver.
StaticIPmodealsoallowsyoutofreezeanetworkconfigurationandprovidesbetterstabilityto
installationsdesignedwithmultipledevicesthankstoanIPswitchorrouters.
Thedefaultstaticvaluesofthedeviceare:
IPaddress:192.168.0.5
Subnetmask:255.255.255.0
SettinguptheStaticIPconnection
●Aftertherequiredinitialstepsarecompleted.
●IfthedeviceisinStaticIPmode.
●SettheIPaddressofthecomputertoanidenticalIPaddressrangeoftype
192.168.0.x.With"x"differentthan5toavoididenticalIPconflictsonthenetwork.
●Alsosetthesubnetmaskto255.255.255.0.
●Startthesoftwareorapplication.
InanidenticalIPaddressrange,thedevicewillberecognizedwhensoftwarestarts.
ResetoftheIPaddress
IfthereisadefaultIPaddressnotfound,usetheUSBconnectionandsoftwaresettingstoolsto
checkorchangethedeviceIPaddress.
Connectingtoawifirouter
Ifthedevice'sRJ45portallowsawiredconnectiontoalocalnetwork,itisalsopossibletoconnect
toitviaWIFIviaaWIFIrouter.
Theillustrationbelowisanexampleofaconfigurationusingathird-partyminiWiFiroutertoallow
awirelessconnection.Otherdescriptionsoftheserouterscanbe"hotspot","hub","dongle",
"bridge","repeater",etc.
Note:ConnectmultipledevicestotheWiFirouterorextendtheavailableRJ45portswithaSwich
IP.
10
Ce manuel convient aux modèles suivants
2
Table des matières
Autres manuels CHROMATEQ Équipement d'enregistrement
Manuels Équipement d'enregistrement populaires d'autres marques

Strymon
Strymon NIGHTSKY Manuel utilisateur

Mitsubishi Electric
Mitsubishi Electric 16CH DIGITAL RECORDER DX-TL5000U Manuel utilisateur

Tews Technologies
Tews Technologies TPMC465 Manuel utilisateur

Honeywell
Honeywell Excel 50 Manuel utilisateur

SeaLevel
SeaLevel COMM+8.LPCI Manuel utilisateur

Arturia
Arturia AUDIOFUSE STUDIO Manuel utilisateur