Chiptech 130809 Manuel utilisateur
Smoke Detector Transmitter Installation Instructions, 130809
Battery Replacement
When the Smoke Detector Transmitter has a low battery it will beep one
chirp per minute, indicating it needs to be replaced immediately.
The Chiptech transmitter inside the detector has its own battery and will
send through a transmitter low battery signal to the monitoring station
when it self tests. It will not make any audible noise. The transmitter
battery should last approximately 5 years and can not be changed in the
field, hence the Smoke Detector Transmitter has to be sent back to
Chiptech for servicing.
The Smoke Detector Transmitter uses a V battery that should last
about one year and needs to be replaced annually.
Pressing the TEST/SILE CE button will check that everything is still
working correctly. If customers don’t want the signal sent to the
monitoring station then the Cancel button on the medical alarm needs
to be pressed during the pre-alarm period.
Installers or clients can replace the Vbattery by sliding out the battery
drawer and inserting a new battery in the correct position. Positive and
negative symbols (+ -) indicate which way the battery should be placed.
The Smoke Detector Transmitter should always be tested after the V
battery is replaced.
Please ote:
The primary aim of the Smoke Detector Transmitter is to alert the
occupants of a possible fire. If there is concern about fire from cooking
in the kitchen, it is advisable to install an additional unmonitored smoke
detector within the vicinity to provide an audible alert thereby reducing
false activations being sent to the monitoring station.
Smoke Detector Transmitter Installation Instructions
Please read and follow these installation instructions to ensure the
Smoke Detector Transmitter functions correctly. Note that the primary
aim of the Smoke Detector is to alert occupants of a house that there is
a fire. The Smoke Detector Transmitter will also send a ‘Smoke Alarm’
to the monitoring station via the medical alarm.
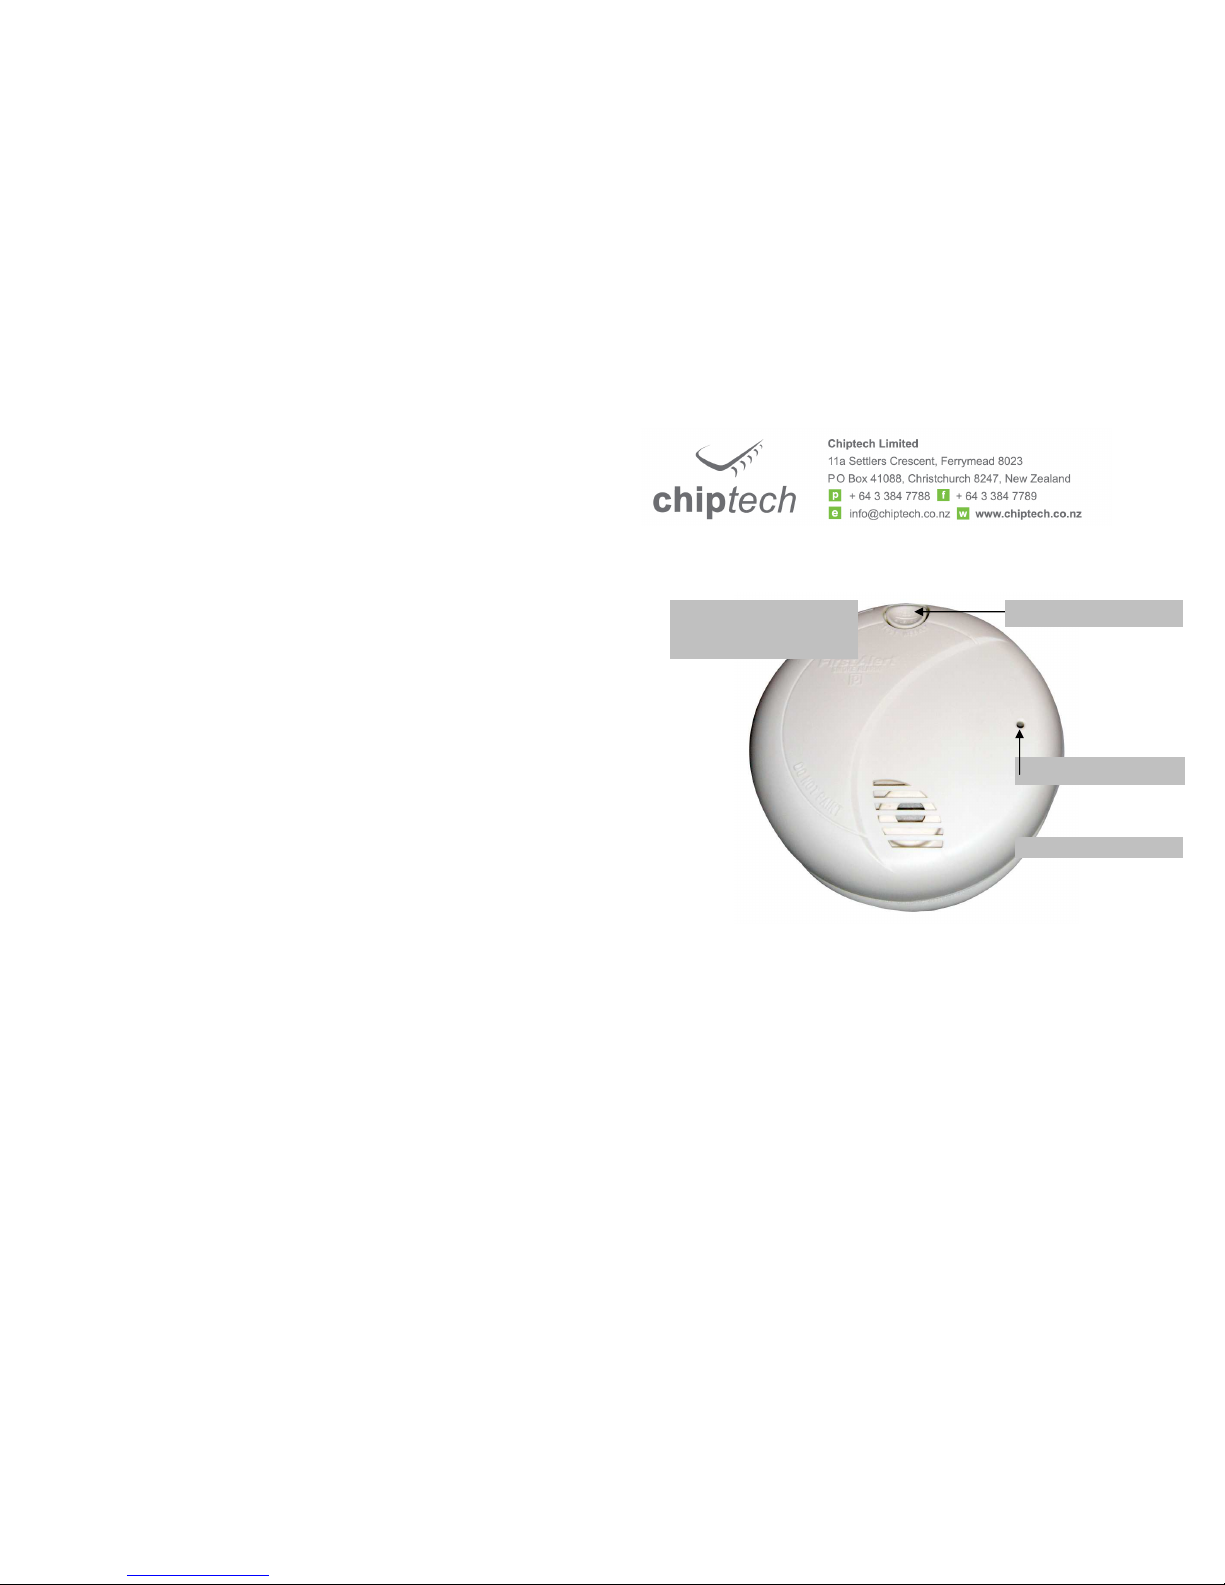
Power Indicator Light
Loud 8
5 Decibel Alarm
TEST/SILE CE Button
Side Battery Drawer with
‘Missing Battery’ Guard
and Low Battery Warning.

Smoke Detector Transmitter Installation Instructions, 130809
Smoke Detector Transmitter
The First Alert smoke detector is fitted with a Chiptech Transmitter.
Photo-electric technology detects the presence of smoke, which triggers
the smoke detector alarm and also transmits a signal to the medical
alarm unit.
The RF Smoke Alarm signal works in the same manner as a client
initiated emergency activation. The medical alarm receives the signal
from the transmitter, sounds the pre-alarm and then dials to the
monitoring station. The signal received at the monitoring station
presents as an RF Smoke Alarm. Unless otherwise specified, the
monitoring stations first action is to call back. If no contact is made they
call the fire service. (The Smoke Detector Transmitter contains no
radioactive components)
Learning in the Smoke Detector Transmitter
Please follow the standard medical alarm installation procedure when
installing the base unit. When you reach the stage of learning in
transmitters you will need to press all the transmitters you wish to use
with the medical alarm.
• To learn in the Smoke Detector Transmitter activate it by pressing
and holding the TEST/SILE CE button on the detector until it
sounds a smoke alarm and the medical alarms lets you know that it
is learned in.
• Learn in any other transmitters to be used with the medical alarm.
• Put the medical alarm in the Testing Mode and range test the other
transmitter as normal.
• When range testing is completed send an emergency signal by
pressing a personal transmitter to check the system is working
correctly.
• Then send through a Smoke Alarm signal by pressing
TEST/SILE CE on the Smoke Detector Transmitter.
• It is good practice to demonstrate the sounds to customers. They
will hear both the Smoke Detector Transmitter’s warning noise and
medical alarm’s activation sound. Show them how to Cancel an
alert during the pre-alarm period in case of a false activation.
RF Smoke Alarm
When an RF Smoke Alarm is received by the monitoring station the
client should be contacted immediately. If there is no response over the
phone line then the fire service should be contacted.
Mounting the Smoke Detector Transmitter
• Choose a position to mount the detector, we suggest the hallway or
bedroom. Try to avoid position near the kitchen, bathroom and
fireplace to decrease the number of false activations.
• Remove the backing bracket by twisting counterclockwise and
position it in the chosen place on the ceiling or wall.
• Mark the position for the holes with a pencil, remove bracket and
drill screw holes into the ceiling or wall. Use a 5mm (3/16”) drill bit.
• Insert plastic screw anchors, tap gently with hammer if necessary to
get them flush with the wall or ceiling.
• Fit screws part way, then position the backing bracket over the
screws and secure it tightly to the surface.
• Insert Smoke Detector battery that is supplied, the power indicator
light should flash.
• Attach the detector to the bracket by twisting it clockwise.
1. TEST/SILENCE button
2. Battery drawer
3. Power Indictor light and
alarm indicator
1. Mounting bracket
2. Mounting slots
3. Battery drawer, install V
battery here
4. Turn this way to remove from
bracket
5. Turn this way to attach to
bracket
Tools needed: Pencil, Drill with
5mm (3/16”) drill bit, Standard
Flathead Screwdriver, Hammer.
Manuels Détecteur de fumée populaires d'autres marques


System Sensor
System Sensor DH500ACDC Manuel utilisateur

Resolution Products
Resolution Products RE612 CryptiX Manuel utilisateur

First Alert
First Alert PC900V Manuel utilisateur

Eminent
Eminent EM6590 E-Domotica Manuel utilisateur

Ei Electronics
Ei Electronics Ei Ei168RC Manuel utilisateur

Carrier
Carrier Kidde Quell Q301 Manuel utilisateur


