Carlsbro CSD120 Manuel utilisateur

CSD120/CSD130

Congratulations!
Thank you for purchasing this digital drum set. The drum set has been Developed to
act and play like a drum set but with greater ease. Before you use the instrument, we
recommend you to read through this manual.
Taking care of Your Digital Drum Set
Location
- Do not expose the unit to the following
Conditions to avoid deformation,
discoloration or more serious damage.
- Direct sunlight.
- High temperature (near a heat)source,
Or in car during the day time).
- Disconnect all cables before moving
Power Supply
-make sure to use the suitable AC adaptor,
and also make sure the ac outlet voltage
at your country matches the input voltage
specified on the AC
AC adaptor's label.
-Turn the power switch OFF When the
Instrument is not in use.
-An AC adaptor should be unplugged
from the AC outlet if the instrument is
not be used for an extended period of
time.
- Unplug the AC adaptor during electric
storms.
-Avoid plugging the AC adaptor into
-The same AC outlet as appliance with
high power consumption, such as
electric heaters or ovens. Also avoid
using multi-plug adaptors since these
can result in reducing the sound quality,
operation errors, and possibly damage.
Turn Power OFF When Making
Connections
- To avoid damage to the instrument
and other devices to which it is
Connected, turn the power switches of
all related device OFF prior to connecting
or disconnecting cables.
Handling and Transport
- Nev er app ly ex cess ive f orce t o t he
controls, connectors or other parts of
the instrument.
- Always unplug cables by gripping the
plug firmly, but not pulling on the cable.
- Disconnect all cables before moving
The instrument.
- Physical shocks caused by dropping,
bumping, or placing heavy objects on
the instrument can result in scratches
more serious damage.
Cleaning
- Clean the unit with a dry soft cloth.
- A Slightly damp cloth may be used to
Remove stubborn grime and dirt.
- Never use cleaners such as alcohol
or thinner.
- Avoid placing vinyl object on top of
The unit (uinyl can stick to and
discolor the surface).
Electrical Interference
- This instrument contains digital
circuitry and may cause interference
if placed too close to radio or
television receivers. If this occurs,
move the instrument further away
from the affected equipment.

Contents
1. Assembly...........................................1
Assemble the drum stand.................1
Assemble the pads 3...........................
Assemble the cymbals 4......................
Assemble the module 5.......................
Assemble the bass drum 5..................
Assemble the pedal and bass drum.6
Connect the pads 6..............................
2. Fold the drum stand 8..........................
Arrange the pad cables 8.....................
Fold the crash 8...................................
Fold the hi-hat and TOM1 8.................
Fold the ride 10....................................
Fold TOM2 and TOM3 10....................
Fold the snare 10.................................
Fold the whole set 11...........................
3. Module function 13..............................
Front panel 13......................................
Rear panel 14.......................................
display display 15.................................
4. Connect with external devices 15........
Connect with audio system or drum
speaker cabinet.............................15
Connect with phone 16........................
Connect with MP3 or CD player 16......
Connect with PC 17.............................
Connect with MIDI keyboard 17...........
Power supply 17..................................
5. Operation 13........................................
Power switch 18...................................
Adjust the master volume 18...............
Select drum kit and reverb 19..............
Pad parameter setting 19.....................
Select pad voice 19..............................
Adjust pad volume 20...........................
Pad pan.....................................................20
Pad tuning 20.................................................
Establish user drum kit 20..............................
Song setting 21...............................................
Select song 21................................................
Song playing 21.............................................
Accompaniment volume 21............................
Drum sound of the song 22............................
Song tempo 22...............................................
Tempo setting and the metronome click...22
Tempo 22.......................................................
Metronome 22...............................................
6. Record and replay 23......................................
Record quickly 23...........................................
Play the recorded song 23.............................
7. Set up 23........................................................
Trigger sensitivity 23......................................
Crosstalk rejection 24.....................................
Trigger curve 24.............................................
Save the Set-up 25.......................................
Local control 25.............................................
8. Reset setting 26.............................................
9. MIDI setting 26...............................................
MIDI connection........................................26
Connect with external audio source
equipment ................................................26
Used as audio source equipment 26.............
MIDI list 27.....................................................
10. Trouble shooting 28.....................................
11. Audio source specification 28......................
12. Drum kit list 29............................................
13. Voice list 30.................................................
14. GM percussion list 36..................................
15. DEMO SONG list 38....................................


1. Assembly
Caution:
-While adjusting the collar, please take extra care to avoid injury.
-Set the each part to the correct position.
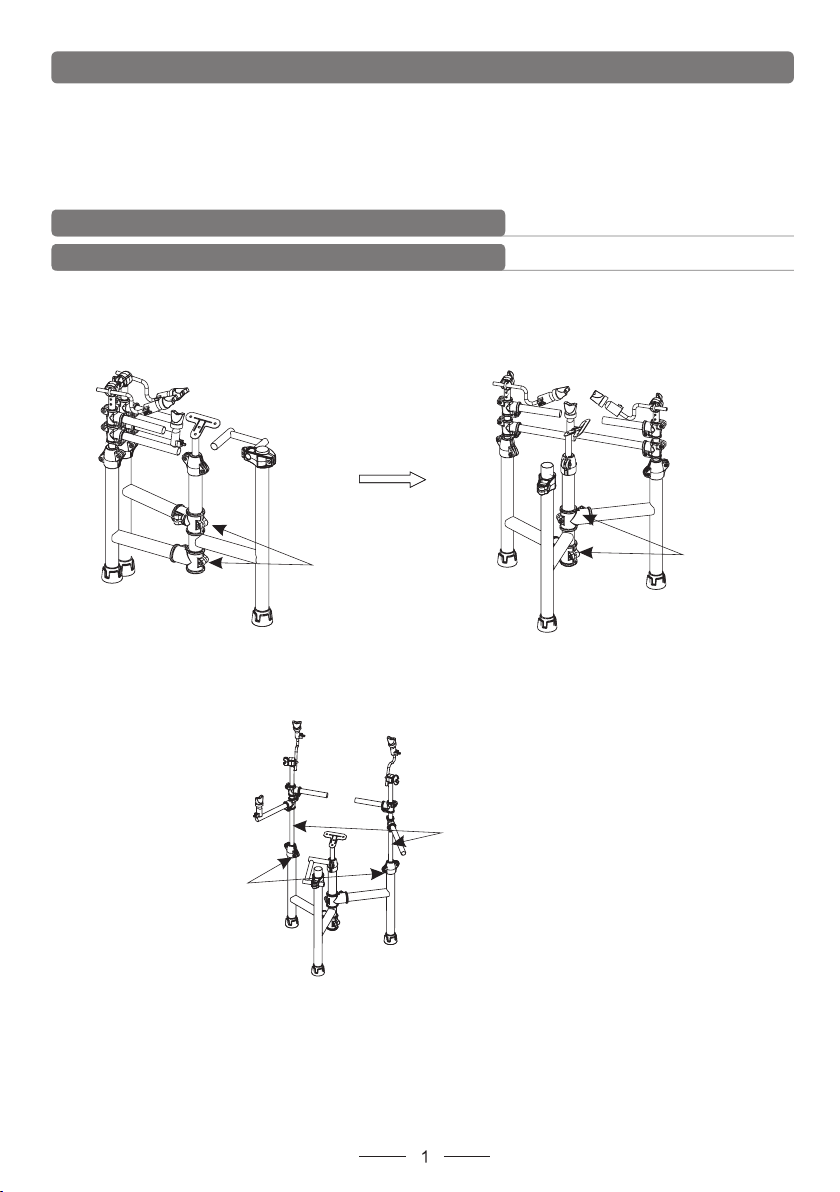
Drum stand assembly
1). Take out the drum stand and loosen the screws of the collars.
2). Set the three master tube at 120°angle.
3). Screw down at the collars.
4). Loosen the screws at the collars.
5). Set the L/R cymbal tubes to the proper height.
6). Screw down to fix the cymbal tubes.
7). Loosen the screws at the collars.
8). Adjust the cymbal collars to proper height.
9). Screw down to fix the cymbal tubes.
Loosen the screws Screw down
Set the height of the cymbal tubes
Loosen the screws
Assembly steps:

Loosen the screws
10) Loosen the screws at the collars.
11). Adjust the HI-HAT collars to proper height.
12). Screw down to fix the HI-HAT tubes.
.
13). Loosen the butterfly nuts.
14). Adjust the cymbal rod to proper height and angle.
15). Tighten the butterfly nuts.
Loosen the screws
Loosen the
butterfly nuts
16). Loosen the screws at the collars.
17). Adjust the U stand of snare to proper position.
18). Screw down.

Loosen the screws
19). Loosen the screws at the collars.
20). Set the module stand to proper position.
21). Screw down.
U stand
Loosen the screws
module stand
22). Adjust the balance of the drum stand.
23). Tighten all the screws at the collars. Tighten the clip screw.
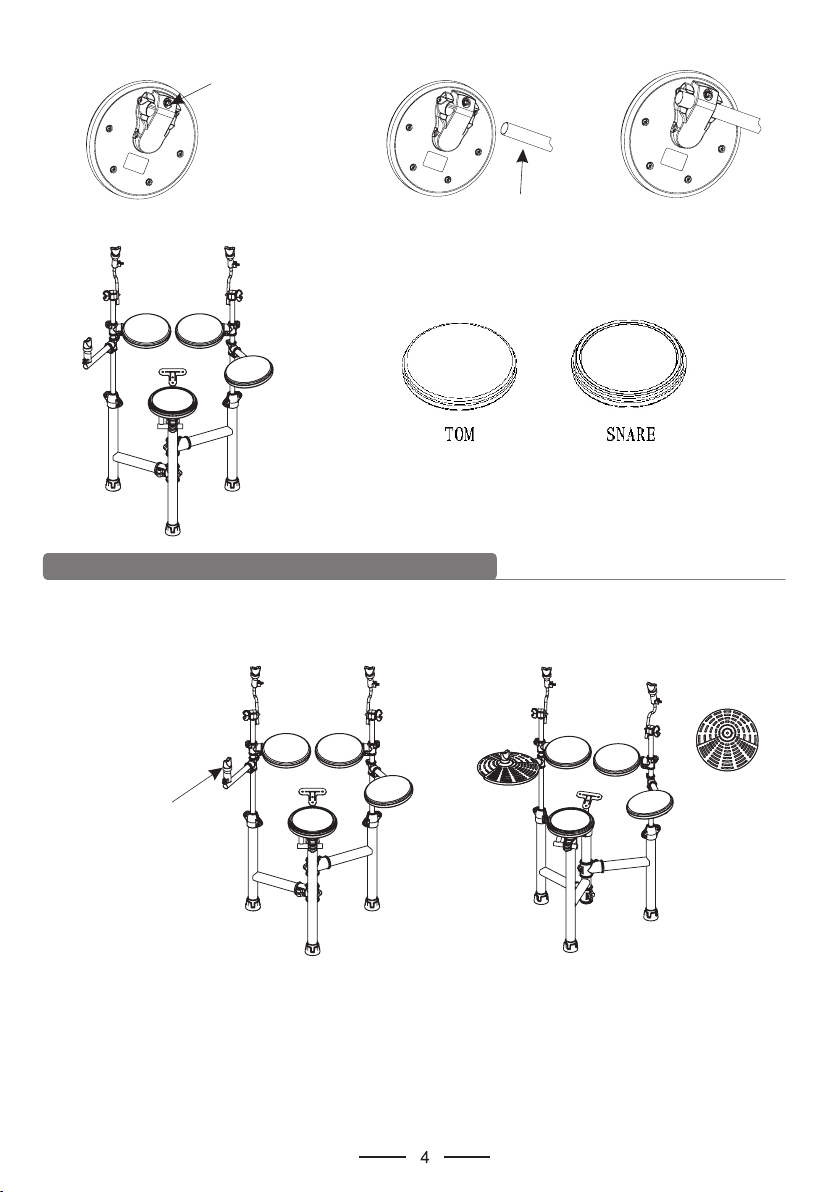
Assemble the pads
1). Take out the pads(3 TOM and 1 Snare). Loosen the square screw.
2). Assemble the pads onto the tubes and adjust the position.
3). Tighten the square screw.

Assemble the cymbals
1)Loosen the butterfly nut on the left side of the HI-HAT.
2)Assemble the HI-HAT cymbal.
3)Tighten the butterfly nut(Note: don't overtighten)
4). Loosen the butterfly nut on the cymbal rod.
5). Assemble the CRASH/RIDE cymbal onto the rod.
6). Tighten the butterfly nut(Note: don't overtighten)
Loosen the square screw
Pad tube
Loosen the
butterfly nut

Loosen the butterfly nut
Assemble the module
1). Loosen the square screws of the module.
2). Assemble the module onto the module stand.
3). Screw down.
Assemble the bass drum(only CSD130)
1 take out the bass drum and bass drum stand
2). loosen the square screw of the bass drum
3). assemble the bass drum on the stand
4). Tighten the square screw.
).
Loosen the square screws
Bass drum
Bass drum stand
Square screw L=28
5). Fix the support bar to the pedal.
6). Fix the bass drum stand the hammer, and tighten the screw

7). Loosen the square screw of the hammer
8). tighter the square screw to fix the hammer
Assemble the pedal and the bass drum
1).Put the pedal to the left floor.
2).Put the bass drum(with hammer)to the right floor.
Note:CSD120 pedal is used as bass drum. Each of the pedal can be used as bass drum.
Connect the pads
1). Use the cable to connect the D-SUB connector of the module and the pad.
2). Use the cable tie to tie the cable(12 ties)
Fix the hammer bar
the hammer pointing
to the pad center
tighten the square screw
loosen square screw
CSD120 CSD130
tighten the screw

RIDE
CRASH
TOM2
TOM1
TOM3
HI-HAT CYMBAL
MODULE
SNARE
CABLE TIE
(12 TOTALLY)
BASS
HI-HAT CTRL
Ce manuel convient aux modèles suivants
1
Table des matières
Autres manuels Carlsbro Tambour