4
BATTERY USAGE
When the battery is discharging in normal use, the battery pack LED is white. When the battery capacity is lower than
5%,the White Led light will begin to flash. [7]
When this happens you should stop cleaning and immediately recharge your battery. [2]
When charging the product, the swich on/off must be OFF.
It’s also possible to charge the battery pack when released from the product. [2]
The charging time of the product is 5Hrs. When the battery fully charged the LED light on the battery will illuminate white. [3]
NOTE: It is normal for the charger to become warm to touch when charging. Use only the charger supplied with your product.
SAFETY PROTECTION SYSTEM
To ensure the reliability of the product is not affected if used under arduous conditions, the product features an integrated
safety protection system.
NOTE: The Safety protection system will action if the agitator has a blockage or is locked, once actioned the agitator
will stop rotating, the white LED lights on the front of the nozzle will Flash 5 times. [19] If this happens, simply switch Off
your product and clear the agitator obstruction. To resume cleaning, press the On/Off button and the product will restart
in standard mode.
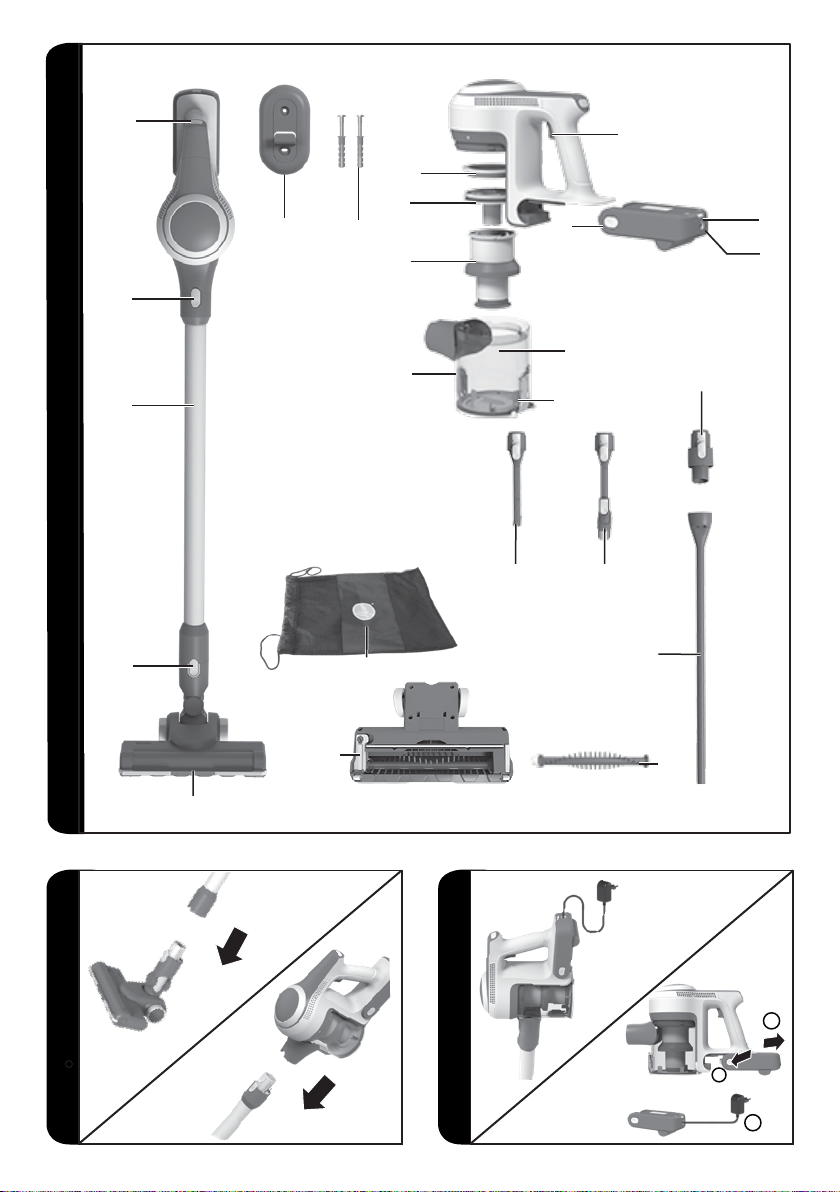
ACCESSORIES*
2 In 1 Crevice and Dusting tool*, Crevice Tool*
The above accessories can be fitted directly into the main body unit or the tube. [6]
NOTE: To remove the nozzle or main body unit from the tube, press the respective release button and pull apart.
Long Flexible Crevice Tool*
The accessory adaptor* must be fitted when using accessory. [6]
NOTE: The long flexible crevice tool is ideal for cleaning in hard to reach areas, underneath furniture and in your car.
1. Crevice tool is ideal for accessing tight spaces.
2. Dusting brush is ideal for cleaning surfaces without damaging or scratching.
WALL MOUNT*
Hang the wall mount to the wall, using the two screws included in the product to hang product. [8]
CLEANER MAINTENANCE
Emptying the Dust Cup
1. Press the handheld release button and remove the tube. [1b]
2. Press the dust cup flap release button to release the dust cup flap and empty the contents. [9]
3. Close the dust cup flap, you will hear a click when fully locked.
NOTE: It is recommended to empty the dust cup after each use or when dust is up to the max fill lines.
Cleaning the Dust Cup and Filter
1. Press the handheld release button and remove the tube. [1b]
2. Press the dust cup flap release buttons to release the dust cup flap and empty the contents. [9]
3. Close dust cup flap, you will hear a click when fully locked.
4. Press the battery pack release buttons and remove the battery pack. [2b]
5. Press the dust cup assembly release button placed on the rear side of the dust cup and turn it anticlockwise pulling
away from the unit. [10]
6. Remove the Pre-Motor filter pulling the support from the dust cup. [11]
7. Remove the single cyclone system pulling the metal ring from the dust cup. [12]
8. Pull the single cyclone system and rotate the Single cyclone vortex finder in anticlockwise direction and then take it out.
[12]
9. Wash the filter and single cyclone system in lukewarm water and leave to dry for 24 hours. [13,14]
10. Reassemble once completely dry and refit to the product. [15,16,17,18]
NOTE: Do not use hot water or detergents when cleaning the pre motor filter. In the unlikely event of the pre motor filter
becoming damaged, fit a genuine Candy replacement.
Do not use the product without pre-motor filter fitted before assembling dust cup to the main body.
IMPORTANT: For optimum performance, always keep your filter clean.
GB
* Certain Models Only