camry CR 4414 Manuel utilisateur

1
CR 4414
(GB) user manual - 6 (DE) bedienungsanweisung - 10
(PT) manual de serviço - 22 (LT) naudojimo instrukcija - 26
(LV) lietošanas instrukcija - 30 (EST) kasutusjuhend - 34
(FR) mode d'emploi - 14 (ES) manual de uso - 18
(HU) felhasználói kézikönyv - 38 (BS) upute za rad - 42
(RO) Instrucţiunea de deservire - 45 (CZ) návod k obsluze - 49
(RU) инструкция обслуживания - 53 (GR) οδηγίες χρήσεως - 58
(MK) упатство за корисникот - 62 (NL) handleiding - 66
(SL) navodila za uporabo - 70 (FI) manwal ng pagtuturo - 74
(PL) instrukcja obsługi - 80 (IT) istruzioni operative - 83
(HR) upute za uporabu - 87 (SK) Používateľská príručka - 91
(DK) brugsanvisning - 94 (UA) інструкція з експлуатації - 98
(SR) Корисничко упутство - 102 (SV) instruktionsbok - 106
(AR) تﺎﻣﯾﻠﻌﺗﻟا لﯾﻟد - 111 (BG) Инструкция за употреба - 114

2
1
2
3
4
5
6
7
A B C
A
A2

3
B C
D E
4
F G
H

5
I J
KK1
K2
L M. N

6
ENGLISH
16. Do not leave the device switched on or the adapter unattended when
unattended.
15. The power cord may not hang over the edge of a table or touch hot
surfaces. The manufacturer is not liable for damages caused by using the
device contrary to its intended purpose or improper operation. Do not allow
children to play with the device, do not allow children or people unfamiliar
with the device to use it.
14. Do not use the device near flammable materials.
13. Place the device on a cool, stable surface, away from hot kitchen appliances such as:
electric stove, gas burner, etc.
12. Do not use the device with a damaged power cord or if it has been dropped or
damaged in any other way or if it is not working properly. Do not repair the device yourself,
as there is a risk of electric shock. Take the damaged device to an appropriate service
center for checking or repair. All repairs may only be carried out by authorized service
points. Incorrectly performed repairs can cause serious danger for the user.
11. Periodically check the condition of the power cord. If the power cord is damaged, it
should be replaced by a specialist repair shop to avoid danger.
10. Do not immerse the cable, plug and the device in water or any other liquid.
9. Do not expose the device to atmospheric conditions (rain, sun, etc.) or use in conditions
of high humidity (bathrooms, damp mobile homes).
7. Always remove the plug from the power socket after use by holding the socket with your
hand after use.
8. When removing the plug from the socket, never pull the power cord but the plug.
6. Boil the water in the tank and pour it twice to get rid of the smell before first use.
5. WARNING: This equipment may be used by children over 8 years of age and people
with reduced physical, sensory or mental ability, or people who have no experience or
knowledge of the equipment, if this is done under the supervision of a person responsible
for their safety or have been granted them information on the safe use of the device and
are aware of the dangers of using it. Children should not play with the equipment. Cleaning
and maintenance of the device should not be performed by children, unless they are over 8
years old and these activities are carried out under supervision.
4. Use extreme caution when using the device when children are nearby.
3. The device should only be connected to a 230V~50 Hz grounded socket. To increase
operational safety, multiple electrical devices should not be connected to one current circuit
at the same time.
2. The device is for home use only. Do not use for other purposes that are not for its
intended purpose.
GENERAL SAFETY CONDITIONS IMPORTANT SAFETY INSTRUCTIONS. PLEASE
READ CAREFULLY AND SAVE FOR FUTURE
1. Before using the device, read the operating manual and follow the instructions contained
in it.

7
Use of the device:
To use the device you need to fill the device with water.
2. By removing the water tank from the device, filling and putting it back into the device.
1. Directly into the water tank.
You can do this in 2 ways.
1. Remove the water tank lid (3).
2. Gently but firmly pull on the water tank upwards and away from the device.
3. Fill the water tank with water.
K2. Coffee powder L. Lavazza Modo Mio M. Lavazza BLUE N. Caffitaly
I. Nespresso capsule J. Dolce Gusto Capsule K1. Coffee Pod
Brewing baskets:
A. Espresso B. Power ON / OFF C. Cafe Lungo
Picture A2:
1. Lever 2. Control panel 3. Water tank lid 4. Water tank
5. Brewing basket 6. Drip tray cover 7. Drip tray (removable)
Picture A1:
Multi capsule coffee maker description:
26. Do not move or move the device during operation.
25. Use only original accessories.
24. For descaling the machine, use a liquid descaler designed for pressure
coffee makers.
23. Always disconnect the power source before cleaning and allow all hot
parts to cool down. The device should be cleaned with a mild non-abrasive
detergent. Never use cleaning solvent as this could damage the paint
layer.
21. Always unplug the machine before filling the tank with water.
22. Regularly clean and inspect the machine to ensure the quality of coffee
obtained and to extend the life of the machine.
20. Never leave the device at a temperature below 0 degrees Celsius, as it
may damage it.
19. Never use the device with sparkling water !!!
18. Never use the device without water! It may be damaged.
17. To provide additional protection, it is advisable to install a residual
current device (RCD) in the electric circuit with a rated residual current not
exceeding 30 mA. Ask an electrician for this advice.
First, remove all of the packings from the device and the attachments.
Preparation:
Please clean the body of the device, water tank, attachments, water tank, water tank lid, drip tray with a soft, slightly damp cloth.
3. Put the water tank lid back into its place.
TO add water directly to the water tank (As shown on page 3 picture B):
1. Remove the water tank lid (3).
To remove the water tank (As shown on page 3 picture C):
2. Pour water into the water tank (4).
4. Put the water tank back into its designated place.

8
9. Pull on the lever (1) upwards to release the brewing basket (5).
You can also always cancel the brewing by pressing the ON / OFF (A2B) button.
8. After that time it will turn off.
5. Put the water tank lid (3) back into its place.
2. Turn on the device by pressing the ON / OFF button (A2 B).
WARNING: DO NOT TURN ON THE DEVICE WITHOUT THE WATER TANK BEING IN PLACE. THE DEVICE EMITS STEAM AND
HOT WATER BACK INTO THE WATER TANK BEFORE STARTING.
3. The control panel will light up and begin to blink.
4. After the control panel stops blinking and shines in a stable light you can begin to prepare the brewing basket (5).
5. If a brewing basket (5) is already inserted in the device:
5a. Pull the lever (1) upwards to release the brewing basket (5).
5b. Remove the brewing basket (5).
6. If the brewing basket (5) is not inserted in the device:
7. It will be on standby for around 15 minutes.
6. After finishing it will emit 2 sound chimes and will stop working.
5. The device will start to work. (PLEASE NOTE THE DEVICE WILL DISCHARGE ANY REMAINING WATER FROM THE BREWING
TANK BACK INTO THE WATER TANK.)
4. If the control panel shows no problems press the desired option. Espresso(A2A) or Café Lungo (A2C).
3. Check if the control panel is shining without any blinking.
2. Press the lever (1) down slowly but firmly.
2. Insert the capsule into the hole in the brewing basket (5) so it is firmly nested inside and does not move.
Brewing:
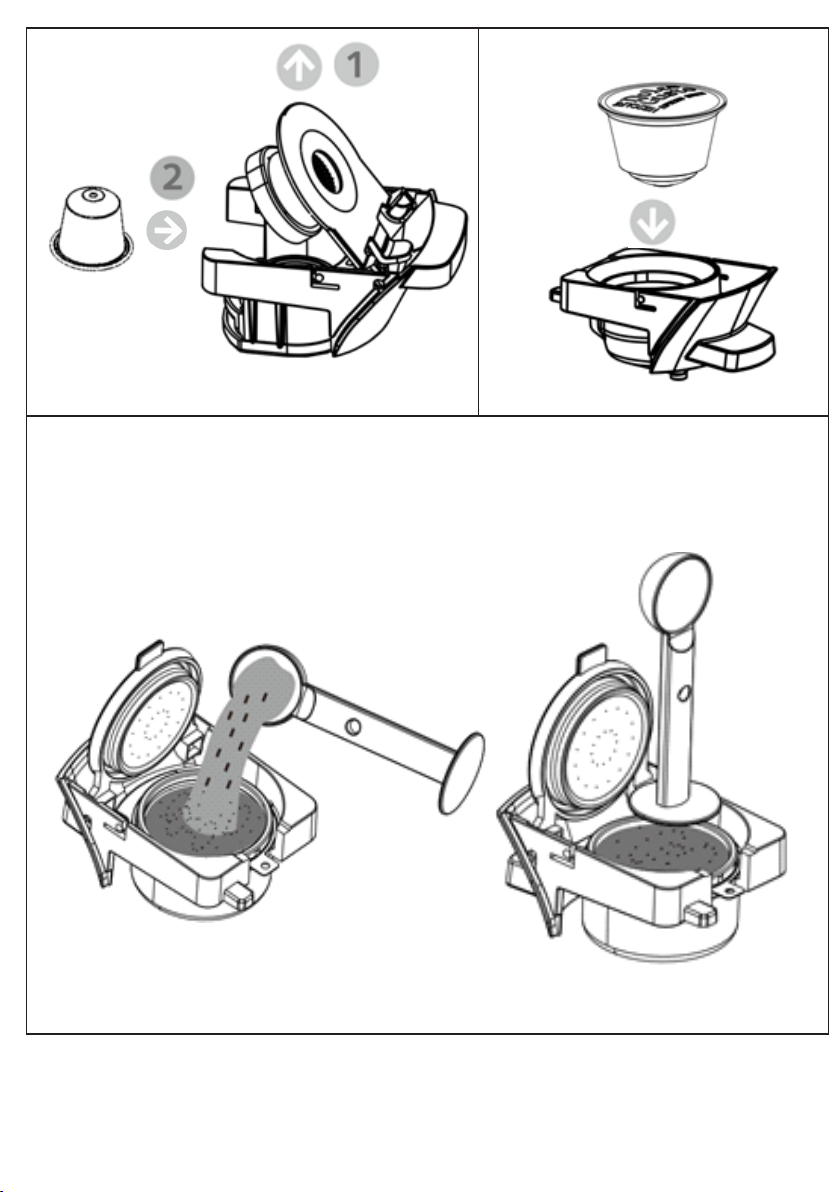
3. Lay the coffee pod into the coffee pod adaptor.
2. Insert the coffee pod adaptor into the brewing baskets.
For coffee pods:
1. Select the coffee powder brewing basket (5).
3. Push the coffee powder down making sure it is nice and flat and the adaptor can be closed without using too much strength.
2. Pour the coffee powder into the brewing basket (5) metal adaptor. (Please note that the powder should not spill outside the metal
inlay.)
1. Please check picture H on page 4.
For Coffee powder:
NOTICE: The brewing basket (5) should shut completely and no part of the basket should stick out compared to the empty brewing
basket (5).
1. Push the capsule downwards into the brewing basket (5).
Picture G:
1. Pull on the inside of the brewing basket (5) and it will open up.
NOTICE: The brewing basket (5) should shut completely and no part of the basket should stick out compared to the empty brewing
basket (5).
3. Close the brewing basket (5).
Picture F:
C. Inserted into the metal brewing compartment. Coffee Pod (K1) Coffee Powder (K2)
B. Inserted from below. Nespresso Capsule (I)
Depending on the type of capsule please follow the pictures F and G.
2. There are 3 types of capsules.
1. Depending on the type of capsule or coffee powder choose the correct brewing basket (5).
A. Inserted from above. Dolce Gusto (J), Lavazza (L)
Preparing the brewing basket (5):
6a. Pull the lever (1) upwards to prepare the device for the brewing basket (5).
Setting up the brewing process:
1. After filling the water tank (3) with water.
1. Insert the previously prepared brewing basket (5) into the device.
WARNING: IF THE LEVER DOES NOT MOVE OR OFFERS MUCH RESISTANCE. DO NOT FORCE IT. REMOVE THE BREWING
BASKET (5) AND CHECK IF THE BREWING BASKET (5) IS CORRECTLY ASSEMBLED. OR IF THERE IS TOO MUCH COFFEE
POWDER INSIDE THE BREWING BASKET (5).

9
7. After the second tank of the solution is emptied. Please put fresh water into the tank and flush out the solution by emptying the fresh
water tank by pressing the lungo button until the tank is empty.
3. Put a brewing basket (5) into the device and lower the lever (1).
4. Turn on the device.
2. Fill the tank full with the solution of the decalcifier and water as per producers of the decalcifier guidelines.
12. Rinse with water until fully clean.
13. Please make sure to drain the detachable drip tray and rinse it with water.
You can change the standby mode on or off.
Disable or enable the standby mode:
1. With the device unplugged from the mains power press both the Espresso (A2A) and Lungo (A2C) buttons.
2. Press the espresso (A2A) button to turn the standby mode On (light on) or Off (light turned off).
3. Press the ON / Off (A2B) button to confirm the setting.
Device Data:
Voltage: 230V ~ 50Hz
Power: 1450 W
Maximum Power: 3000 W
Water capacity: 0,6 L
At least once a month or earlier depending on the number of drinks made the device needs to be decalcified.
11. Remove the capsule / pod / coffee powder from the brewing basket (5).
10. WARNING. AFTER BREWING THE BREWING BASKET (5) WILL BE HOT TO THE TOUCH. PLEASE TAKE CARE NOT TO BURN
YOURSELF.
To do so please follow the below instructions:
1. Use specially made pressure coffee maker decalcifiers.
5. Put a big bowl in place of the cup.
6. Please use the Lungo setting (A2C) and empty at least 2 full tanks of the decalcifier and water solution.
PLEASE NOTE: NEVER USE VINEGAR OR OTHER ACID-BASED DECALCIFIERS FOR THIS DEVICE. IT CAN DAMAGE THE
DEVICE.
If you want to add some more water or think the amount of coffee is too little you can press and hold the espresso button and the device
will continue to produce water. TO stop releasing the button.
Decalcification:
Please transfer cardboard packaging to waste paper. Pour the polyethylene bags (PE) into the plastic container
ingredients may pose a threat to the environment. The electrical device should be handed over to limit
Worn device should be returned to the appropriate point storage because it is dangerous in the device
its reuse and use. If in the device there are batteries you have to take out and give to the point stored separately.

10
11. Überprüfen Sie regelmäßig den Zustand des Netzkabels. Wenn das Netzkabel
beschädigt ist, sollte es von einer Fachwerkstatt ersetzt werden, um Gefahren zu
vermeiden.
9. Setzen Sie das Gerät nicht atmosphärischen Bedingungen (Regen, Sonne usw.) aus
oder verwenden Sie es nicht bei hoher Luftfeuchtigkeit (Badezimmer, feuchte
Wohnmobile).
6. Kochen Sie das Wasser im Tank und gießen Sie es zweimal ein, um den Geruch vor
dem ersten Gebrauch zu beseitigen.
8. Wenn Sie den Stecker aus der Steckdose ziehen, ziehen Sie niemals am Netzkabel,
sondern am Stecker.
13. Stellen Sie das Gerät auf eine kühle, stabile Oberfläche, entfernt von heißen
4. Seien Sie bei der Verwendung des Geräts in der Nähe von Kindern äußerst vorsichtig.
10. Tauchen Sie Kabel, Stecker und Gerät nicht in Wasser oder andere Flüssigkeiten.
12. Verwenden Sie das Gerät nicht mit beschädigtem Netzkabel, wenn es heruntergefallen
oder auf andere Weise beschädigt wurde oder nicht ordnungsgemäß funktioniert.
Reparieren Sie das Gerät nicht selbst, da die Gefahr eines Stromschlags besteht. Bringen
Sie das beschädigte Gerät zur Überprüfung oder Reparatur zu einem geeigneten
Servicezentrum. Alle Reparaturen dürfen nur von autorisierten Servicestellen durchgeführt
werden. Durch unsachgemäß durchgeführte Reparaturen können ernsthafte Gefahren für
den Benutzer entstehen.
7. Ziehen Sie nach Gebrauch immer den Stecker aus der Steckdose, indem Sie die
Steckdose nach dem Gebrauch mit der Hand halten.
5. WARNUNG: Dieses Gerät kann von Kindern über 8 Jahren und Personen mit
eingeschränkten physischen, sensorischen oder geistigen Fähigkeiten oder Personen, die
keine Erfahrung oder Kenntnisse mit dem Gerät haben, verwendet werden, wenn dies
unter der Aufsicht einer verantwortlichen Person geschieht zu ihrer Sicherheit dienen oder
ihnen Informationen zum sicheren Umgang mit dem Gerät erteilt wurden und sich der
Gefahren bei der Verwendung bewusst sind. Kinder sollten nicht mit dem Gerät spielen.
Die Reinigung und Wartung des Geräts sollte nicht von Kindern durchgeführt werden, es
sei denn, sie sind über 8 Jahre alt und diese Tätigkeiten werden unter Aufsicht
durchgeführt.
3. Das Gerät darf nur an eine geerdete Steckdose 230V~50 Hz angeschlossen werden.
Zur Erhöhung der Betriebssicherheit sollten nicht mehrere elektrische Geräte gleichzeitig
an einen Stromkreis angeschlossen werden.
2. Das Gerät ist nur für den Heimgebrauch bestimmt. Nicht für andere Zwecke verwenden,
die nicht dem vorgesehenen Zweck entsprechen.
ALLGEMEINE SICHERHEITSBEDINGUNGEN WICHTIGE SICHERHEITSHINWEISE.
BITTE SORGFÄLTIG LESEN UND FÜR DIE ZUKUNFT SPEICHERN
1. Lesen Sie vor der Verwendung des Geräts die Bedienungsanleitung und befolgen Sie
die darin enthaltenen Anweisungen.
(DE) DEUTSCH
Table des matières
Langues :
Autres manuels camry Cafetière


