Buffalo GF539 Manuel utilisateur

Hot Drinks Dispenser
Instruction Manual
Model . Modéle . Modell . Modello . Modelo . Malli
GF539

UK
Safety Tips
Position on a flat, stable surface.
A service agent/qualified technician should carry out installation and any repairs if
required. Do not remove any components on this product.
Consult Local and National Standards to comply with the following:
oHealth and Safety at Work Legislation
oBS EN Codes of Practice
oFire Precautions
oIEE Wiring Regulations
oBuilding Regulations
DO NOT immerse the appliance in water, or use jet/pressure washers to clean the
appliance
Do not use the appliance for anything other than its intended use.
Always switch off and disconnect the power supply to the appliance when not in use.
Not suitable for outdoor use.
Keep all packaging away from children. Dispose of the packaging in accordance to
the regulations of local authorities.
If the power cord is damaged, it must be replaced by a BUFFALO agent or a
recommended qualified technician in order to avoid a hazard.
This appliance is not intended for use by persons (including children) with reduced
physical, sensory or mental capabilities, or lack of experience and knowledge, unless
they have been given supervision or instruction concerning the use of the appliance
by a person responsible for their safety.
Children should be supervised to ensure that they do not play with the appliance
Introduction
Please take a few moments to carefully read through this manual. Correct maintenance and
operation of this machine will provide the best possible performance from your BUFFALO
product.
Pack Contents
The following is included:
BUFFALO Hot Drinks Dispenser
Instruction Manual
Cleaning Brush
BUFFALO prides itself on quality and service, ensuring that at the time of packaging the
contents are supplied fully functional and free of damage.
Should you find any damage as a result of transit, please contact your BUFFALO dealer
immediately

Telephone Helpline: 0845 146 2887 (United Kingdom)
Operation
Filling the water boiler tank
Make sure the power switch is set to OFF.
Remove the lid to the water boiler tank (Fig 1)
Fill the tank with water until it reaches
the MAX fill line (Fig 2).
Filling the Bowl
Remove the lid and pour the beverage
prepared according to the
manufacturer’s instructions into the
bowl (Fig 3)
Never exceed the MAX level mark
Replace lid

UK
Turn on the power using the green
switch (Fig 4). Switch will illuminate
when machine is on.
Set the thermostat to the required
temperature (Fig 5).
Dispensing the product
Warning: The products dispensed from the
machine can be hot please take care to avoid
risk of scalding
Place a suitable cup beneath the tap
Push or pull the lever on the tap until
the required amount of product has
been poured into the cup (Fig 6)
Release the tap lever so that the
product stops pouring.

Telephone Helpline: 0845 146 2887 (United Kingdom)
If the product to be dispensed is
especially thick pull the tap Rod out to
the maximum position (Fig 7)
Any clogging in the dispensing line may
be removed by sliding the tap rod back
and forth (Fig 7)
Warning: never touch the bowl or lid while the machine is operating, since they are very hot;
always use the handle when moving the bowl lid
Cleaning and Maintenance
Emptying the bowl
Before cleaning out the bowl, it is first necessary
to empty out any product inside it.
With the machine switched on, empty
out all of the product still inside the
bowl, using the lever on the tap.
Warning: the product dispensed from the machine has a very high temperature; risk of scalding.
UK
Removing and cleaning the bowl
Warning: before removing the bowl, make sure that the main switch is off, the unit is unplugged
from the mains and that the bowl is empty and sufficiently cooled down
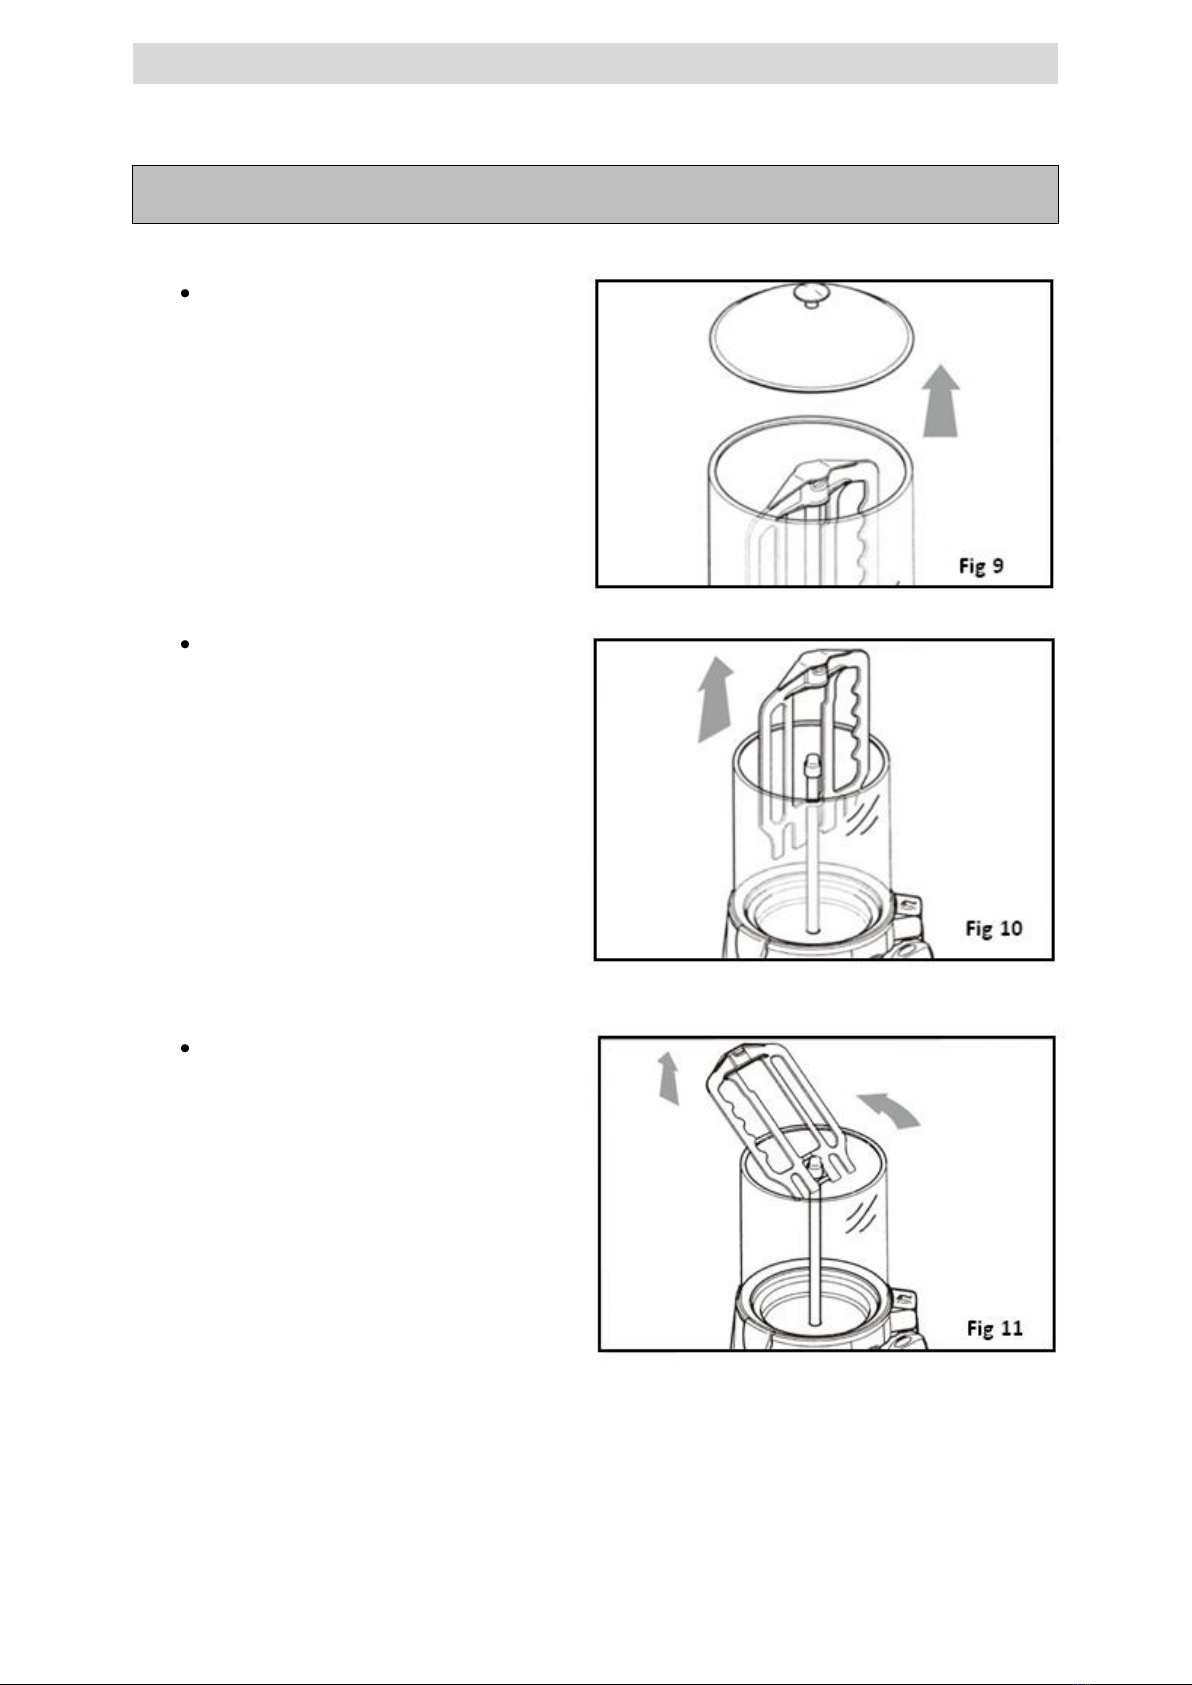
Remove the lid (Fig 9)
Slide the mixing paddle upwards to
remove it, keeping it in line with the
central rod until the bottom slot of the
mixing paddle is level with the rotation
pin (Fig 10).
Tilt the mixing paddle and slide it
upwards, as illustrated in Fig 11, to
remove it completely

Telephone Helpline: 0845 146 2887 (United Kingdom)
Unlock the bowl clips as illustrated in
Fig 12, to free the bowl from the
machine body;
Release the bowl from the machine
body, using two fingers to prise it away
from the fixed steel part of the mixer
rod (A) and the others to grip the outlet
edge of the bowl(B) (Fig 13)
Gradually pull the bowl harder until it
comes away from its seating;
Slide the bowl upwards using both hands
(Fig 14)
Slide the mixing rod upwards with one
hand, taking care to grip it by the
rotation pin (Fig 15)

UK
Place the bowl on a flat surface and using
both hands, remove the gasket by sliding
it upwards in the direction shown by the
arrow (Fig 16)
Wash the disassembled bowl and components with a sanitising detergent solution, rinsing
thoroughly with clean hot water.
Before reassembling the bowl ensure the gasket seal is positioned correctly
Moisten the gasket seal with water and fit the bowl back into place.
DO NOT USE LUBRICANT.
Warning: make sure that the bowl is correctly fitted to the machine; an incorrectly fitted bowl will
cause the product to leak out with risk of scalding!
Reassemble the bowl, rod and mixing paddle by reversing the disassembly instructions

Telephone Helpline: 0845 146 2887 (United Kingdom)
Removing the tap
Ensure the bowl is empty
Move the tap rod to the maximum
dispensing position (Fig 17)
Press the button(A) securing the tap to
the machine and then remove the tap
with both hands (Fig 18)
Cleaning the Water Pan
With bowl and tap removed clean the
surface of the pan using a damp cloth
and/or a non-abrasive sponge (Fig 19)

UK
Clean the channel connecting the bowl and
the tap, using a cleaning brush (included)
(fig 20)
Refit the tap;
Pour a little water inside the pan;
Use the tap to drain out all water from the
pan so as to eliminate any small product
residues inside the dispensing channel.
Disassembling and cleaning the tap
To clean the inside of the tap, disassemble it as
follows:
Remove the tap (See removing the tap)
Place the tap on a clean, flat surface
Loosen and remove the screw (A)
Slide out the pin (B) and spring(C) from the
seating.
Autres manuels pour GF539
1
Table des matières
Langues :
Autres manuels Buffalo Distributeur


