BT SG300 Manuel utilisateur

SG300 BT
Wireless HandHeld CCD
Scanner
Quick Guide


Table of contents
1. Introduction ...........................................1
1.1 Illustration ......................................1
2. Quick Start .............................................2
2.1 Standard Shipment Package .......2
2.2 Start Up ..........................................2
2.3 User’s Manual ................................3
3. Installation ..........................................4
3.1 Environment Requirement ...........4
3.2 Cradle Installation to the Host
Device......................................................4
3.3 Cable installation ..........................8
3.4 Skip resistant pad position ..........8
4. Program Sequence ...............................9
4.1 Programming flow chart..................9
4.2 Factory Default Settings..................9
4.3 General Process......................... 10
4.4 Set All Default ............................. 10
4.5 Interface ...................................... 11
5. RS232 Parameters ............................. 12
5.1 Baudrate......................................... 12
5.2 Parity .............................................. 12
5.3 Data bits ......................................... 13
5.4 Stop bits......................................... 13
6. Postambles .......................................... 13
6.1 Postamble ...................................... 13
7. Bluetooth Setup .................................. 14
7.1 Scanner Mode ............................... 14
7.2 Memory Mode ................................ 14
7.3 Sleep Mode .................................... 15
8. Symbologies........................................ 16
8.1 Enable All Symbologies ............... 16
8.2 Enable / Disable Symbologies..... 16

1
1. Introduction
Thank you for purchasing this hand held long-range
barcode scanner. This BT wireless hand-held long-
range CCD scanner features a freedom of scanning
without the limitation of cable. Thanks to the user-
friendly two-way communication, the operator will be
alarmed if the scanned result was not reached the
receiving cradle. This scanner can be operated at 10
Meters range in open space and it can be upgraded
to 100 Meters range for optional. The receiving
cradle includes BT receiver and batteries charger.
The charger cradle and scanner charger jack have
been reserved for special request.
1.1 Illustration

2
2. Quick Start
2.1 Standard Shipment Package
The standard shipment package is provided with the
following items.
- SG300BT Handheld Bar code Scanner
-Cradle or Charger
-Power Adaptor (if applied)
-Communication Cable
-Skip resistant pad
-Iron panel of cradle and screw
-Quick Start Guide
Visually inspect the device and accessories for any
evidence of physical damage. If anything is missing
or appears to be damaged, immediately contact your
dealer.
2.2 Start Up
Connect the communication cable provided to your
POS or Host system and cradle. Power on the
cradle with the provided power supply and scan the
Bluetooth MAC address code located on the bottom
of cradle.
After approximately five seconds your connection is
operational and the blue LED on the cradle is on.,
The scanner with Bluetooth must be charged for a
minimum of 4.5 hours before it can be used. If the
battery is full, the red light will be off.

3
2.3 User’s Manual
If you need the further information or more advanced
setup options you can contact with your dealer or
download the User’s Manual on the service website.

4
3. Installation
This device is very user friendly to be connected
to your POS or Host system trough a RS232,
Keyboard or USB cable.
To read barcode, you simply press the trigger
button and aim the beam to the barcode. You
will hear one beep and the green LED indicator
will light on after scan successfully.
The configuration is very easy also you can
setup the device by scanning all necessary
programming codes from programming menu at
a time to change the settings permanently. And
all settings can be disabled after scan reset to
factory default.
3.1 Environment Requirement
Operation System: Win 98 / 2000 / XP / Vista
Hardware Interface: RS232, KBW, USB II
Power Supply: 5V DC
3.2 Cradle Installation to the Host
Device
Once you have unpacked all components, you
can start installing the device into different steps.

5
RS232 Interface
A. Turn off the host device.
B. Connect the 10-pin RJ45 male connector
into the 10-pin modular jack on the
bottom of the cradle.
C. Connect the 9-pin D-type Female
connector of the RS232 cable to the
proper COM port of the host device.
D. Plug the external power supply into the
power jack on the bottom of the cradle.
E. Plug the power supply into the AC outlet.
The red LED on the rear of the cradle will
stay on.
F. Turn on the host device

6
3.2.1 Keyboard Wedge Interface
A. Turn off the host device.
B. Connect the 10-pin RJ45 male connector
into the 10-pin modular jack on the
bottom of the cradle.
C. Disconnect the keyboard from host.
D. Connect the “Y” ends of the
communication cable to the keyboard and
keyboard port on the host device. If
necessary, use the male/female adapter
cable supplied with the scanner for the
proper connections.
E. Plug the external power supply into the
power jack on the bottom of the cradle.
F. Plug the power supply into the AC outlet.
The red LED on the rear of the cradle will
stay on.
G. Turn on the host device.
H. Establish communication between the
scanner and cradle.
7
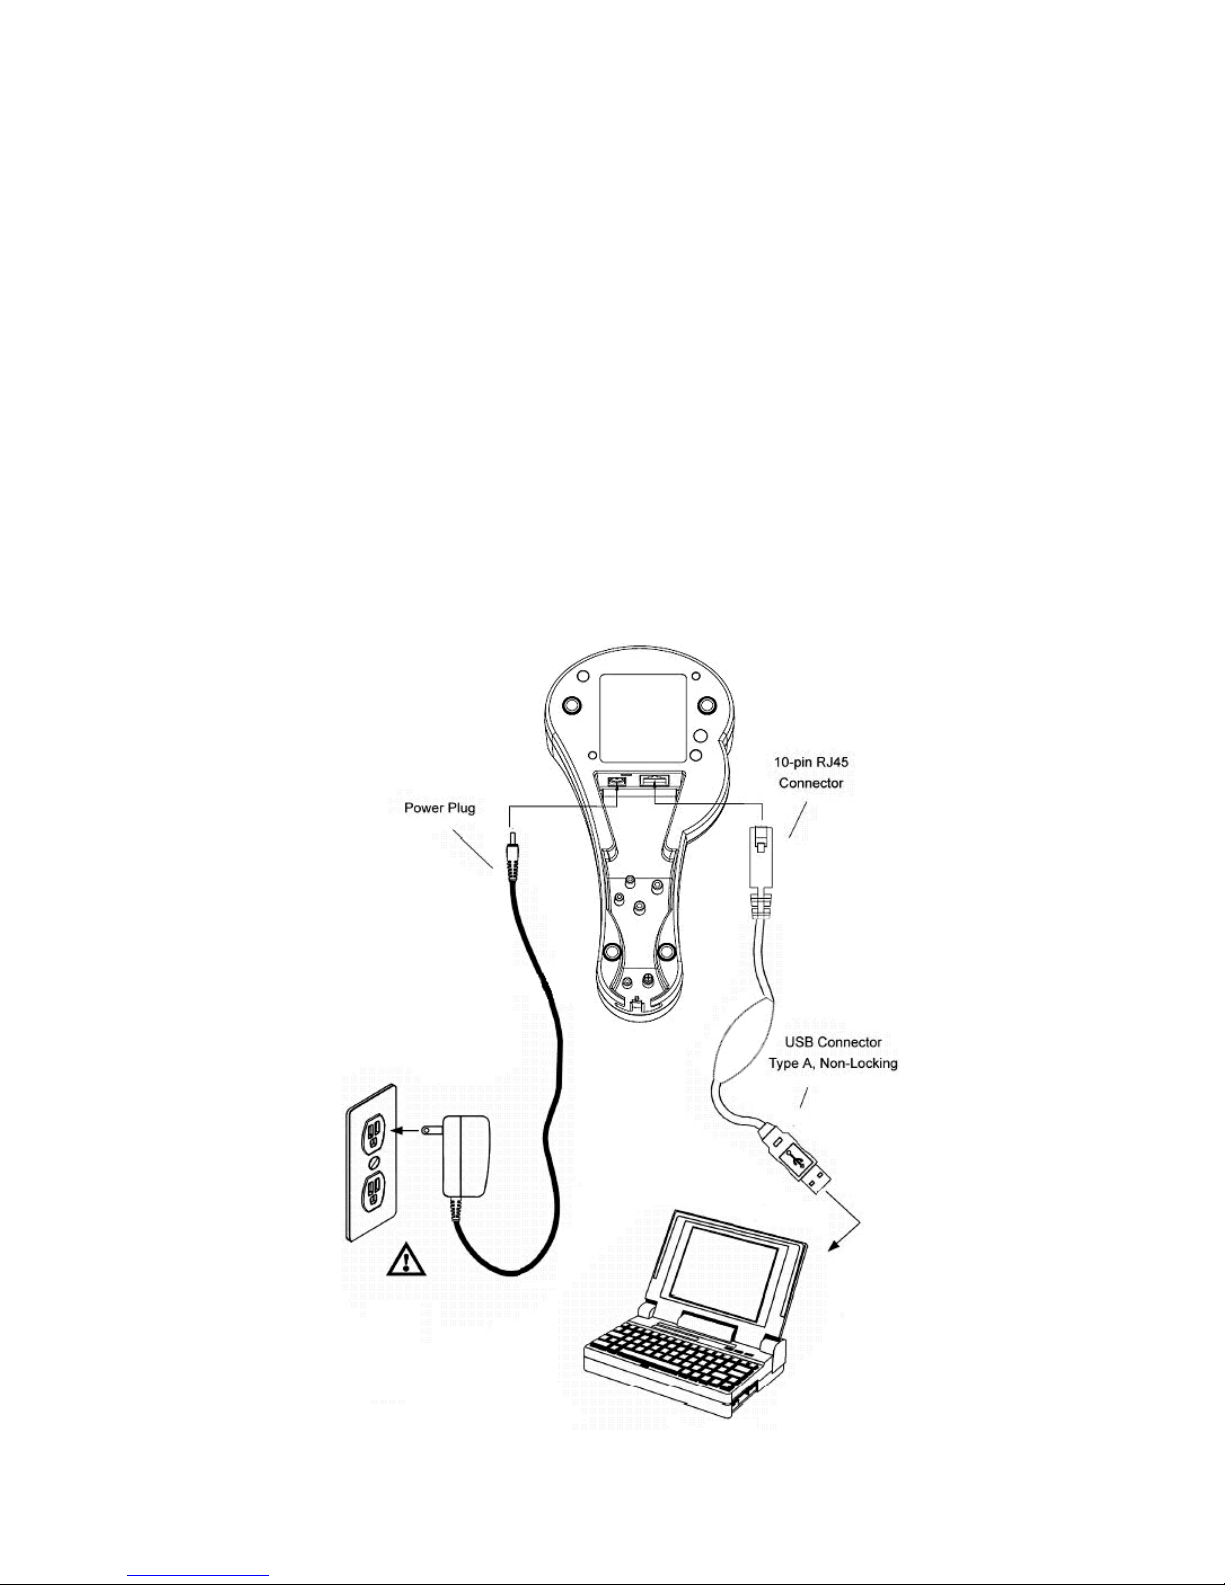
3.2.2 USB Interface
A. Turn off the host device.
B. Connect the 10-pin RJ45 male connector
into the 10-pin modular jack on the bottom of
the charger cradle.
C. Connect the USB A type connector to the
USB port on the host device.
D. Plug the power supply into the power jack on
the bottom of the cradle.
E. Plug the power supply into the AC outlet.
The red LED on the rear of the cradle will
stay on.
F. Turn on the host device.
G. Establish communication between the
scanner and cradle.
Table des matières
Manuels Lecteur de codes-barres populaires d'autres marques

POSMicro
POSMicro Datalogic PowerScan D7100 Manuel utilisateur

Marson
Marson MT780 Guide de configuration rapide

NCR
NCR RealPOS Manuel utilisateur

Motorola
Motorola SE3300 Guide de configuration rapide

Element
Element P130BT Manuel utilisateur

Motorola
Motorola Symbol LS3008 Manuel d'installation et d'exploitation


