Brookstone Kitchen Vac Manuel utilisateur

Your future
looks clean.
Very clean.
778137_INS_Tabletop Vacuum
Size:5”Wx4.75”H_Output:100%_Prints:1/1,Blk
Kitchen Vac
QUICK WET & DRY CORDLESS CLEANUP
Merrimack, New Hampshire USA 03054 • 800-846-3000 • Brookstone.com

1
Table of conTenTs
Warnings and Cautions......................................................2
Location of Parts and Controls...............................................5
Set Up .....................................................................6
Charging ...................................................................6
Vacuuming ................................................................. 7
Vacuuming Wet Spills .......................................................8
Care and Maintenance . . . . . . . . . . . . . . . . . . . . . . . . . . . . . . . . . . . . . . . . . . . . . . . . . . . . . . 9
Specifications..............................................................11
Warranty ..................................................................13

2
caUTIon
• TO REDUCE THE RISK OF ELECTRIC SHOCK, DO NOT REMOVE COVER.
THERE ARE NO SERVICEABLE PARTS INSIDE.
• TO REDUCE THE RISK OF FIRE OR ELECTRIC SHOCK, DO NOT EXPOSE
THIS UNIT TO RAIN OR MOISTURE.
The lightning flash with arrow-head symbol within an equilateral triangle
is intended to alert the user to the presence of uninsulated “dangerous
voltage” within the unit’s enclosure that may be of sufficient magnitude
to constitute a risk of electric shock.
The exclamation point within an equilateral triangle is intended to alert
the user to the presence of important operating and maintenance
(servicing) instructions in the literature accompanying the unit.
IMPoRTanT safeTY InsTRUcTIons
All of the safety and operating instructions should be read, adhered to and followed
before the unit is operated.
save These InsTRUcTIons
778137_INS_Tabletop Vacuum
Size:5”Wx4.75”H_Output:100%_Prints:1/1,Blk

3
DanGeR
To reduce the risk of electric shock, burns, fire or injury:
1. Do not use while bathing or in a shower.
2. Do not place or store unit where it can fall or be pulled into a tub or sink.
3. Do not place in, drop or submerge in water or other liquid.
4. Do not reach for unit that has fallen into water. Unplug it immediately.
5. Care should be taken so that objects do not fall and liquids are not
spilled onto the unit.
WaRnInG
1. Close supervision is necessary when this appliance/product is used by or near
children or mentally disabled individuals.
2. Use this unit only for its intended use as described in this manual.
3. Unplug this unit during lightning storms or when unused for long
periods of time.
4. Never drop or insert an object into any opening.
5. Protect the power cord from being walked on or pinched, particularly at plug
outlets, convenience receptacles and the point where it exits the unit.
6. Do not allow cord to touch hot surfaces. Wrap cord loosely around the unit
when storing.

4
7. The unit should be situated away from direct sunlight or heat sources such
as radiators, electric heaters, heat registers, stoves, or other units (including
amplifiers) that produce heat. Avoid placing on top of stereo equipment that
radiates heat.
8. Never block the air openings of the unit with materials such as clothing,
plastic bags or papers, or place it on a soft surface such as a bed or couch,
where the air openings may be blocked.
9. Do not overload electrical outlet. Use only the power source as indicated.
10. Do not carry this unit by cord or use cord as handle.
11. Never operate this unit if it has a damaged cord or plug, if it is not working
properly, or if it has been dropped or damaged, or dropped into water. If the
unit’s power supply cord or plug is damaged, do not attempt to fix it yourself.
12. To avoid the risk of electric shock, do not disassemble or attempt to repair
the unit. Incorrect repair can cause risk of electric shock or injury to persons
when unit is used.
13. Do not operate in the presence of explosive and/or flammable fumes.
14. Never remove the plug from the socket by pulling the power cord.
778137_INS_Tabletop Vacuum
Size:5”Wx4.75”H_Output:100%_Prints:1/1,Blk

5
locaTIon of PaRTs anD conTRols
1. Release Button
2. On/Off Switch
3. Charge Bracket
4. Nozzle/Reservoir
5. Liquid Separator
6. Charging LED
7. Body
8. Filter
9. Filter Cup
10. Cyclonic Nozzle
11. Adapter
10
9
8
7
6
5
11
42
3
1

6
seT UP
Plug the ADAPTER into the charging bracket
(see at right) and turn the ADAPTER’S plug
90º counter-clockwise to lock it in position.
chaRGInG
Plug the Tabletop Vacuum into the CHARGING BRACKET to charge. When the
Vacuum is seated in the CHARGING BRACKET correctly, the CHARGING LED on
the Vacuum will illuminate. Charge the Vacuum for 14-16 hours prior to initial use.
You may store the Vacuum in the CHARGING BRACKET. This will not affect the
battery memory or life of the product.
Touch Plug in
Power LED
778137_INS_Tabletop Vacuum
Size:5”Wx4.75”H_Output:100%_Prints:1/1,Blk

vacUUMInG
1. Remove the Vacuum from the CHARGING BRACKET.
2. Press the ON/OFF SWITCH to turn on the Vacuum.
3. The Vacuum can be used to clean up dust, dirt and small liquid spills. It’s ideal
for the kitchen area.
Note: The Vacuum may become warm during use. This is normal.
7
8
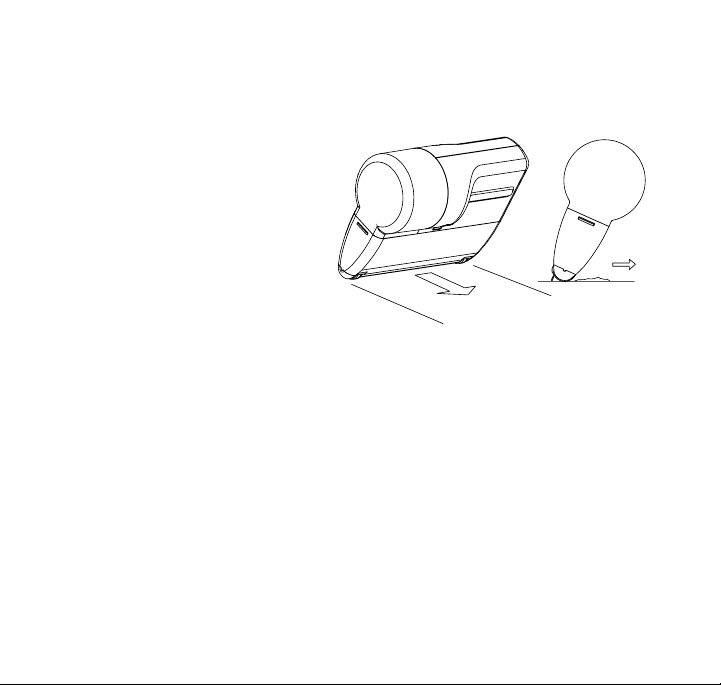
vacUUMInG WeT sPIlls
Before attempting to vacuum wet
spills, make sure the LIQUID SEPARATOR
is correctly installed.
Turn the Vacuum on, place it
on the surface where the spill is
located, and draw it towards you
while pulling the squeegee over
the spill. See the illustration
at right.
Important: Do not over-fill the Nozzle/Reservoir with dry or liquid waste.
If the contents overflow onto the FILTER, immediately turn off the Vacuum
and empty.
778137_INS_Tabletop Vacuum
Size:5”Wx4.75”H_Output:100%_Prints:1/1,Blk

9
caRe anD MaInTenance
CLEANING THE VACUUM
1. Check that the Vacuum Cleaner is switched off.
2. Hold the Vacuum Cleaner with the NOZZLE/RESERVOIR pointing downwards.
3. Press the release button to release the NOZZLE/RESERVOIR as well as the
LIQUID SEPARATOR.
4. Rotate the CYCLONIC NOZZLE to remove and take out the FILTER and
FILTER CUP.
5. Empty all containers, tapping lightly to remove all debris.
6. If necessary, hand-wash the FILTER CUP and FILTER in lukewarm soapy
water, rinsing them thoroughly afterwards, and making sure that they are
completely dry before reinserting them in the correct position.
8. A damaged or very dirty FILTER should be replaced. Please call the Brookstone
Customer Care Center at 800-846-3000 to order a replacement filter.
Note: NOT dishwasher safe. Do not place any parts in a dishwasher.
Ce manuel convient aux modèles suivants
1
Table des matières
Autres manuels Brookstone Aspirateur


