Brookstone Smart Strip Manuel utilisateur
689604_INS_Smart Strip Surge Protector
Size:5”Wx4.75”H_Output:100%_Prints:1/1,Blk
Smart Strip®
AUTOMATIC POWER CONTROLLER

1
TABLE OF CONTENTS
Cautions and Warnings ....................................................2
Location of Parts and Controls .............................................5
The Smart Strip® Story.....................................................6
Feature Facts.............................................................6
Using the Smart Strip®.....................................................8
Adjusting the Sensitivity....................................................9
Smart Strip® Specifications................................................10
Troubleshooting ..........................................................11
Connected Equipment Limited Warranty. . . . . . . . . . . . . . . . . . . . . . . . . . . . . . . . . . . .12
Warranty.................................................................13

2
CAUTION
• TO REDUCE THE RISK OF ELECTRIC SHOCK, DO NOT REMOVE COVER.
THERE ARE NO SERVICEABLE PARTS INSIDE.
• TO REDUCE THE RISK OF FIRE OR ELECTRIC SHOCK, DO NOT EXPOSE
THIS UNIT TO RAIN OR MOISTURE.
The lightning flash with arrow-head symbol within an equilateral triangle
is intended to alert the user to the presence of uninsulated “dangerous
voltage” within the unit’s enclosure that may be of sufficient magnitude
to constitute a risk of electric shock.
The exclamation point within an equilateral triangle is intended to alert
the user to the presence of important operating and maintenance
(servicing) instructions in the literature accompanying the unit.
IMPORTANT SAFETY INSTRUCTIONS
All of the safety and operating instructions should be read, adhered to and followed
before the unit is operated.
SAVE THESE INSTRUCTIONS!
689604_INS_Smart Strip Surge Protector
Size:5”Wx4.75”H_Output:100%_Prints:1/1,Blk

DANGER
To reduce the risk of electric shock, burns, fire or injury:
1. Do not use while bathing or in a shower.
2. Do not place or store the unit where it can fall or be pulled into a tub or sink.
3. Do not place in, drop or submerge in water or other liquid.
4. Do not reach for a unit that has fallen into water. Unplug it immediately.
5. Care should be taken so that objects do not fall and liquids are not
spilled onto the unit.
WARNING
1. Do not use this unit with an extension cord or another relocatable power source.
2. Close supervision is necessary when this product is used by or near children
or mentally disabled individuals.
3. Use this unit only for its intended use as described in this manual.
4. Never drop or insert an object into any opening other than a plug in an outlet.
5. Protect the power cord from being walked on or pinched, particularly at plug
outlets and the point where it exits the unit.
6. Do not allow the cord to touch hot surfaces. Wrap the cord loosely around
the unit when storing.
7. The unit should be situated away from direct sunlight or heat sources such
as radiators, electric heaters, heat registers, stoves, or other units (including
amplifiers) that produce heat. Avoid placing on top of stereo equipment that
radiates heat.
3

8. Never place this unit on a soft surface such as a bed or couch.
9. Do not overload electrical outlets. Use only as indicated.
10. Do not carry this unit by its cord or use its cord as a handle.
11. Never operate this unit if it has a damaged cord or plug, if it is not working
properly, or if it has been dropped or damaged, or dropped into water.
If the unit’s power supply cord or plug is damaged, do not attempt to
fix it yourself.
12. To avoid the risk of electric shock, do not disassemble or attempt to repair
the unit. Incorrect repair can cause risk of electric shock or injury to persons
when the unit is used.
13. Do not operate in the presence of explosive and/or flammable fumes.
14. Never remove any plug from outlets by pulling its power cord.
689604_INS_Smart Strip Surge Protector
Size:5”Wx4.75”H_Output:100%_Prints:1/1,Blk
4

5
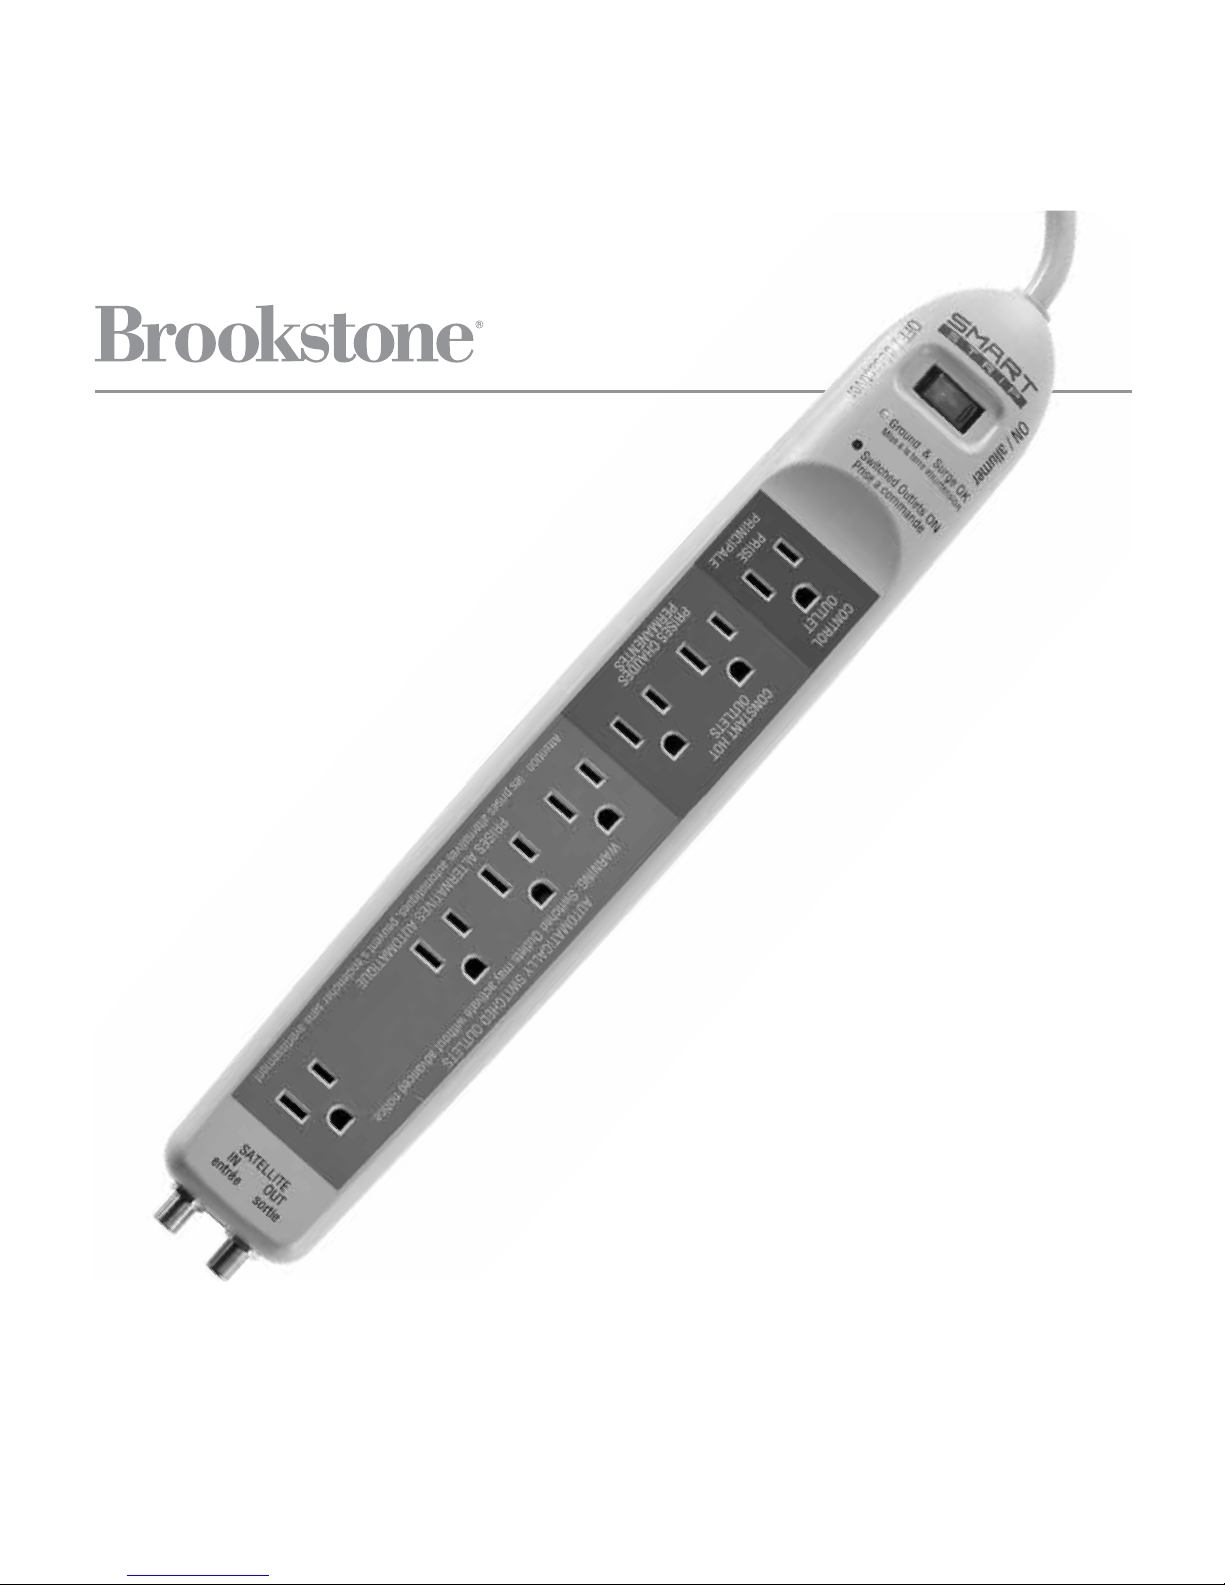
LOCATION OF PARTS AND CONTROLS
1. Power Switch (large red LED)
2. Ground and Surge Indicator
(small green LED)
3. Switched Outlets Indicator
(small red LED)
4. 1 Control Outlet (blue)
5. 2 Constant Hot Outlets (red)
6. 4 Automatically Switched
Outlets (green)
7. Coaxial Connectors
(1 in/1 out)
8. Sensitivity Adjustment Knob
9. 45° Grounded Outlet
Plug (not shown)
654321 7
8

THE SMART STRIP® STORY
In today’s world, most electronics you power off are still in “stand-by” mode,
drawing power—some drawing much more power than others.
Smart Strip® helps you save electricity by disconnecting select devices from
the power source completely—automatically, without you having to literally
unplug every one.
Simply power off the device plugged into the Control Outlet, and the items you
have plugged into the Automatically Switched Outlets will turn off—completely!
Below is a link that will help you calculate your estimated savings you will earn
by using the Smart Strip®. Just type the link in the address bar of your browser
and follow the on-line instructions.
http://www.bitsltd.net/Idle%20Current%20Calculator.html
FEATURE FACTS
POWER SWITCH: Smart Strip’s lighted switch is also a 15-amp circuit breaker.
It will illuminate when switched on. If it’s not on, turn it on, reset it, or try a
different outlet.
SWITCHED OUTLETS INDICATOR: When this LED is illuminated, it indicates
the AUTOMATICALLY SWITCHED OUTLETS are live.
GROUND AND SURGE INDICATOR: When this LED is illuminated, you know
your equipment is protected.
689604_INS_Smart Strip Surge Protector
Size:5”Wx4.75”H_Output:100%_Prints:1/1,Blk
6

7
CONTROL OUTLET (BLUE): You plug your main component, like your TV or CPU,
into this outlet. This outlet controls the AUTOMATICALLY SWITCHED OUTLETS.
So if the device plugged in the CONTROL OUTLET is on, the AUTOMATICALLY
SWITCHED OUTLETS are live. If it is off, the AUTOMATICALLY SWITCHED
OUTLETS are not live.
CONSTANT HOT OUTLETS (RED): Plug the items you do not want to shut off
completely into these outlets, like your DVR, fax or cable modem, or items that lose
their memory settings when unplugged. These items will only turn off when the
POWER SWITCH on the Smart Strip® itself is turned off.
AUTOMATICALLY SWITCHED OUTLETS (GREEN): Plug the items you wish to
disconnect from the power source completely in these 4 outlets. When you power
off the main device plugged into the CONTROL OUTLET, the devices connected
to these outlets will be disconnected from the electricity completely.

689604_INS_Smart Strip Surge Protector
Size:5”Wx4.75”H_Output:100%_Prints:1/1,Blk
8
USING THE SMART STRIP®
1. Plug your control item into the CONTROL OUTLET.
2. Plug up to two items you do not want to disconnect from the power source
into the CONSTANT HOT OUTLETS.
3. Plug up to four items you want to disconnect from the power source when you
turn off the control item into the AUTOMATICALLY SWITCHED OUTLETS.
4. Connect your cable/satellite coaxial cable to the IN jack, and use the included
cable to then connect the Smart Strip® to your equipment. This protects from
surge only.
Examples of device/plug location:
TV/Entertainment Area: TV in CONTROL outlet > DVR and a lamp in the
CONSTANT HOT outlets > VCR, DVD Player, Subwoofer and Receiver in the
AUTOMATICALLY SWITCHED outlets.
Home Office: Computer Tower/CPU in CONTROL outlet > Fax and Modem
in the CONSTANT HOT outlets > Monitor, Printer, Scanner and Copier in the
AUTOMATICALLY SWITCHED outlets.

9
ADJUSTING THE SENSITIVITY
If the SWITCHED OUTLET INDICATOR never turns on:
1. Turn on the device that is plugged into the CONTROL OUTLET.
2. Turn the SENSITIVITY ADJUSTMENT KNOB clockwise a small amount with
your fingernail or a small screwdriver and wait 2 seconds. Repeat this process
until the SWITCHED OUTLET INDICATOR illuminates and the devices plugged
into the AUTOMATICALLY SWITCHED OUTLETS turn on.
3. Turn off the device plugged into the CONTROL OUTLET. The SWITCHED
OUTLET INDICATOR and devices should turn off.
If the SWITCHED OUTLET INDICATOR never turns off:
1. Turn off the device that is plugged into the CONTROL OUTLET.
2. Turn the SENSITIVITY ADJUSTMENT KNOB counterclockwise a small amount
with your fingernail or a small screwdriver and wait 2 seconds. Repeat this
process until the SWITCHED OUTLET INDICATOR, and the devices plugged
into the AUTOMATICALLY SWITCHED OUTLET, turn off.
Important! Some devices may take a few minutes to revert to sleep mode.
3. Turn on the device plugged into the CONTROL OUTLET. The SWITCHED
OUTLET INDICATOR and devices should turn on.
Note: If you need to repeat the process to set the sensitivity, keep in mind
that the SENSITIVITY ADJUSTMENT KNOB only makes one revolution.
Do not force more than one full turn in either direction.
Table des matières


