BonsenKitchen VS3000 Manuel utilisateur

Vacuum Sealer
Model:VS3000
Operation Manual
www.bonsenkitchen.com

1
Introduction
Congratulations on the purchase of this modern and high-quality product. This instruction
manual contains important information on safety, usage and disposal. Before using the
product, familiarize yourself with all handling and safety guidelines. This device may only
be used as described and for the purposes indicated. Please also pass these operating
instructions on to any future owner(s).
Safety Instructions
Always abide by the following safety rules and instructions when using electrical
appliances and read these instructions carefully before using the vacuum sealer.
Read all instructions.
Do not touch hot surfaces. Use handles or knobs.
To protect against electric shock do not immerse the cord or main unit in water or
other liquid.
Close supervision is necessary when any appliance is used by or near children.
Unplug from outlet when not in use and before cleaning.
Do not operate the device with a damaged cable or plug or after a malfunction of the
device or after damage. Contact customer service for inspection, repair or adjustment.
Do not use outdoors.
Do not let the cable hang over the edge of the table or counter and do not touch hot
surfaces.
Do not place on or neara hot gas or electric burner, or in a heated oven.
Do not open the appliance cover during operations.
Always ensure the upper/bottom cover in correct location during operations.
This product is only authorized for domestic use and not for commercial or industrial
purposes. It is only intended for applications described in these instructions.
This vacuum sealer may be used by children aged 8 years old and over if they are
supervised by an adult and have been told how to use the appliance safely and are
aware of potential risks.
Cleaning and maintenance may not be carried out by children unless they are 8 years
old or older and are supervised.
Children must not play with the vacuum sealer.
WARNING: Do not immerse the vacuum sealer in water or other liquids when cleaning it. If

2
SAVE THESE INSTRUCTONS
OPERATING INSTRUCTIONS
If the SUPPLY CORD is damaged, it must be replaced by the manufacturer, its service
agent or similarly qualified person in order to avoid a hazard.
A short power-supply cord is to be provided to reduce the risk resulting from becoming
entangled in or tripping over a longer cord.
If an extension cord is used,
1) The marked electrical rating of the extension cord should be at least as great as the
electrical rating of the appliance;
2) If the appliance is of the grounded type, the extension cord should be a
grounding-type 2-wire cord;
3 ) The longer cable should be arranged so that it does not hang over the counter top
or table top where it can be pulled by children or where it can be accidentally tripped
over.
Longer extension cords are available and may be used if care is exercised in their use.
the supplied power cord is damaged, it should be replaced by a qualified technician in order
to avoid a hazard.

3
Returning the packaging to the materials cycle conserves raw materials and reduces
the amount of waste that is generated. Dispose of packaging materials that are no
longer needed in accordance with applicable local regulations.
NOTE:
If possible, keep the original packaging during the warranty period so that the device
can be properly packed for returning in the event of a warranty claim.
Scope of Delivery
The appliance is supplied withthe following components as standard:
1 x Vacuum Sealer
10 x Vacuum Bags (7.9 x 11.8 inches)
Check the package for completeness and for signs of visible damage.
If the consignment is incomplete or damaged due to defective packaging or carriage,
please contact us.
Installation Requirements
For safe and trouble-free operation of the device, the set-up location must fulfill the
following requirements:
When setting it up, place the appliance on a firm, flat and horizontal surface.
Do not place the device in a hot, wet or extremely damp environment or in the vicinity
of flammable materials.
The mains power socket must be easily accessible, so that the power cable can be
easily disconnected in the event of an emergency.
Electrical Connection
Before connecting the device, compare the connection data (voltage and frequency) on
the type plate with those of your power supply. This data must match to prevent
damage to the device.
Make sure that the power cord is undamaged and does not run over hot surfaces
and/or sharp edges.
Make sure that the power cord is not taut or bent.
Do not let the power cable hang over edges (trip wire effect).
Insert the plug into the mains power socket.
Sealing Vacuum Bags
The bag width may not exceed 11.8 inches. Otherwise it cannot be welded correctly.
Use only nylon-PE films with a structure (points or grooves) on oneside and a thickness
of approximately 0.006 - 0.012 inch. Otherwise the weld seam will not be tight and the
appliance may be damaged. You can recognize bags of this type from the information
on the package. The quality of the weld seam will vary depending on the type and
thickness of the bag.
Open the device cover by pressing the cover release and fold the cover upwards.Place
the open end of the bag in the machine so that the opening of the bag lies centrally
under the lower sealing ring. The bag should not be inserted further than the rear
ring and must lie between the front and sealing rear sealing ring. If the bag lies over
one or both of the sealing rings, the bag cannot be properly sealed.
ease of disposal,and are there fore recyclable.
2 x Vacuum Tubes

4
The bag opening must lie flat on the welding wire. Otherwise, welding will not work
properly. Close the cover of the device. The seal presses the bag onto the sealing wire to
create a smooth seam. Make sure that both corners of the lid are closed. If necessary,
press the top cover again so that the lid clicks in audibly and firmly. Select the mode
(dry or wet). When the selection is , the indicator lights up. WhenMoist isDry Dry
selected, the indicator will light up.Moist
1.Buttons:
1) Dry 2) Moist 3) External Vac 4) Seal/Stop 5)Vac
13) External interface switch/ Suction switch
2.Indicate Light:
14) Dry Indicator 15) Moist Indicator 16) External Vac Indicator
17) Seal Indicator 18) Vac Indicator
3.Other Parts:
6) Open Button 7) Vac Cotton 8) Vac Chamber
9) Heating Seal 10) Sealing Rubber Strip 11) Snap Joint
12) External Interface /Suction Interface
Make sure that the weld is properly closed. A correct weld should be a smooth, straight
strip without wrinkles.
Wait 15 seconds before sealing the next bag to allow the appliance to cool down.
Fill the bag in such a way that no food residues or liquids can escape and enter the
machine during sealing.
Parts
Dry Moist Seal
Stop Vac
14 15 17 18
4
123
6
7
8
912
10
11
External
Vac
16
13
5

5
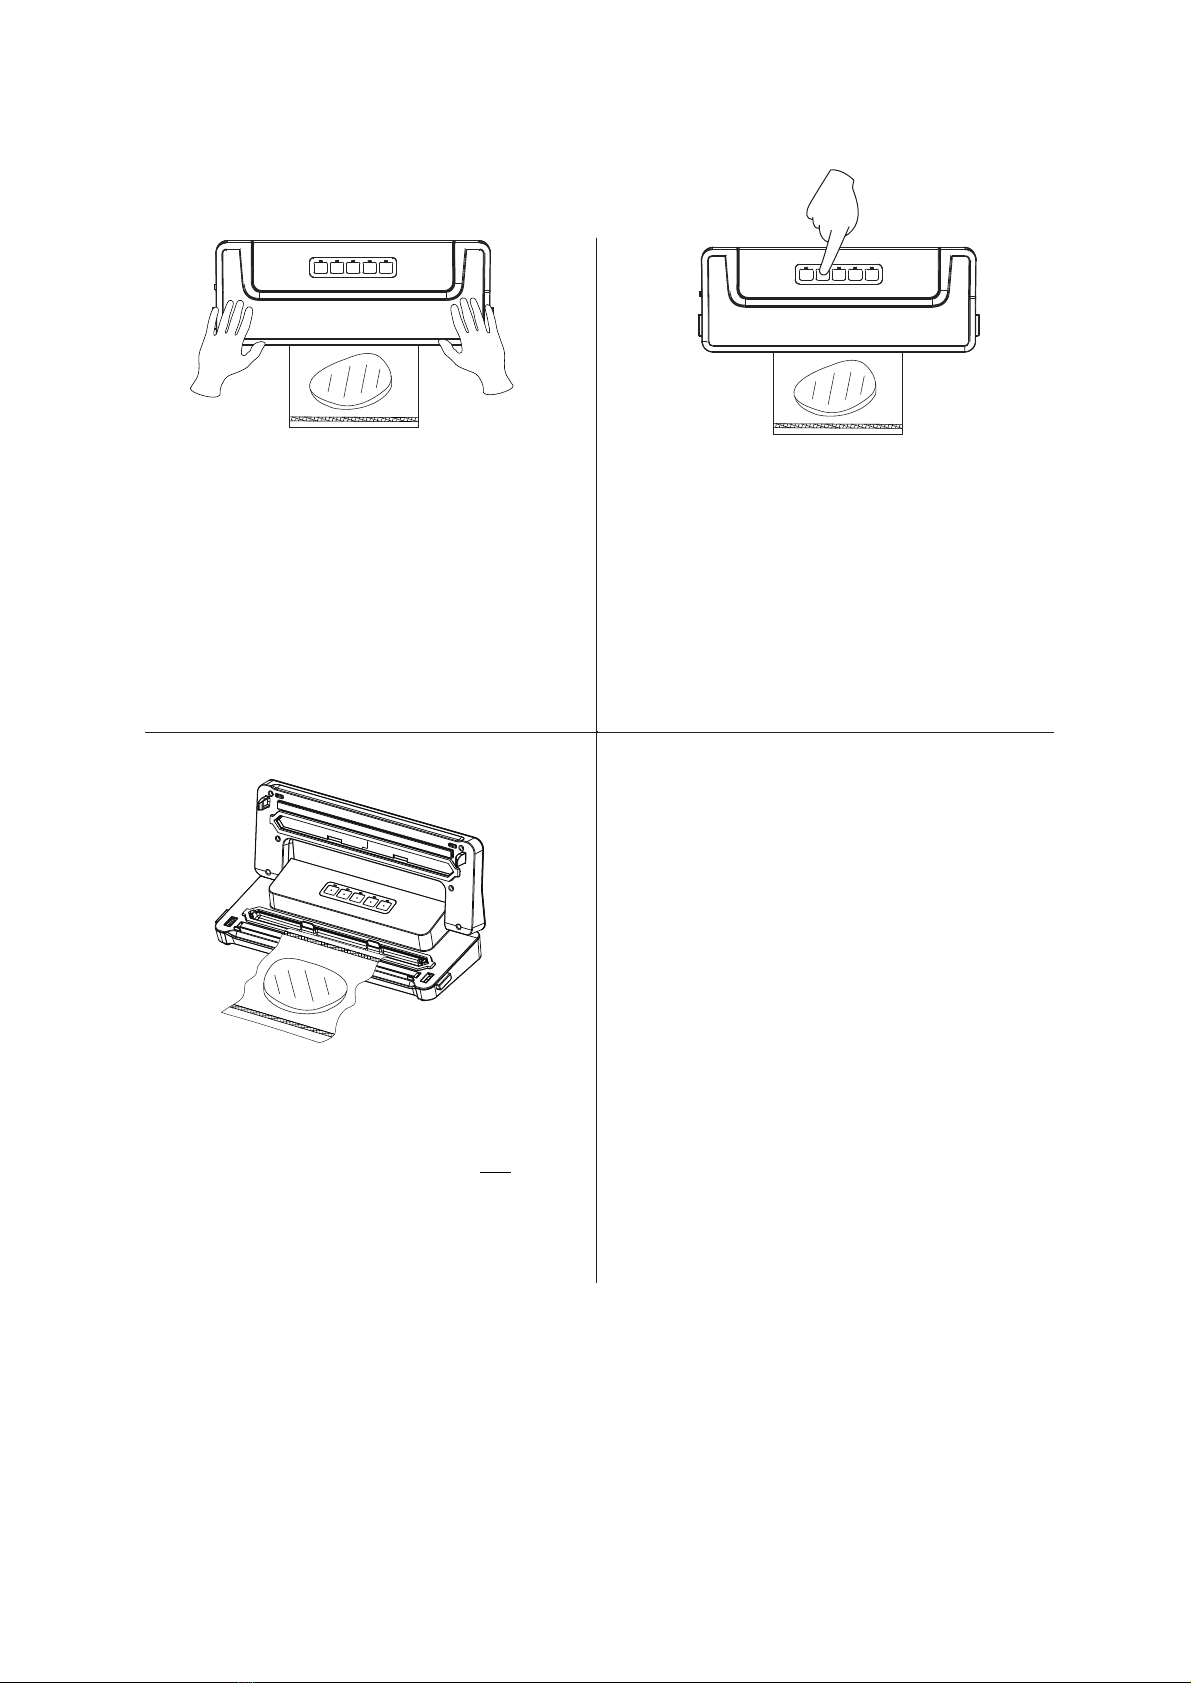
1.How to use “DRY”vacuum mode :
Place item(s) in bag, allowing at least
5cm (2 inches) of space between bag
contents and the open end of bag. More
space is required for larger item(s).
Press “ ” button, it will automatically Dry
vacuum the seal.
Push down both sides of the lid until
hear a big lock-up sound. (Pic.2)
(Pic.1)
(Pic.3)
(Pic.2)
(Pic.4)
① ②
③ ④
Operating the equipment
on both sides after “ ” and “ ” Dry
indicator lights turn off. Take out the
bag.
Seal
Stop
Open the lids by pressing the buttons
5CM
(2 Inches)
6
2.How to use “Moist”vacuum mode :
Open the lids by pressing the buttons
on both sides after “Vac” and “ ”
indicator lights turn off. Take out
the bag. (Pic.3)
Push down both sides of the lid until
hear a big lock-up sound. (Pic.1)
(Pic.3)
(Pic.1)
① ②
③
Press” Moist” button, it will
automatically vacuum the seal.(Pic.2)
(Pic.2)
Seal
Stop

7
3.How to use “VAC” vacuum mode:
Push down both sides of the lid until
hear a big lock-up sound.(Pic.1)
and then Press “ ”button,it
will automatically vacuum the seal.
(Pic.3)
Press “Vac” buttonit,it will vacuum the
seal as your desired.
Open the lids by pressing the buttons
on both sides after “ ”indicator
lights turn off. Take out the bag.
(Pic.4)
(Pic.1)
(Pic.3)
(Pic.2)
(Pic.4)
① ②
③ ④
Seal
Stop
Seal
Stop

8
4.How to seal only:
Push down both sides of the lid until
hear a big lock-up sound.
Open the lids by pressing the buttons
on both sides after indicator light turns
off, then take out the bag.
If you want to seal a bag without
vacuuming, press “ ”button, indicator
light turns on.(Pic.2)
(Pic.3)
① ②
③
Seal
Stop
(Pic.1) (Pic.2)

9
5.How to vacuum packaging jar:
Insert one end of Accessory Hose into
Accessory Port on appliance. Insert the
other end into port on the jar. (Pic.1
universal interface)
Press External interface switch on the
appliance, it starts to vacuum. When it
has no sound,it means job has been
finished. You also can stop it whenever
you want, just press “ ” button.
(Pic.2)
(Pic.1) (Pic.2)
① ②
Seal
Stop
i
r
V
a
A
l
v
e
e
v
l
a
A
V
r
i
6.How to vacuum zipper bags:
Insert one end of Accessory Hose into
Accessory Port on appliance. Insert the
other end into port on the zipper bag.
(Pic.1 universal interface)
Press External interface switch on the
appliance, it starts to vacuum. When it
has no sound, it means job has been
finished. You also can stop it whenever you
want, just press “ ” button. (Pic.2)
(Pic.1) (Pic.2)
① ②
Seal
Stop
If you want to vacuum wine core,you can use the same vacuum hose,same operation.
NOTE: Once you have sealed 5 bags continuously, allow the appliance to cool down for
about 1 minute. During this cool-down phase, you cannot start the appliance. After the
cool-down phase, you can use the appliance as normal.
Table des matières
Autres manuels BonsenKitchen Appareils de cuisine

BonsenKitchen
BonsenKitchen MF3902 Manuel utilisateur

BonsenKitchen
BonsenKitchen MF8001 Manuel utilisateur

BonsenKitchen
BonsenKitchen HB8901 Manuel utilisateur

BonsenKitchen
BonsenKitchen PM8901 Manuel utilisateur

BonsenKitchen
BonsenKitchen MF3901 Manuel utilisateur

BonsenKitchen
BonsenKitchen VS3911 Manuel utilisateur

BonsenKitchen
BonsenKitchen VS3802 Manuel utilisateur

BonsenKitchen
BonsenKitchen VS3004 Manuel utilisateur

BonsenKitchen
BonsenKitchen MF3902 Manuel utilisateur


