
BM PRO MiniBoostPRO Manuel utilisateur

SAFETY PRECAUTIONS
Please read the Safety Precautions before installing or using the MiniBoostPRO.
Be sure to observe all precautions without fail. Failure to observe these
instructions properly may result in personal damage, or personal injury which
depending on the circumstances may be serious and cause loss of life.
WARNING
Correct installation is the most critical factor in ensuring the safe use of the
MiniBoostPRO. If every consideration of these instructions has been satisfied, the
MiniBoostPRO will be safe to operate.
This product is not intended for use by persons (including children) with reduced physical,
sensory or mental capabilities, or lack of experience and knowledge, unless they have
been given supervision or instruction concerning the use of the appliance by a person
responsible for their safety.
Children shall not play with this product.
Metal conducts electricity. Take care not to drop or touch metal objects onto the battery
terminals, which if contacts the battery terminals, could cause short circuits and may lead
to serious personal injury. Take care to remove unwanted metal objects from the vicinity
of the battery and MiniBoostPRO. Remove any personal metal adornment such as chain,
watch or ring before handling the battery and MiniBoostPRO.
Only charge battery types which are supported by this charger (see “Compatible Battery
Types”).
Batteries are always electrically live and must be treated with extreme caution. They can
supply high, short circuit currents, even if they appear damaged or undamaged.
2
WARNING
Electricity and water do not mix. Keep this product and your battery dry and do not expose
it to water or water vapour. Do not operate this product or battery near any sort of liquid.
Do not operate this product with wet hands.
Do not use this product in environments that are excessively hot, cold, dusty or humid or
where it will be exposed to magnetic fields or long periods of sunshine. Such exposure
may cause the product or your battery to fail, catch fire or explode.
Clean the housing of this product lightly with a dry or moist cotton cloth. Do not
use alcohol, thinners, benzene or any other chemical cleaner. Do not immerse the
MiniBoostPRO in water.
The MiniBoostPRO is a high precision electronic product. It contains no user-serviceable
parts inside. Do not try to dismantle, modify or repair it yourself. Disassembly, service or
repair by an unauthorised person will void the warranty.
Before using this product, check that cable connections to the battery are of correct
polarity.
Product specifications are subject to change and improve without notice.
3

CONTENTS
SAFETY PRECAUTIONS . . . . . . . . . . . . . . . . . . . . . . 2
ABOUT THE MINIBOOSTPRO . . . . . . . . . . . . . . . . . . . . 6
TERMINOLOGY . . . . . . . . . . . . . . . . . . . . . . . . . 6
ADDITIONAL ACCESSORIES REQUIRED FOR INSTALLATION . . . . . . . 6
COMPATIBLE BATTERY TYPES . . . . . . . . . . . . . . . . . . . 6
DESCRIPTION OF PARTS. . . . . . . . . . . . . . . . . . . . . . 7
INSTALLATION INSTRUCTIONS . . . . . . . . . . . . . . . . . . . 8
VENTILATION AND THERMAL CONSIDERATIONS . . . . . . . . . . . 8
MOUNTING . . . . . . . . . . . . . . . . . . . . . . . . . . 8
WIRING INSTRUCTIONS . . . . . . . . . . . . . . . . . . . . . . 9
CABLE SIZE . . . . . . . . . . . . . . . . . . . . . . . . . . 9
WIRING AND CONNECTIONS . . . . . . . . . . . . . . . . . . . 9
STANDARD INSTALLATION WIRING INSTRUCTIONS . . . . . . . . . . 10
INSTALLATION WITH BATTERYPLUS35-II WIRING INSTRUCTIONS . . . . 11
INSTALLATION WITH ASPOWER WIRING INSTRUCTIONS . . . . . . . . 12
FUSING . . . . . . . . . . . . . . . . . . . . . . . . . . . . 13
CHARGING DELAY. . . . . . . . . . . . . . . . . . . . . . . . 13
IGNITION DETECT . . . . . . . . . . . . . . . . . . . . . . . . 13
BATTERY CHEMISTRY SELECTION . . . . . . . . . . . . . . . . . 14
BATTERY CHARGING . . . . . . . . . . . . . . . . . . . . . . 16
CHARGING SEQUENCE LED INDICATORS . . . . . . . . . . . . . . 17
BYPASS MODE . . . . . . . . . . . . . . . . . . . . . . . . . 17
PROTECTIVE FEATURES . . . . . . . . . . . . . . . . . . . . . 18
FAULT CODES . . . . . . . . . . . . . . . . . . . . . . . . . 19
SERVICING AND CLEANING . . . . . . . . . . . . . . . . . . . 19
Designed by BMPRO, one of Australia’s leading power solution experts, the BMPRO product
range is proudly designed and manufactured in Melbourne, Australia, and represent a high-
quality product that will provide years of service.
DISCLAIMER: BMPRO accepts no liability for any loss or damage which may occur from the
improper or unsafe use of its products. Warranty is only valid if the unit has not been modified
or misused by the customer.
MANUAL PART 039222
REV 7.0
Copyright © 2023
4

FAQS AND TROUBLESHOOTING . . . . . . . . . . . . . . . . . . 20
SPECIFICATIONS . . . . . . . . . . . . . . . . . . . . . . . . 21
WARRANTY TERMS AND CONDITIONS (AUSTRALIA) . . . . . . . . . 22
LIMITED WARRANTY TERMS AND CONDITIONS (USA). . . . . . . . . 24
COMPLIANCE . . . . . . . . . . . . . . . . . . . . . . . . . 25
5

ABOUT THE MINIBOOSTPRO
BMPRO’s MiniBoostPRO is a multi-stage DC-to-DC battery charger, that enables
charging a secondary battery from solar panels and / or the towing vehicle’s 12V
electrical system.
Blending both the solar and auxiliary inputs, the MiniBoostPRO provides a
combined maximum charging current of 30A, with a preference to solar for
charging your secondary battery.
When charging, the MiniBoostPRO continually monitors primary, secondary
battery and solar voltage.
COMPATIBLE BATTERY TYPES
The MiniBoostPRO may be used to charge 12V batteries with capacities of 50-
300AH and of the following chemistries: AGM/Wet, Gel and LiFePO4 (lithium).
ADDITIONAL ACCESSORIES REQUIRED FOR INSTALLATION
The following accessories (not supplied) are required to complete installation of
the MiniBoostPRO:
92x 40A Automotive Fuse
92x 2A Automotive Fuse
TERMINOLOGY
Secondary battery refers to either an auxiliary battery installed in the motor
vehicle or a house battery installed in the RV.
Primary battery refers to a cranking battery in the motor vehicle. Connected to
the alternator, it is commonly referred to as an auxiliary input.
Bypass mode is the mode where the primary / input AUX source of power is at
the higher voltage than the secondary / output battery.
Boost mode is the mode where the voltage of the primary battery input source is
less than the secondary / output battery.
WARNING
Do not connect other types of Lithium batteries to the MiniBoostPRO.
Do not connect batteries with capacity less than 50Ah.
6

DESCRIPTION OF PARTS
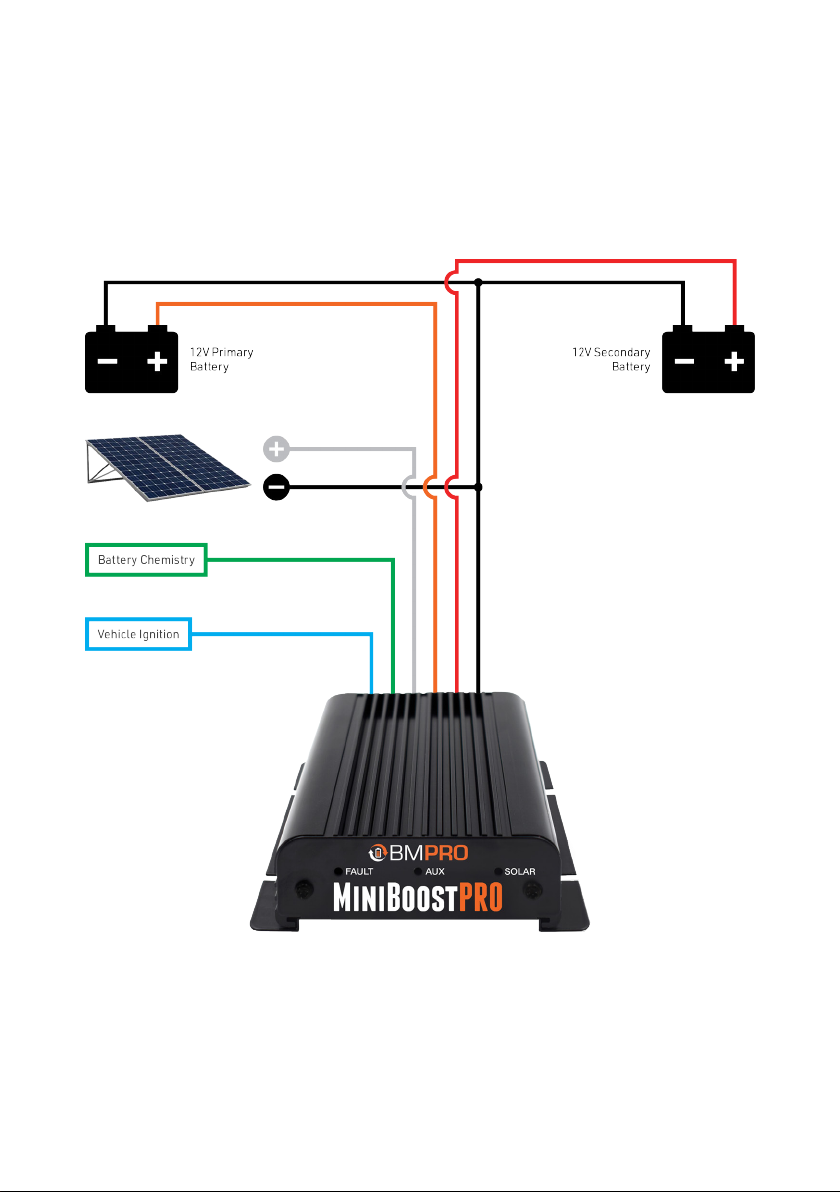
1. Aux LED
Green LED indicates charging
from primary source.
2. Solar LED
Blue LED illuminates when the
MiniBoostPRO charges the
battery from its solar input.
3. Fault LED
Red LED is a warning / fault
indicator.
4. Aux In
Orange cable to connect to the
primary battery positive terminal.
5. Solar In
White cable to connect to the solar
panel positive terminal.
6. Batt Out
Red cable to connect to the
positive terminal of the battery to
be charged (secondary).
7. Common Negative
Black cable to connect to the
solar, primary and the battery’s
secondary negative terminals.
8. Ignition Detect
Blue cable to connect to the
towing vehicle’s ignition.
9. Batt Chemistry
Green cable to configure battery
chemistry and select charging
parameters.
y
X
U
V
W
x
uvw
7

INSTALLATION INSTRUCTIONS
Installation of the MiniBoostPRO should be carried out only by a certified
installer with caravan electrical experience.
MOUNTING
Securely mount the MiniBoostPRO to any suitably strong flat surface. Install
the MiniBoostPRO inside your caravan or camper trailer, preferably close to the
house battery.
VENTILATION AND THERMAL CONSIDERATIONS
The MiniBoostPRO may be installed in any orientation. To prevent overheating
of the MiniBoostPRO, install the unit in a well-ventilated area that allows for
continuous airflow around the unit. Overheating of the MiniBoostPRO will affect
the optimal operation of the unit.
8

WIRING INSTRUCTIONS
WIRING AND CONNECTIONS
To assist with wiring, cable colour codes are labelled on the back of the
MiniBoostPRO. To ensure safe and reliable wiring, wire connections should be
crimped or soldered. All wire connections must be protected by heat shrink to
prevent exposed wires.
The MiniBoostPRO may be used in conjunction with a BMPRO power
management system such as the BatteryPlus35-II or ASPower.
If using a power management system, connect the MiniBoostPRO’s Batt Out
and Common Negative cables to the positive and negative primary input. The
MiniBoostPRO may be wired direct to the secondary battery via a protective
fuse.
CABLE CABLE COLOUR MINIMUM CABLE SIZE
Solar In White 6.0mm or 10 AWG
Aux In Orange 6.0mm or 10 AWG
Batt Out Red 6.0mm or 10 AWG
Common Negative Black 6.0mm or 10 AWG
Ignition Blue 0.34mm or 22 AWG
Batt Chemistry Green 0.34mm or 22 AWG
CABLE SIZE
Cables should be sized to carry 30A. The following table demonstrates the
recommended cable size, ranging up to a total length of 15m from input to
output.
9
STANDARD INSTALLATION WIRING INSTRUCTIONS
10
Autres manuels pour MiniBoostPRO
2
Table des matières
Autres manuels BM PRO Chargeur de batteries

BM PRO
BM PRO MiniBoostPRO Manuel utilisateur

BM PRO
BM PRO MiniBoost Manuel utilisateur

BM PRO
BM PRO ProBoost25 Manuel utilisateur

BM PRO
BM PRO MiniBoost Manuel utilisateur

BM PRO
BM PRO BatteryPlus35SR Guide de l'utilisateur

BM PRO
BM PRO BatteryCharge7.5 Manuel utilisateur

BM PRO
BM PRO BatteryCharge4 Manuel utilisateur

BM PRO
BM PRO BatteryCharge15 Manuel utilisateur

BM PRO
BM PRO MiniBoost Manuel utilisateur


