BENDIX ULTIMATE TOW Manuel

FEATURES:
Easy install
Compact remote head to fit in the smallest
knock out panels
OEM-style dial with built-in LED
Open circuit and trailer disconnection indicator
Installation & Operating
Instructions
For peace of mind and ultimate tow control, tow with the
Bendix Ultimate Tow Electric Brake Controller!
When the road ahead is all you can think about, place your
trust in the Bendix Ultimate Tow Electric Brake Controller. The
Ultimate Tow uses its own unique braking algorithm which
provides total control, comfort, and reliability even in the
toughest of Australian conditions.
Bendix’s remote head is compact and easy to install. With easy
installation, your unit can be installed with just one hole, the
remote head can fit in the smallest of knock out panels in your
vehicle. It features a slim-line, OEM look with a built-in LED.
The Ultimate Tow allows you to adjust your braking force and
operate the override function with ease. If you are worried about
space behind the dash, Bendix has you covered, the Ultimate
Tow’s control module can be fitted up to 1.28m away from
the remote head mounted in your dash. Mounting the control
module is as simple as cable-tying it to a harness or mounting
it with the screws provided.
Manufactured with a rugged cast alloy enclosure, the Ultimate
Tow controller is dust and moisture resistant so that even in the
harshest braking conditions heat is dissipated efficiently so you
can keep going.
The true innovation lays within the operating systems of the
Ultimate Tow controller. Designed, engineered, and tested
in Australia for Australian driving conditions, it represents a
quantum leap in brake control technology.
Your new Ultimate Tow controller comes fully programmed and
tested from an Australian based facility. Boasting a 3-year
warranty, you simply need to wire it up and hit the road,
worry free.
Compact & rugged aluminium case
for heat dissipation
3-year warranty
ALKO ESC Compatible

1 × Bendix Ultimate
Tow Electric Brake
Controller
2 × Self-tapping
mounting screws
2 × Nylon fabric fastening
hook and loop straps
1 × 15A blade fuse
1 × Instruction manual
1 × Double-sided adhesive EVA foam
mounting pad (78 × 61mm)
1 × Protection blocking diode
1 × Fuse holder
assembly
1 × Decal sheet
(with 4 dash
decal sizes)
1 × Control dial
1 × Control
dial lead
IN THE BOX:

Note: Ultimate Tow is load activated and cannot be tested without load. At no load, the output reading of high voltage will register.
The output voltage is PULSED, so it cannot be measured with a voltmeter or test light.
INSTALLATION:
1. Disconnect the vehicle’s NEGATIVE battery terminal.
2. Determine a suitable mounting location inside the cabin.
3. Hold the brake controller in the selected position and
mark the hole location through the holes in the flanges
of the unit.
4. Using a suitable drill bit, drill holes in the marked locations.
5. Secure the brake controller in position with self-tapping
screws. Take care to not strip the holes by over-tightening
the screws or use the nylon fabric fastening hook and loop
straps, or double-sided adhesive pad to secure.
6. Drill a hole for the 8.5mm remote control shaft in a
suitably sized mounting panel in the dash with a wall
thickness of less than 4mm.
7. Affix decal, washer and retaining nut over shaft and
tighten. Turn shaft fully counter-clockwise and affix the dial
on the shaft with firm, even pressure with the indicator
facing the minimum position.
8. Plug the remote control lead into the brake controller.
9. Connect brake wiring as per wiring instructions and follow
Set-up and Operation procedures.
10. Reconnect the NEGATIVE battery terminal.
To Remote Control
To Positive Voltage Feed
(ie. Battery Positive)
To Vehicle Brake Switch (Cold Side)
or source that is pure DC when
vehicle brake lights are on.
Note: Only Activated by Positive feed.
To trailer brake wire /
Pin 5 on Trailer Plug
as described in
AS 4177.5-2004
Earth
BLACK
BLUE
WHITE
RED
Fuse must be fitted
(Supplied)
FUSE
WIRING DIAGRAM
Note: If you cannot attach to the vehicle brake switch. Follow the alternative wiring diagrams.
Specifications
Minimum Input Voltage 9 VDC
Nominal Input Voltage 12 VDC
Maximum Input Voltage 15 VDC
Suitable For 12V Trailer Brakes Yes
No Current Load 30 mA
Maximum Load 2 Axle /14A avg
Weight 200g
Dimensions L x W x H: 30mm x 57mm x 90mm
Model Fuse
ULTTOW12V 15A

ALTERNATIVE WIRING DIAGRAM:
FOR CONNECTIONS IN VEHICLES WITH NO ASSISTED SAFETY SYSTEMS
ALTERNATIVE WIRING DIAGRAM:
FOR CONNECTIONS TO VEHICLES WITH ASSISTED SAFETY SYSTEMS
Please note: an external fuse
must be fitted (not supplied).
The control unit is activated by a
positive feed brake switch only.
(Please check the polarity of your
vehicles brake switch before
connection)
Note: Not all wiring shown. Do not alter wires that are not shown. Wiring must be connected as per AS 4177.5-2004.
Wire Guide
White Wire Negative Battery
Blue Wire Brake
Black Wire Positive Battery
Fuse : 12V 20A / 24V 15A
Red Wire Brake Switch
7 Pin Trailer Socket
Blocking Diode needs
to be fitted (supplied).
To vehicle wiring
12V Positive
12V Positive
Earth/Negative
Earth/Negative
Diode must be rated to at least 7A 12V
7 Pin Trailer Socket
Blocking Diode needs
to be fitted (supplied).
To vehicle wiring
12V Positive
12V Positive
Earth/Negative
Earth/Negative
Diode must be rated to at least 7A 12V
When computerized systems prevent attaching the red wire to the brake switch directly. Please follow the appropriate wiring diagram
below for your situation.

DASH LABEL MOUNTING INSTRUCTIONS:
PLEASE ENSURE THAT A FUSE IS FITTED ON THE BLACK WIRE (POSITIVE BATTERY)
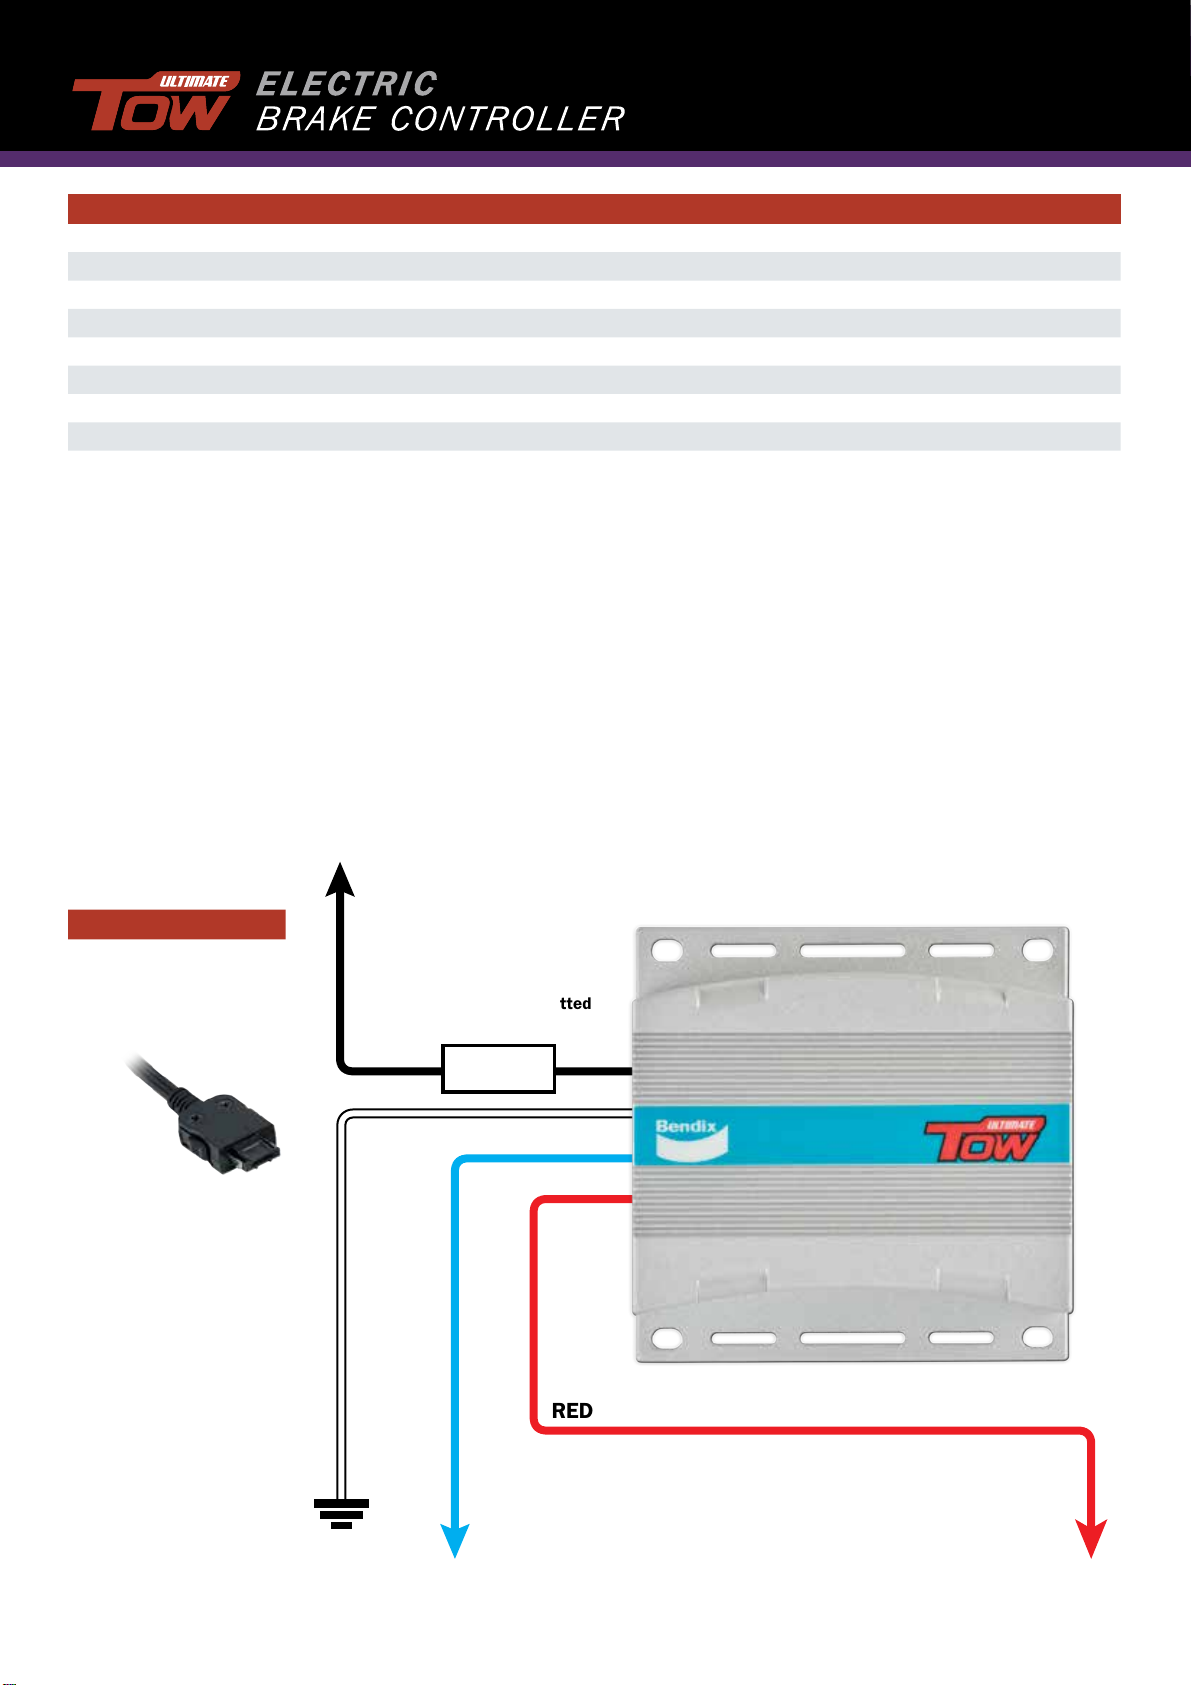
(Optionally a 20A fuse may also be fitted to the BLUE brake wire)
The BLACK wire is the positive voltage power supply line. A
fuse must be fitted (refer to table above for size).
The RED wire must be connected to a point that receives
a DC Voltage equal to that of the supply voltage when the
brakes are on. Generally, for most vehicles we strongly
recommend that you connect the RED wire to the cold side
of the brake light switch. If this is not an option for your
vehicle, then any point that receives a straight DC voltage
should be applicable. For example- top rear tail light, brake
light relay or the wire connecting to the stop lights on the
trailer plug.
NOTE: Vehicles that use the same globe/supply for rear and
tail lights cannot have the RED wire to the stop light/tail
lights directly. Please use the alternatives listed above.
The BLUE brake wire must be connected directly to the
trailer brake wire.
The WHITE ground wire must be connected to a grounded
metal part of the dashboard, vehicle fire wall or directly to
the negative battery terminal.
Important: A brake control unit that is not properly grounded may operate intermittently or not at all.
Make sure all connections are secure.
Do not connect the Black “BATTERY” wire to the fuse panel or tie into any accessory wiring.
Connecting to the existing wiring may damage the vehicles wiring and cause trailer brake failure.
Do not reverse Black “BATTERY” wire and White “GROUND” connections.
Even a momentary incorrect connection can damage the brake control unit.
1. Refrain from using the vehicle chassis as a conduit for
the earth return for the brake coils. Facilitate a separate
ground wire. (See point 3 below)
2. Mount the brake controller and route all cables for
the input and output of the brake controller away from
antennas and RF Equipment.
In the unlikely event of RF Interference, you may wish to try one of the following :
The Remote Brake Controller has four (4) coloured wires- BLACK, RED, BLUE and WHITE.
3. Use a short as possible bifilar (or twisted) wire to feed
the Ultimate Tow and brake coils ( both active and return).
4. Add a ferrite clamp over the RED, BLUE, BLACK
& WHITE wires.
7 Pin Trailer Socket
Blocking Diode needs
to be fitted (supplied).
To vehicle wiring
12V Positive
12V Positive
Earth/Negative
Earth/Negative
Diode must be rated to at least 7A 12V
7 Pin Trailer Socket
Blocking Diode needs
to be fitted (supplied).
To vehicle wiring
12V Positive
12V Positive
Earth/Negative
Earth/Negative
Diode must be rated to at least 7A 12V
Installation on
standard blank
switch plate
Drill 1 × 8.5mm hole Apply dash sticker Insert shaft of dial and
fasten with supplied
nut until tight
Press on dial with
firm even pressure
Min Max
Min Max
Min Max
1 2 3 4 5

SET-UP & OPERATION
Setting the braking force:
To set the brake intensity, simply rotate the dial until the
required braking level is achieved. A clockwise dial rotation will
increase the braking and a counter-clockwise will decrease it.
Using the override feature:
To activate the override function, simply push on the adjustment
dial. Releasing the dial disables the function.
NOTE: when the override is active, the braking force is still
determined by the dial position.
The override function works to apply the trailer brakes without
applying the vehicle brakes. This feature can be used when
the tow vehicle begins to sway or enter a tail wag situation.
Please consult towing professionals or towing training schools
for advice on how to use this feature correctly. In the event of
an emergency situation, do not rely on the override button for
additional braking force. If additional braking force is required
turn the dial clockwise and return your hand to the wheel in a
quick and timely manner.
LED STATUS INDICATION
LED Indication Status
BLUE (Constant On)
Trailer connected / brakes connected / all systems OK
BLUE (Flashing)
Either:
• Brake pedal pressed, controller actively braking
• Override has been pressed
Note: Unit will flash 3-4 times after pressing the brake or using the override then return
to solid state.
OFF
No power or trailer is disconnected from vehicle
FOR MORE INFORMATION ABOUT THESE PRODUCTS
Freecall the Bendix Brake Advice Centre on
1800 819 666 (8am-5pm Monday to Friday EST)
or +61 3 5327 0211 from overseas.
Visit our website bendix.com.au / bendix.co.nz or
PRJ-08081
WARRANTY CONDITIONS:
This product comes with a 3 year warranty.
The customer is entitled to a replacement or refund for a major
failure and compensation for any other reasonably foreseeable
loss or damage.
The customer is also entitled to have the products repaired or
replaced if the products fail to be of acceptable quality and the
failure does not amount to a major failure.
Bendix warrants that its products will, under normal use and
service, be free of defects in material and workmanship for a
period of 3 years from the date of the original purchase by the
customer as marked on the customer’s original invoice.
Please refer to our website for full warranty and return
information which can be found at www.bendix.com.au
Table des matières
Autres manuels BENDIX Contrôleurs

BENDIX
BENDIX DD-3-SD-3 SAFETY ACTUATORS Manuel utilisateur

BENDIX
BENDIX EC-60 ABS-ATC ESP CONTROLLERS ADV Manuel de référence

BENDIX
BENDIX MC-30 TRAILER ABS CONTROLLER Manuel utilisateur

BENDIX
BENDIX BRAKE CHAMBERS Manuel utilisateur

BENDIX
BENDIX EC-60 ABS-ATC ESP CONTROLLERS ADV Manuel utilisateur

BENDIX
BENDIX EC-60 ABS Instructions de montage

BENDIX
BENDIX EC-13 TRAILER ANTILOCK CONTROL Manuel utilisateur

BENDIX
BENDIX EC-15 ANTILOCK CONTROLLER ASSY Manuel utilisateur

BENDIX
BENDIX EC-30 ABS-ATC CONTROLLER Mode d'emploi

BENDIX
BENDIX EC-30 ECU Manuel utilisateur


