Batribike 50930 Manuel utilisateur

batribike.com
Hand Built in Europe
ELECTRIC BICYCLES
Display
Options
UPGRADES
Centre LCD
LED Display
Mini LCD
50713
50707-2
50930
50935

2
DEALERSTAMP
IMPORTANT PLEASE READ THIS MANUAL FULLY BEFORE USE
DISPLAY TYPE:-
LED
MINI LCD
CENTRE
LCD
/
/
FITMENT DATE:-
DAY MONTH YEAR
BICYCLE SERIAL №:-
FITTED and TESTED BY:-

3
Thank you for purchasing a Display Option for
your BATRIBIKE Electric Bicycle
This manual contains brief fitting notes intended for the Dealer and
User Instructions for each display type.
This manual should be left with the User after fitting.
Contents
Parts Identification ............................................ PAGE 4
Fitting Instructions ............................................ PAGE 6
Operating Instructions ...................................... PAGE 8
LED Option ............................................ PAGE 10
Mini LCD Option .................................... PAGE 14
Centre LCD Option ................................ PAGE 22
Troubleshooting ................................................ PAGE 31
Warranty ........................................................... PAGE 34

4
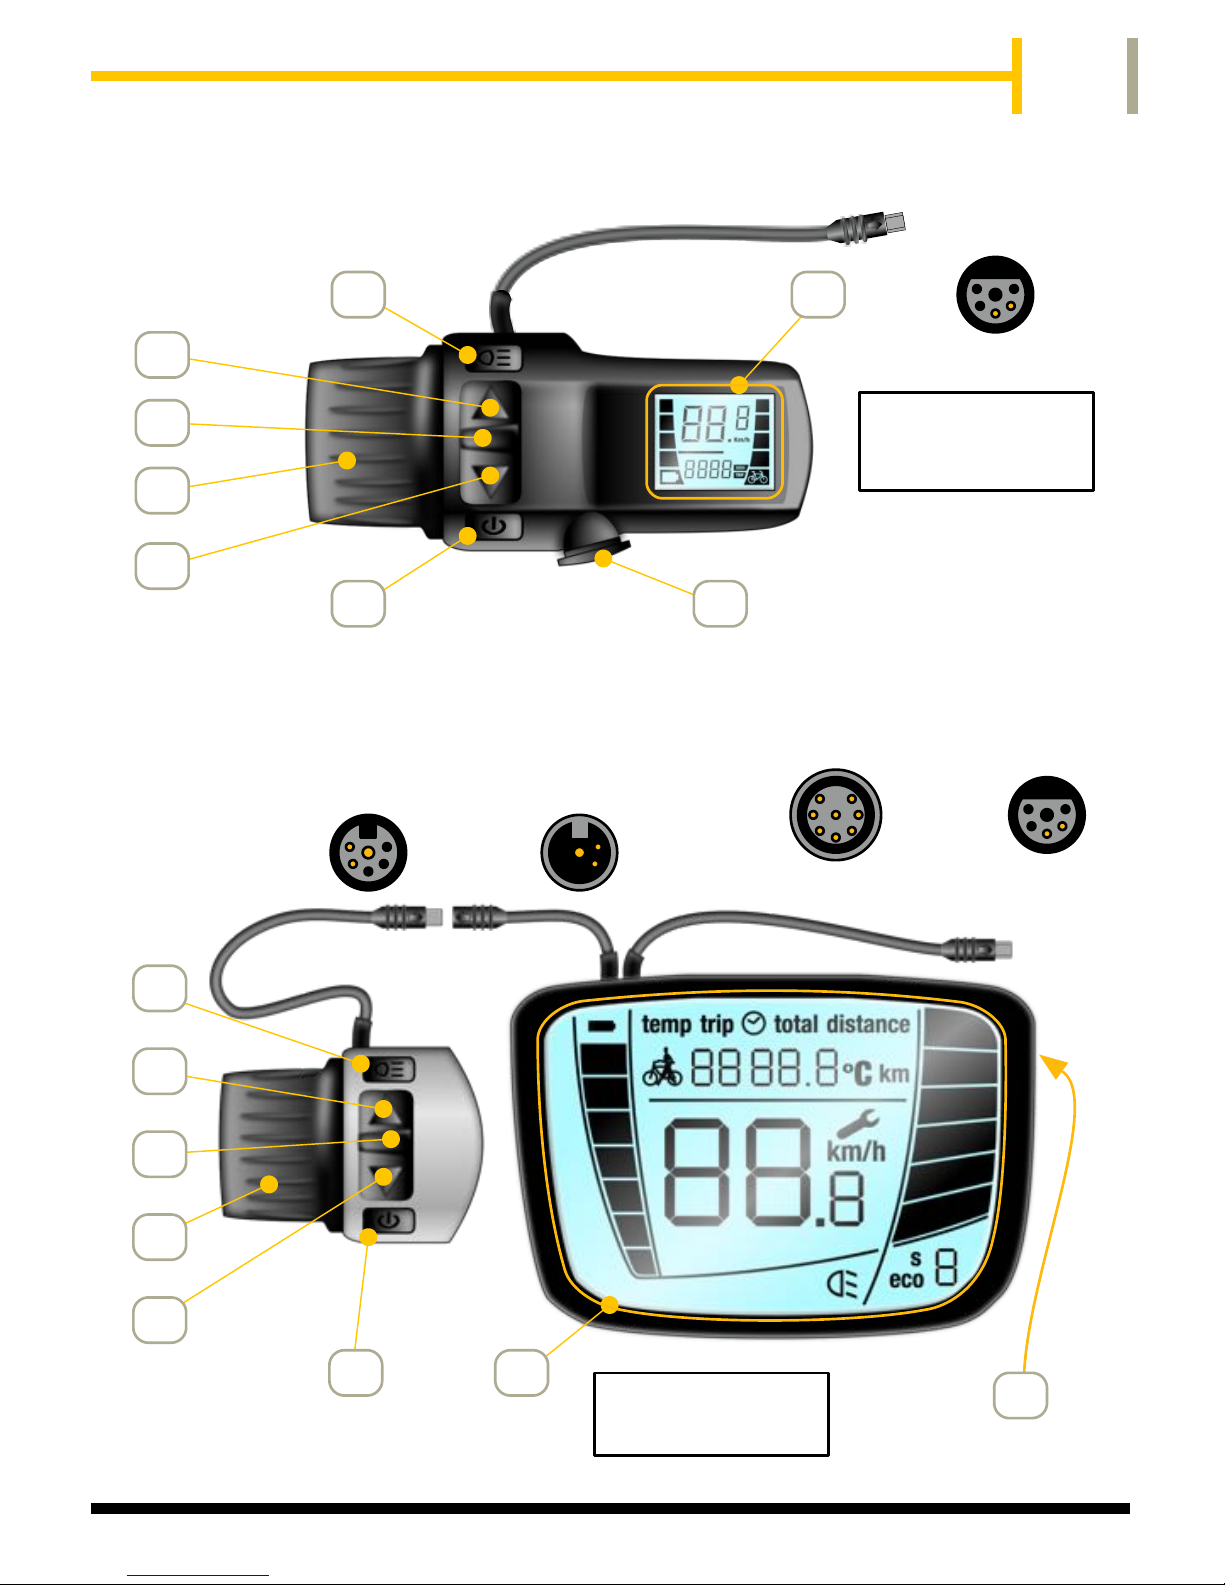
PARTS IDENTIFICATION
We continually strive to ensure that we provide you with the best possible products, therefore
SPECIFICATIONS ARE SUBJECT TO CHANGE WITHOUT NOTICE
1
2
3
4
5
6
7
8
9
10
11
Lights ON/OFF Button
Mode Button
Power Assistance Level Indication
Power UP Button
Charging Socket
Battery Charge Level Indication
Walk Assist (6 Km/h) Button
LCD Information Area
Throttle (Pedalling Only) / Walk Assist
Power ON/OFF Button
Power DOWN Button
1
6
5
2
3
4
7
FITTED AS STANDARD ON:-
OMEGA
ALPHA
SIGMA
QUINTESSENTIAL
LED
CONNECTS TO BIKE
WIRING HARNESS
PRODUCT PART NUMBERS
The following shows the ProMovec part numbers required for each display type and bike model.
Please ensure you select the correct size bracket if fitting a Centre Display
50713
50707-2
50930
50935
50937
50938
Centre LCD Bracket for handlebar diameter 32 mm
Centre LCD Bracket for handlebar diameter 22 mm
LED Display Unit
Centre LCD without Charging Socket (All models except PERDU)
Mini LCD without Charging Socket (All models except PERDU)
Centre LCD with Charging Socket (For PERDU)
5
Centre LCD
5
1
8
9
3
FITTED AS STANDARD ON:-
TEN
7
10
CONNECTS TO BIKE
WIRING HARNESS
SWITCH UNIT
CONNECTION
5
7
1
8
9
3
10
11
ONLY USED
ON PERDU
FITTED AS STANDARD ON:-
PERDU
DELTA
Mini LCD
CONNECTS TO BIKE
WIRING HARNESS
ON REAR
PERDU ONLY
11
PERDU
VERSION
STANDARD
VERSION
50930
50935

6
Dealer Instructions
Fitment of Display Upgrade
These instructions are designed to be used by Authorised
BATRIBIKE Dealers and competent personnel.
It is important that you ensure that the existing display is operating
correctly with no errors prior to fitting a display upgrade. Any errors
or malfunctions must be rectified before following this procedure.
1. Trace the display connection cable from the display to where it
enters the frame.
2. Gently unwrap the cable cover/spiral wrap to release the display
cable.
3. Carefully remove plastic shroud from frame aperture using small
flat bladed screwdriver inserted into rear of shroud to release the
clip.
4. Gently pull the display cable from the frame aperture until the
plug and socket can be seen.
5. Unplug the connecting plug from the wiring harness.
6. Remove the existing display from the handlebars. (It may be
necessary to first remove the grip, brake lever etc.)
7. Depending upon display type is to be fitted:-
EITHER, for LED and Mini LCD
a. Fit the new display onto the handlebars (and then refit brake
lever, grip etc. as necessary).
OR, for Centre LCD
b. Fit the switch unit onto the handlebars, fit the centre display
onto the middle of the handlebars, connect the switch unit
lead and the centre display taking care to use the correct
plug, (and then refit brake lever, grip etc. as necessary).

7
8. Plug the new display cable into the wiring harness.
9. Test for correct operation.
10. Gently push the cable back into the frame aperture.
11. Refit plastic shroud ensuring the clip secures the shroud into the
frame aperture.
12. Refit the cable cover/spiral wrap.
13. Ensure that the user is provided with this instruction manual.
PLUG &
SOCKET
PLASTIC
SHROUD
DISPLAY
SPIRAL
WRAP
AROUND
WIRING
HARNESS
INSIDE
FRAME
APERTURE
EXISTING
GENTLY INSERT
SCREWDRIVER
BLADE HERE
ALPHA MODEL
USED AS
EXAMPLE
OTHER MODELS
SIMILAR
PLUG ON
DISPLAY
CABLE
SOCKET ON
WIRING
HARNESS

8
User Instructions
Your BATRIBIKE electric bicycle has a choice of display upgrade
available. Refer to the following sections for Operating Instructions
for each display type.
LED Display
See page 10 for operation.
The operation of the LED system provides adjustable SPEED in five
selectable steps. Level 1 powers up to 6 mph, whilst level 5 powers
up to 15 mph. Each level operates at up to full power, and power
cuts out at the selected speed level.

9
Mini LCD
See page 14 for operation.
The operation of the Mini LCD system has four selectable POWER
levels. Level 1 gives 25% of the power, level 2 - 50% up to level 4,
100% power. Speed range is from 0 to 15 mph in all levels. This is
available as an easy to fit upgrade.
Centre LCD
See page 22 for operation.
The Centre LCD system provides more power levels than the Mini
LCD and a larger display makes it easier to read. This is available
as an easy to fit upgrade.

10
LED Operation
To use under electric power, switch on at
the battery if required, (bike model specific),
then press and hold the DOWN button on
the handlebar LED display until the blue
lights are seen.
Switching On
To turn off the LED and the power to the bike, press and hold the
DOWN button for 2 seconds.
If the power is left on for an extended
period and the bike is not used, then
the power will automatically be turned off.
To fully turn off the power, switch off at the battery if required,
(bike model specific).
Switching Off
Control Buttons
By means of the three buttons, UP, DOWN and
6 Km/h, on the handlebar mounted display unit,
the various functions of the power controller can
be utilised.
See the following sections for details.
Ce manuel convient aux modèles suivants
3
Table des matières
Autres manuels Batribike Accessoires pour vélos


