Base aire AirWerx 100X Manuel utilisateur

Tel: 1-888-641-8862
Web: www.baseaire.com
E-mail: [email protected]
Installation & Operations Manual
AirWerx 100X
Patent pending
Specifications subject to change without notice.


Table of Contents
Important Notes
Warranty Registration
Specifications
How it Works
Installation Requirements
Installation
Key Functions
Indicator Lights
Remote Control
Operating Instructions
Unit Diagram
Maintenance
Dehumidifier Storage
Ducted Applications
Troubleshooting
Spare Parts
Warranty Information
2
2
3
3
3
4
4
5
6
7
8
9
11
11
12
13
14
1
.............................................
......................................
..................................................
................................................
................................
......................................................
................................................
...............................................
..............................................
.....................................
..................................................
...................................................
......................................
........................................
...............................................
....................................................
.......................................

Your dehumidifier comes with an extensive warranty. To register your unit simply fill out and
return the warranty form provided in your dehumidifier box.
For future reference, write down the model, serial number, and date of purchase for your
dehumidifier. This information is necessary for seeking assistance in the future and can be
found on the data label on the side of the unit.
2
Warranty Registration
Model Number: AirWerx 100X
Serial Number: ______________ Date of Purchase: _____________
For additional questions concerning your dehumidifier, contact your
local installer or call Base Aire at 1-888-641-8862.
Important Notes
• Always connect your dehumidifier using a grounded electrical connection
(as required for all electrical appliances). The use of non-grounded wiring
will void the warranty.
• Your dehumidifier should only be repaired by a qualified technician.
• Do not use the dehumidifier in standing water. If there is a chance that the
dehumidifier has been flooded, unplug the unit, remove the cover, and allow
it to dry completely before proceeding.
• Do not insert objects or your fingers into the inlet or discharge.
• Do not use water to clean the exterior of the dehumidifier. To clean unit,
unplug from power, then use a damp cloth to wipe the exterior.
• Do not stand on dehumidifier or place objects on it.
• Do not use with extension cord or plug adapter.
• Unless otherwise noted, all maintenance should be done with the unit
powered off.

Capacity @ 80°F/60%RH: 100 Pints Per Day
Airflow @ 0.0” SP: 250CFM
Operating Temp. Range: 33.8-104°F
Operating Relative Humidity Range: 35%-90%
COP: 2.7 L/kWh
Refrigerant: R410A
Amperage Usage: 6.82 Amps
Power Supply: 115V/60Hz/Single Phase
Outlet Requirement: 15 Amp
Sound Level: 60 dBa
Dimensions LxWxH: 23.8” x 14.7” x 17.9”
ETL Listed: Yes
3
Specifications
How It Works
Installation Requirements
• The area where the dehumidifier is located should be sealed with a vapor barrier.
• If the unit is installed in a crawl space, all vents should be sealed.
• For proper ventilation, neither the inlet or discharge should be positioned against a wall.
The inlet needs a minimum of 12” clearance and the discharge requires a minimum of 36”
clearance.
• For the best air diffusion, install the unit so that a side panel faces the wall.
• AirWerx dehumidifiers are only intended for operation when the unit is upright and level
with the feet on the ground.
AirWerx dehumidifiers use an integrated humidistat to monitor theconditioned space. When
the relative humidity goes above the selected setpoint, the dehumidifier will energize. Air is
then drawn across an evaporator coil, which is cooler than the dew point of air. This means
moisture will condense out of the air. The air is then reheated through the condenser coil and
distributed back into the room.

4
Installation
Key Functions
1. Power Key
• Use this button to turn the dehumidifier on and off.
• Press once to turn machine on. You will hear two beeps and the light will
illuminate green (solid or flashing depending on mode).
• Press the power button a second time and you will hear one beep as the machine shuts
down. Note that there is a 1 minute fan delay.
2. Arrow Buttons
· Use the up and down arrow buttons to set the desired humidity setpoint on the display
screen.
· The setpoint can be any number between 35%-90%. When the indoor humidity is higher
than the setpoint, the unit will operate.
• Keep in mind that the displayed humidity levels are approximate ( +/-5%)
3. Continuous Mode
• To set the unit to run continuously regardless of humidity, simply use the down
arrow key to set the humidity below 35%.
1. Place dehumidifier on a level surface.
2. Set up the drain line
• Remove the compression nut and slide it over the end of the hose to be attached to unit.
• Slide the side of hose with compression nut over the insert on the compression fitting
completely.
• Tighten compression nut.
3. Plug dehumidifier into grounded 15 amp circuit.
• Do not place unit directly on vapor barrier. For example, use blocks or pavers to create a
level surface.
• If unit has been turned or flipped so that the compressor did not remain upright, place the
unit on a level surface and wait a minimum of 2 hours before proceeding.

1. Humidity Display Screen
• The display screen has two functions:
1. When the unit is powered on, it shows the humidity of the space
2. When setting the desired humidity level, the screen will show the set point.
After a brief delay, it will revert to current humidity of the space.
2. Power Indicator Light
• This light indicates that the unit is properly powered on and ready to operate.
• Always make sure the unit is “off” prior to performing any service, unless otherwise indicated.
• If the humidity is above the setpoint, the light will be solid green and the machine will
operate.
• If the humidity is below the setpoint, the unit will be in standby mode and the light will be
flashing.
3. Continuous Mode/ Auto Defrost Light
• When the light illuminates green, it indicates that the dehumidifier is set to continuous
operation mode.
• When the light illuminates red, it means the unit is in auto defrost mode and clearing the
evaporator coils of any ice buildup.
4. Compressor Light
• When the light illuminates red, it indicates the compressor has been initiated but is currently
warming up.
• Once the light switches to green, it means the compressor is currently in working status.
• The continuous light will illuminate green and the display will show “CO”.
• To switch back to normal humidistat operation, use the arrow keys to
move the setpoint above 36%.
4. Manual Drain Button
• If you need to store or move your dehumidifier, press the “Drain” button to remove water
from the integral pump’s reservoir.
5. Pump Trouble Warning
• If the pump reservoir level gets too high, the water sensor will activate to prevent
overflow.
•When this occurs, the compressor will stop automatically, and the display will show “E4”.
After a 1 minute delay, the fan motor will turn off and the dehumidifier will not operate until
the problem has been resolved.
•Check to verify that the pump is functioning, then unplug the unit for two minutes to reset
the error code.
5
Indicator Lights

Remote Control Instructions
6
AirWerx Dehumidifiers can be controlled using an optional remote accessory. The remote
connects to your dehumidifier via a 25’ CAT 5 cable, with the integrated sensor giving you
multiple options for monitoring surrounding conditions.
Example #1- Install the dehumidifier in the laundry room and duct it into the living room.
Mount the remote in the living room and use the remote sensor.
Example #2- Install the dehumidifier in your crawl space with the remote mounted in your
garage.
NOTE: The symbols indicated below only show when the remote is powered on.
1. On/Off (Power) Button
Press the on/off button and the machine will
start running (two beeps). Press the button
again to turn the machine off.
2. Up Button/ Down Button
Use the up and down arrows to adjust the
humidity level.
3. Mode
Use the mode button to switch between
dehumidifier and a ducted application.
• The symbol on the display
indicates the sensor on the remote control is
being utilized.
• The symbol on the display indicates the sensor on the dehumidifier is being
utilized.
4. Temperature
Press the temperature button to display the current temperature on the screen
5. Continuous
Press this button to switch the unit into continuous mode. “CONT.” will appear on the display
screen.
6. Drain Pump
Use this button if the unit will not be used for an extended period of time.
This button will remove water from the pump reservoir.

7
Operating Instructions
1. Start the machine
• Press the power key to turn the dehumidfier on.
2. Adjust the settings
• Use the up and down arrow keys to adjust your desired setpoint
(typically 50-55%)
3. Stop the machine
DO NOT DISCONNECT THE POWER CORD TO FORCE THE UNIT TO STOP.
4. Water Drainage
• Press the power button again and the dehumidifier will stop. Note that the fan will
continue to operate for 1 minute after the unit has shut off.
• The AirWerx 100X has an integrated condensate pump. During normal operation,
the 100X will automatically drain as required.
• If you would like to store or move your unit, press the drain button to drain water from
the pump reservoir. The drain will operate for 15 seconds each time the button is
pushed. It may be necessary to push the button more than once.
8
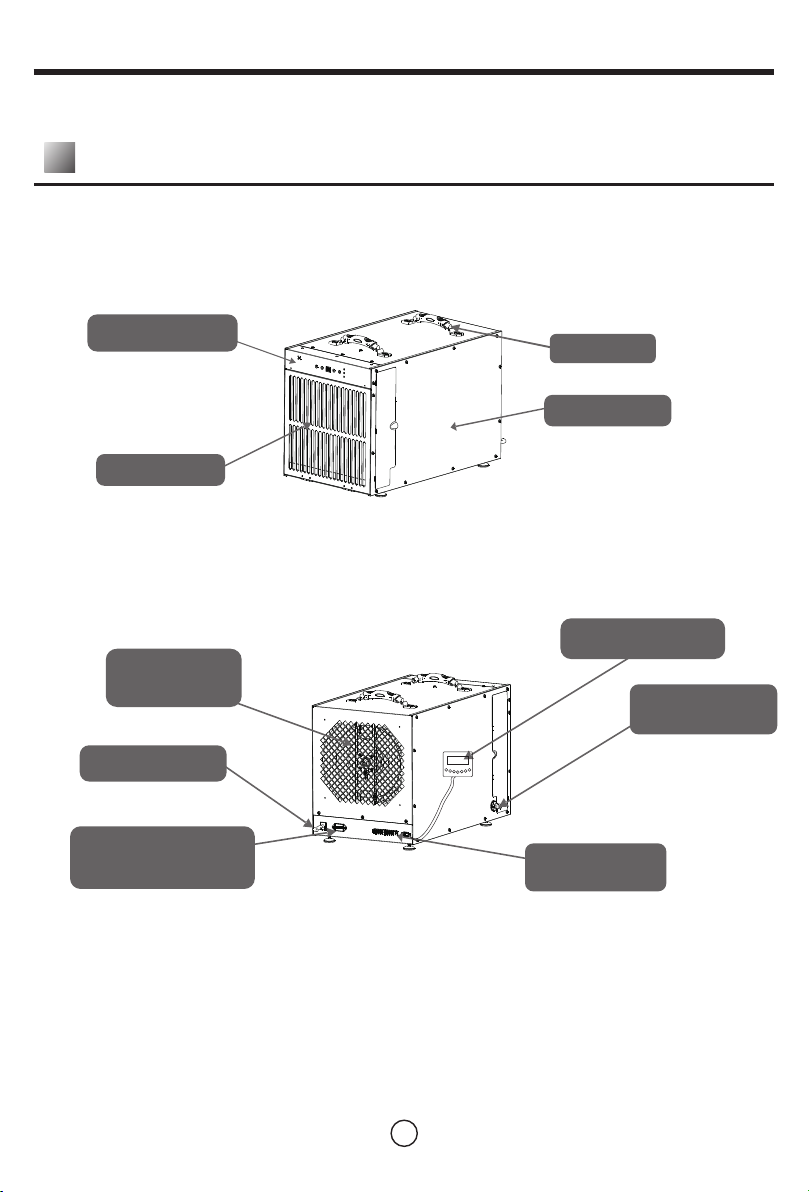
Unit Diagram
Front View
Back View
Control Panel Handle
Side Panel
Pre-filter
Discharge
Grille
Power Cord
Ventilation Fan Port
(Optional)
Remote Control
Drain Hose
Connection
Auxiliary
Terminals
Table des matières
Autres manuels Base aire Déshumidificateur


