Avipas AV-1161 Manuel utilisateur


Preface
Thank you for using this HD Video Conferencing Camera.
This manual introduces the functions, installation process and operation of the HD
camera. Prior to installation and usage, please read the manual thoroughly.
Precautions
This product should only be used under the specified conditions in order to avoid
any damage to the camera:
◼Do not subject the camera to rain or moisture.
◼Do not remove the cover. Otherwise, you may risk receiving an electric shock.
In case of unintended equipment operation, contact an authorized engineer.
◼Never operate under unspecified temperature, humidity or power supply.
◼Please use soft dry cloth to clean the camera. If the camera is very dirty, clean
it with diluted neuter detergent; do not use any type of solvents, which may
damage the surface.
Note:
This is a class A production. Electromagnetic radiation at certain frequencies may
affect the image quality of TV in home environment.

Catalogue
ABOUT THE PRODUCT -------------------------------------------------------- 1
FEATURES -------------------------------------------------------------------------------- 1
LIST OF PARTS & ACCESSORIES ------------------------------------------------------------ 1
MAIN PARTS & INTERFACES ---------------------------------------------------------------- 2
INSTALLATION AND CONNECTION ------------------------------------------- 3
INSTALLATION ----------------------------------------------------------------------------- 3
CONNECTION ------------------------------------------------------------------------------ 4
OPERATION ------------------------------------------------------------------- 5
ZOOM AND FOCUS ------------------------------------------------------------------------- 5
MENU ------------------------------------------------------------------------------------- 5
SPECIAL PRESETS LIST ----------------------------------------------------------------------- 5
MENU CONFIGURATION ----------------------------------------------------- 6
MENU EXPLANATION ----------------------------------------------------------------------- 8
VIDEO ------------------------------------------------------------------------------------ 9
EXPOSURE -------------------------------------------------------------------------------- 9
COLOR ----------------------------------------------------------------------------------- 10
SYSTEM ---------------------------------------------------------------------------------- 10
RESTORE DEFAULTS ---------------------------------------------------------------------- 11
NETWORK ------------------------------------------------------------------- 11
ANNEX 1 TECHNICAL SPECIFICATIONS ------------------------------------ 12
ANNEX 2 SIZE AND DIMENSION -------------------------------------------- 13
ANNEX 3 RECOMMENDATION DISTANCE FOR EXTENSION POWER
CABLE
------------------------------------------------------------------------------ 15
TROUBLE SHOOTING ------------------------------------------------------- 15

1
1 ABOUT THE PRODUCT
1.1 Features
◼1/3” CMOS sensor, 2.14MP;
◼5x optical zoom;
◼Support multi control
methods: LAN / RS-232 / RS-485
/ rear panel button;
◼Support SDI and network
interface, simultaneous full HD
video output;
◼H.264 video compression, up
to 1080P30 with low network
delay;
◼Support 2-channel audio
input, AAC compression;
◼Compatible with HTTP /RTSP/
RTMP / ONVIF protocols.
1.2 List of Parts & Accessories
When you open the box, check all
accessories according to the
packing list. In case of any items
missing, please contact your
supplier.
Camera (1)
Power Adapter (1)
RS-232/ RS-485 Connector(2)
Convertors for Extension
Power Cable

2
1.3 Main Parts & Interfaces
1.3.1 Camera
Front View
1 Camera Lens
Rear View
2 Button Operation
3 RS-485 Control Interface
4 RS -232 Control Interface
5 USB Interface
6 TF Card Slot
7 HD-SDI Interface
8 Network Interface
9 Audio Interface
10 Power Indicator
11 Power Input(DC12V)
Side View
12 Mounting Hole
1/4” screw, used to fix the
camera

3
2 INSTALLATION AND
CONNECTION
2.1 INSTALLATION
The installation mode of the camera
is wall mount.
NOTE
Before installing, make sure
there is enough space to
install the camera and its
parts.
Make sure the installed
place is strong and safe
enough to hold the camera
and relative parts, it is
suggested that the installed
place can withstand 4 times
the weight of the camera
and its relative parts.
2.1.1 Wall Mount
1. According to diameter and
position of the 4 installation
holes (as shown below on the
bracket), drill 4 holes on the
wall and fix the bracket onto
the wall using 4 screws (not
included in the package).
2. Use screws to fix the camera
on the bracket, fix the limit
screw to lock the camera.
Make sure the camera is tightly
fixed onto the bracket before
your hands leave the camera.

4
2.2 CONNECTION
Before powering on, make sure all connections are correct and secure.

5
3 OPERATION
Before operation, make sure all
connections are correct and secure.
Please refer to “INSTALALTION AND
CONNECITON” on page 3.
3.1 ZOOM AND FOCUS
Press or to zoom in / zoom out
the camera; press or to
manually focus of the camera. Make
sure you exit the camera menu
before zooming using buttons.
3.2 MENU
Press “MENU” button to enter
camera menu.
3.2.1 MENU SELECTION
Use and button to select
menu options, or to change
option / value.
3.2.2 MENU CONFIRMATION
Under camera menu, press “MENU”
to enter the submenu; press and hold
“MENU” button for 3 seconds to exit
menu operation.
4 SPECIAL PRESETS LIST
Preset
Numbe
r
Function
95
Enter into menu
101
video format: 1920X1080P25
103
video format: 1280X720P50
104
Installation mode: STAND
105
Installation mode: CEILING
106
Video format:
1920X1080P30
108
Video format: 1280X720P60
110
Image distortion
compensation: OFF
111
Image distortion
compensation: 1
112
Image distortion
compensation: 2
113
Image distortion
compensation: 3
114
Image distortion
compensation: 4
115
Image distortion
compensation: 5
116
Image distortion
compensation: 6
117
Image distortion
compensation: 7
118
Image distortion
compensation :8
119
Image distortion
compensation :9
120
Image distortion
compensation :10

6
5 MENU CONFIGURATION
<VIDEO>
(Please
refer
page 9)
I MAGE MODE
MODE1,MODE2, MODE3
SHARPNESS
0, 1, 2, 3, 4, 5, 6, 7, 8, 9, 10, 11, 12, 13,
14, 15
CONTRAST
1, 2, 3, 4, 5, 6, 7, 8, 9, 10, 11, 12, 13, 14,
15
GAMMA MODE
0, 1, 2, 3, 4,
DNR LEVEL
ON, OFF
LDC LEVEL
1,2,3,4,5,6,7,8,9,10,OFF
BACK
<EXPOSU
RE>
Please
refer page
9
EXP-
COMP
-7, -6, -5, -4, -3, -2, -1, 0, +1, +2, +3, +4, +5,
+6, +7
BLC
ON,OFF
ANTI–
FLICKER
OFF,50HZ,60HZ
BACK
<COLOR>
Please
refer page
10
WB MODE
AUTO,ONE PUSH,MANUAL
SATURATI
ON
1, 2, 3, 4, 5, 6, 7, 8, 9, 10, 11, 12, 13, 14
HUE MODE
AUTO,MANUAL
BACK
<
SYSTEM >
ADDRESS 1, 2, 3, 4, 5, 6, 7
PROTOCOL VISCA,PELCO-P,PELCO-D
7
❶
❷
❸
Please
refer page
10
BAUD RATE 2400,4800,9600,38400
VIDEO FORMAT 1080P30,1080P25,720P60
,720P50,
MOUNT MODE STAND,CEILING
RS485 PORT, HALF-DUPLEX-1,HALF-
DUPLEX-2
LANGUAGE ENGLISH,CHINESE
FIRMWARE VER V2.0.03
BACK
<RESTORE DEFAULTS>
Please refer page 11
<EXIT>
5.1 MENU EXPLANATION
5.1.1 MAIN MENU
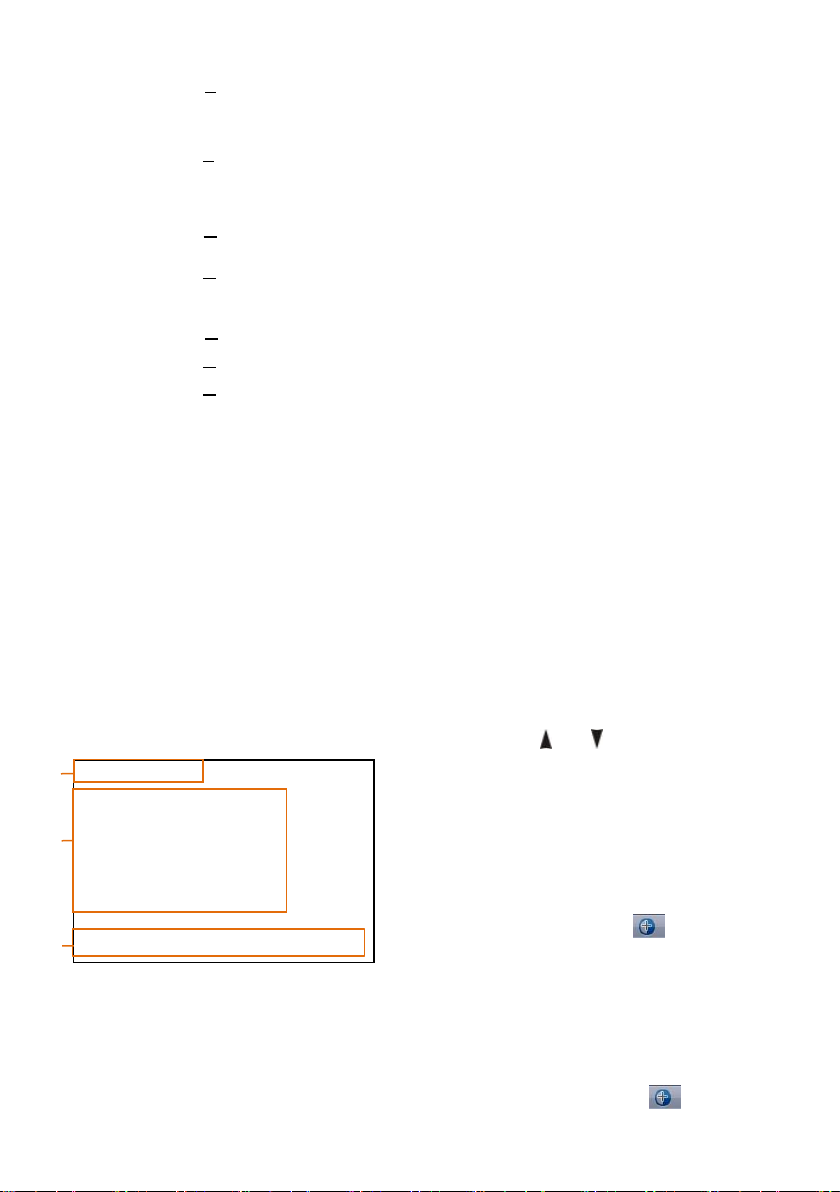
Call preset 95 to enter main menu.
❶Current Menu
It displays currently selected
menu option.
❷Menu Options
It shows all the submenus under
the current menu.
Press or button to select
submenu options. You’ll see
an arrow if one submenu is
selected. Press button to
enter the selected submenu.
5.1.2 SUBMENU
Under main menu, navigate to select
<EXPOSURE>,press button to
MENU
VIDEO…
EXPOSURE…
COLOR…
SYSTEM…
RESTORE DEFAULTS…
EXIT
[ ]SELECT [OK]NEXT
[]EXIT
Autres manuels pour AV-1161
1
Table des matières
Autres manuels Avipas Caméra de sécurité

Avipas
Avipas AV-2020 Guide de sécurité

Avipas
Avipas AV-2010 Manuel utilisateur

Avipas
Avipas AV-1562 Manuel utilisateur

Avipas
Avipas AV-1280 Manuel utilisateur

Avipas
Avipas AV-2020 Manuel utilisateur

Avipas
Avipas AV-2000W/G Manuel utilisateur

Avipas
Avipas AV-1364 Manuel utilisateur

Avipas
Avipas AV-1562 Manuel utilisateur


