Avalon Qvis Manuel utilisateur

AVALON
1 U
4, 8 Channel
DVR
User’s Manual
®


3
Directory
1 Production Introduction ................................................................ 6
1.1 Product overview .................................................................6
1.2 Main functions ....................................................................6
2 Open-package check and cable connections ....................................8
2.1 Initial check ............................................................8
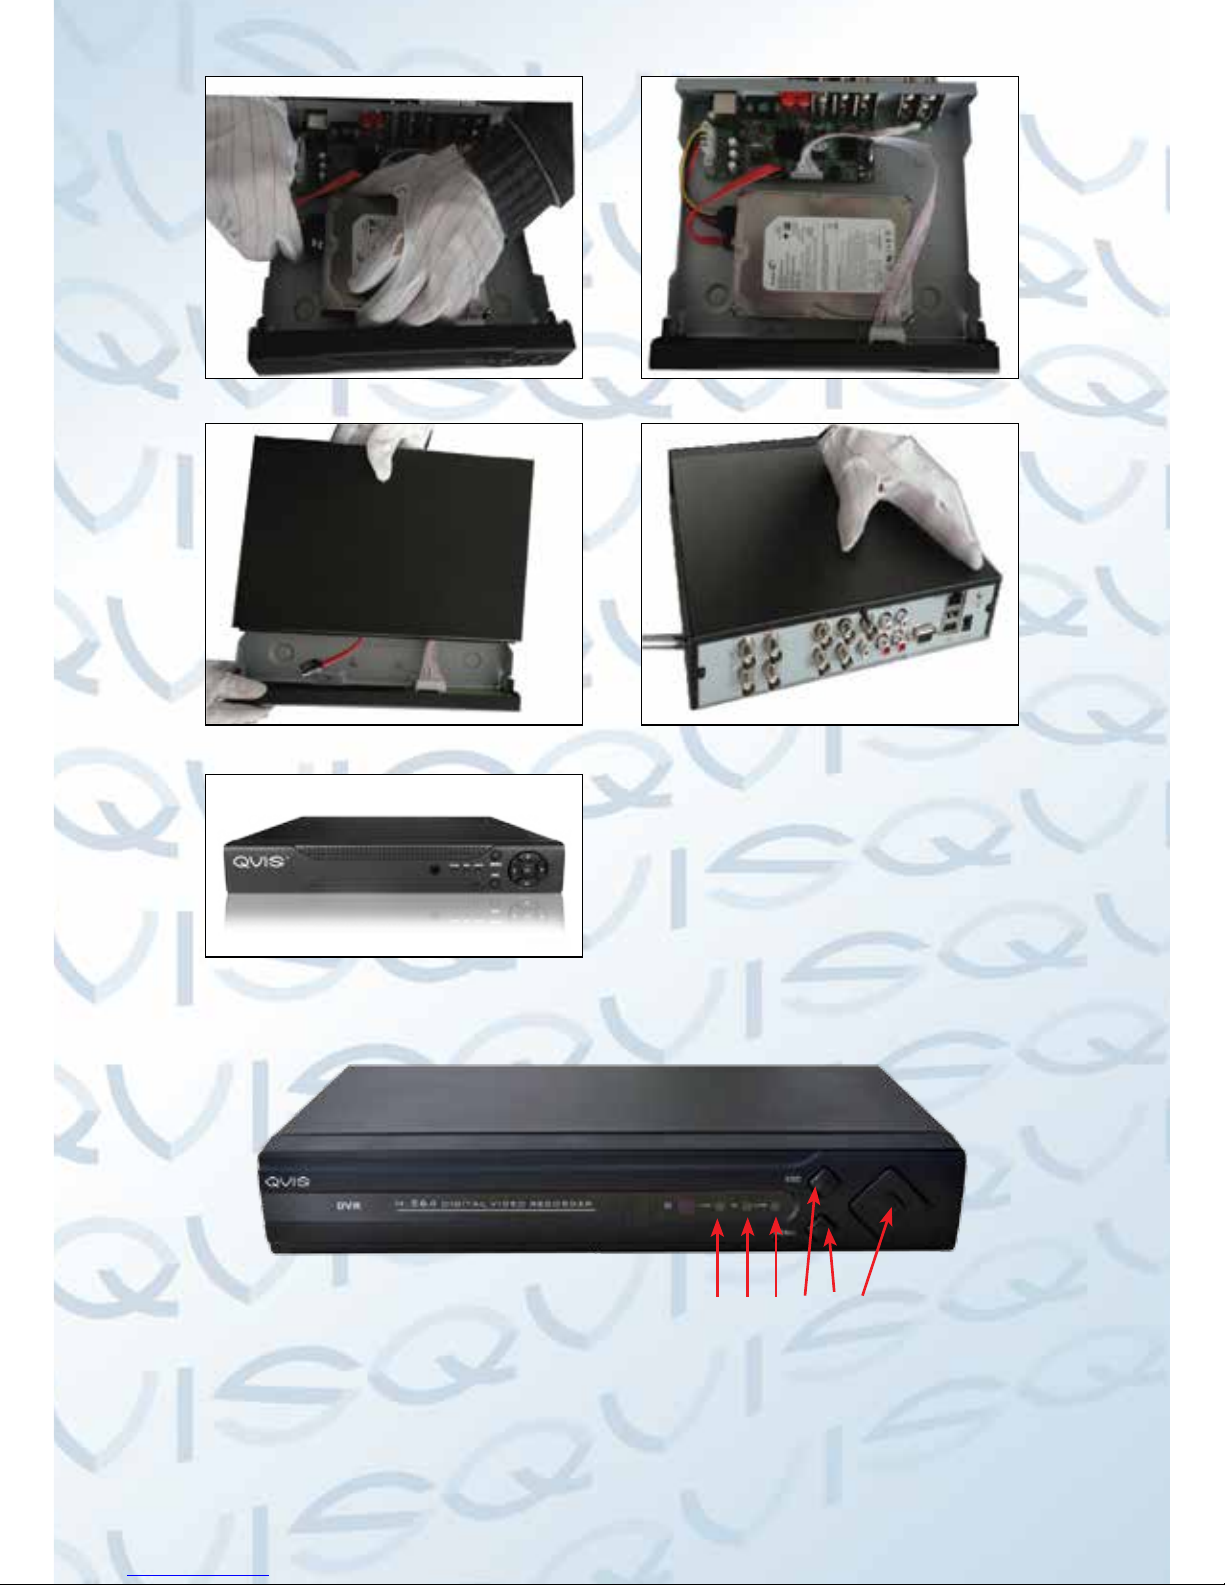
2.2 Hard disk installation ...........................................................8
2.3 Front panel .........................................................................9
2.4 Rear panel ..........................................................................10
2.5 Audio and video input and output connections ........................10
2.5.1 Video input connections ..................................................10
2.5.2 Video output connections and options ...............................10
2.5.3 Audio signal input ........................................................11
2.5.4 Audio signal output .......................................................11
2.6 Speed dome connections ....................................................11
3 Basic operation ............................................................................12
3.1 Turn on ............................................................................12
3.2 Turn off ............................................................................12
3.3 System Login ....................................................................12
3.4 Preview ............................................................................13
3.5 Desktop shortcut menu ......................................................13
3.5.1 Main menu ..................................................................14
3.5.2 Playback .....................................................................14
3.5.3 Record Mode ...............................................................17
3.5.4 PTZ control ..................................................................18
3.5.5 Color setting .................................................................22
3.5.6 Output adjust ................................................................22
3.5.7 Logout .........................................................................23
3.5.8 Window switch .............................................................23
4 Main menu .................................................................................24
4.1 Main menu navigation ........................................................24
4.2 Record .............................................................................25
4.2.1RecordCong ..............................................................25
4.2.3 Playback ......................................................................26
4.2.4 Backup ........................................................................26
4.3 Alarm ...............................................................................27
4.3.1 Motion Detect ..............................................................27
4.3.2 Video Blind ...................................................................29
4.3.3 Video Loss ....................................................................29
4.3.6 Abnormal .....................................................................30
4.4 System .............................................................................31
4.4.1 General ........................................................................31
4.4.2 Encode .........................................................................32
4.4.3 Network ......................................................................33
4.4.4 NetSevice ...................................................................33
4.4.5 GUI Display .................................................................37
4.4.6 PTZ .............................................................................38
4.4.7 Tour ............................................................................39

4
4.5 Advanced ..........................................................................39
4.5.1 HDD Manage ...............................................................39
4.5.2 Account .......................................................................40
4.5.3 Online user ...................................................................42
4.5.4 Output adjustment ........................................................42
4.5.5 Auto maintain ..............................................................42
4.5.6 Restore .......................................................................43
4.5.7 Upgrade ......................................................................43
4.5.8 Device Info ...................................................................43
4.6 Info ..................................................................................44
4.6.1 HDD info ....................................................................44
4.6.2 BPS ............................................................................44
4.6.3 Log .............................................................................45
4.6.4 Version ........................................................................45
4.7 Shut down system .............................................................45
5 FAQ and maintenance ..................................................................46
5.1 FAQ .................................................................................46
5.2 Maintenance .....................................................................51
Appendix 1.Remote controller operation .............................................52
Appendix 2.Mouse operation ............................................................52
Appendix 3.Technique parameters ......................................................53

5
Welcome
Thank you for purchasing our DVR!
This manual is designed to be a reference tool for the installation and operation
of your Qvis DVR series DVR system.
YouwillndinformationaboutthisQvisDVRseriesDVR'sfeaturesandfunctions,
as well as a detailed menu tree.
Before you begin installation and operation please read the following safeguards
and warnings carefully!
Important Safeguards and Warnings
Do not place heavy objects on the DVR.
PleaseensurenosolidorliquidfallintoorinltratetheDVR.
Pleasebrushprinted circuit boards, connectors,fans,machine box and soon
regularly.
Beforecleaninghowever,pleaseswitchoffthepowersupplyandunplugitfrom
the mains.
Do not attempt to disassemble or repair the DVR by yourself. Do not attempt to
replace any components by yourself.
Environment
Please position and use the DVR in a dry environment between 0oand 40o.
Do not position or use in direct sunlight or near a heat source..
DonotinstalltheDVRindamp,smokyordustyenvironment.
Avoid shocks or physical damage to the DVR.
Please insure the DVR is level and in a stable workplace.
Please install in a well ventilated environment. Keep the vents clean.
Use within the rating input and output scope.

6
1 Production Introduction
1.1 Product overview
This DVR is designed especially for the security and defence eld and is an
outstanding digital surveillance product.
WiththeembeddedLINUXoperatingsystemitisverystableand,inaddition,
has, as standard, the H.264mp video compressed format and G.711A audio
compressedformatwhichinsuresahighqualityimage,low error coding ratio
and single frame playback.
With our professional network video surveillance software and TCP/IP network
technology it has a superb network communication and telecommunication
ability.
The DVR can be used individually or online as part of a surveillance network.
The DVR can be used in banks, telecoms, power systems, prisons, hospitals,
transportation,homes,factories,storehousesandmanyotheruses.
1.2 Main functions
Real-time surveillance
Analog and VGA interface (VGA interface is equipped selectively)
Surveillance function through a monitor or a display
Storage
Non-workingharddiskdormancyprocessingwhichisconvenienttoradiateheat,
reducepowerandextendthelife-spanoftheDVR.
A special storage format which insures the data safety.
Compression
Real-time compression by individual hard disks which insures the audio and
video signal have a stable synchronization
Backup
ThroughaSATAandUSBinterfacestoUSBequipment,removableharddisks
etc.
Alsothroughthenettodownloadthelestotheharddisk
Playback
Individual real-time video recording as well as searching, playback, network
surveillance,recordingcheck,downloadingetc.
Multi-playback mode
Zoom in on a selected region
Net operating
Through net tele-surveillance in real time
Tele-PTZ control
Tele-recording check and real-time playback

7
Alarm linkage
Multi-route relay alarm output which is convenient for alarm linkage and control.
Protecting circuits in the alarm input and output interface which protects the
main machine from damage
Communication interface
RS485 interface which operates the alarm input and PTZ control
Standard ethernet network interface which controls the telecommuting function
Intelligent operating
Mouse action function
Fast copy and paste operating for the same setting

8
2 Initial check and cable connections
2.1 Initial check
WhenyourstreceiveyourDVR,pleasecheckthefollowing:
1. Please check whether there is any visible damage to the package
appearance. The protective materials used for the package of the DVR can
protect the DVR against most accidental damage during transportation.
2. Pleaseopentheboxandgetridofftheplasticprotectivematerials.Check
whether there is any visible damage to the DVR itself.
3. Pleaseopenthemachinecrustandcheckthedatawireinthefrontpanel,
power wire and the connection between the fan power and the main board.
Front and rear panel
l Thekeyfunctionsonthefrontpanelandtheinterfacespecicationforthe
realpanelareinthespecication.
lPlease check the product type described on the front panel whether is the
product type you ordered.
The label on the real panel is very important for after sales service. Please
protectitcarefully.Ifyouhavetocontactusforaftersalesservice,please
provide the product type and serial number from this label.
2.2 Hard disk installation
BeforeyourstusetheDVR,pleaseinstalltheharddiskasfollows:-
1). Undo the side screws 2). Lift off the cover
3). Screw on the hard disk 4). Connect SATA power wire

9
5). Connect SATA data wire 6). Ensure the right connections
7). Put the top back on 8). Screw on the cover
9).Installationnished
2.3 Front panel (may vary on some models)
(1) Alarm indication light
(2) Record indication light
(3) Power indication light
(4) ESC
(5) Menu
(6) Direction and OK
1 2 3 4 5 6

10
2.4 Rear panel
2.5 Audio and video input and output connections
2.5.1 Video input connections
The video input port is a BNC connector plug. The type of input signal is PAL/
NTSCBNC(1.0VP-P,75Ω).
The video signal must be of the correct standard and have a high signal to noise
ratio,lowaberrationandlow interference.Theimagemust be clearandhave
natural color and brightness in the environment in which it is to operate.
Insure the vidicon signal is stable and credible
The vidicon should be installed in a suitable location where is away from
backlighting and low illumination or uses backlighting and low illumination
compensation.
The earth and power supply of the vidicon and the DVR should be shared and
stable.
Insure the transmission line is stable
Thevideotransmissionlineshouldbeahighqualitycoaxialpairwhichissuitable
forthetransmissiondistance.Ifthetransmissiondistanceistoogreat,youshould
use shielded twisted pair, video compensation equipment or transmit by ber
optics to insure the signal quality.
The video signal line should be away from all electro magnetic Interference and
other signal line equipment. High voltage current should be especially avoided.
Insure the connection is stable
The signal and shield lines should be connected with a tight connection which
willhelpavoidfalsesignals,jointweldingandoxidation.
2.5.2 Video output connections and options
ThevideooutputisdividedintoPAL/NTSCBNC(1.0VP-P,75Ω)andVGAoutput
(selectiveconguration).
IfyoureplaceyourQvismonitorwithacomputerdisplay,therearesomeissues
to take note of.
1). Do not leave the display turned on for a long time.
2). To ensure normal working demagnetize regularly.
3). Keep the display away from electro magnetic Interference.
Table des matières


