
AutoGuard GMSCR300 Series Manuel utilisateur
User’s Manual
GMSCR150 & GMSCR300 Series
IMPORTANT: THE INSTALLATION OF THIS FIXTURE MUST BE DONE BY A QUALIFIED ELECTRICIAN.
WARNING: BEFORE ATTEMPTING ANY INSTALLATION OR MAINTENANCE, ENSURE THAT THE ELECTRICAL SUPPLY IS SWITCHED OFF AND THE CIRCUIT
FUSES REMOVED OR THE CIRCUIT BREAKER IS IN THE “OFF” POSITION.
• This fixture must be grounded.
• Do not mount the luminaire against flammable surfaces.
• The motion detector will not operate correctly if it is installed:
(I) Near the outlet of a central heating boiler.
(II) Pointing directly at moving vehicles.
(III) Within sight of reflection from moving water.
(IV) Where other lamps could shine onto the detector.
• Check the total load of the circuit. Including this luminaire. Does not exceed the rating of the circuit cable.
NOTE: This highly responsive unit may occasionally activate due to rapid environmental changes. Allow for approximately 30 seconds warm-up time
before the sensor resumes normal activity.
WARNING: THIS FIXTURE WILL BECOME HOT WHEN IN USE. ALLOW BULB TO COOL BEFORE TOUCHING.
NOTE: DO NOT REMOVE THE TAPE UNTIL YOU FINISH THE INSTALLATION. IF THE TAPE COMES OFF THE LIGHT, PLEASE REPLACE IT OR HOLD THE
LIGHT HEAD TO AVOID SWIVELING AND DAMAGE THE PRODUCT.
WARNING: RISK OF FIRE, BURNS, AND SHOCK, KEEP AWAY FROM FLAMMABLE EXPLOSIVE OR COMBUSTIBLE MATERIALS, TURN OFF, AND ALLOW
TO COOL BEFORE RE-LAMPING KEEP AT LEAST 3 FEET AWAY FROM ADJACENT MATERIALS.
CAUTION: RISK OF EXPOSURE TO EXCESSIVE ULTRAVIOLET (UV) RADIATION, DO NOT OPERATE WITHOUT COMPLETE BULB ENCLOSURE (LENS) IN
PLACE.
CAUTION: TO REDUCE RISK OF FIRE, USE MAX. 150W OR LESS TYPE T3 BULB 120V 60HZ FOR 150W FIXTURES; USE MAX. 300W OR LESS TYPE
T3 BULB 120V 60HZ FOR 300W FIXTURES. Suitable for wet location use.
CAUTION: RISK OF ELECTRIC SHOCK. Keep lamp at least 16 feet from pools and spas.
DO NOT SUBMERSE! KEEP PROTECTIVE GLASS IN PLACE!
ENGLISH
OVERVIEW
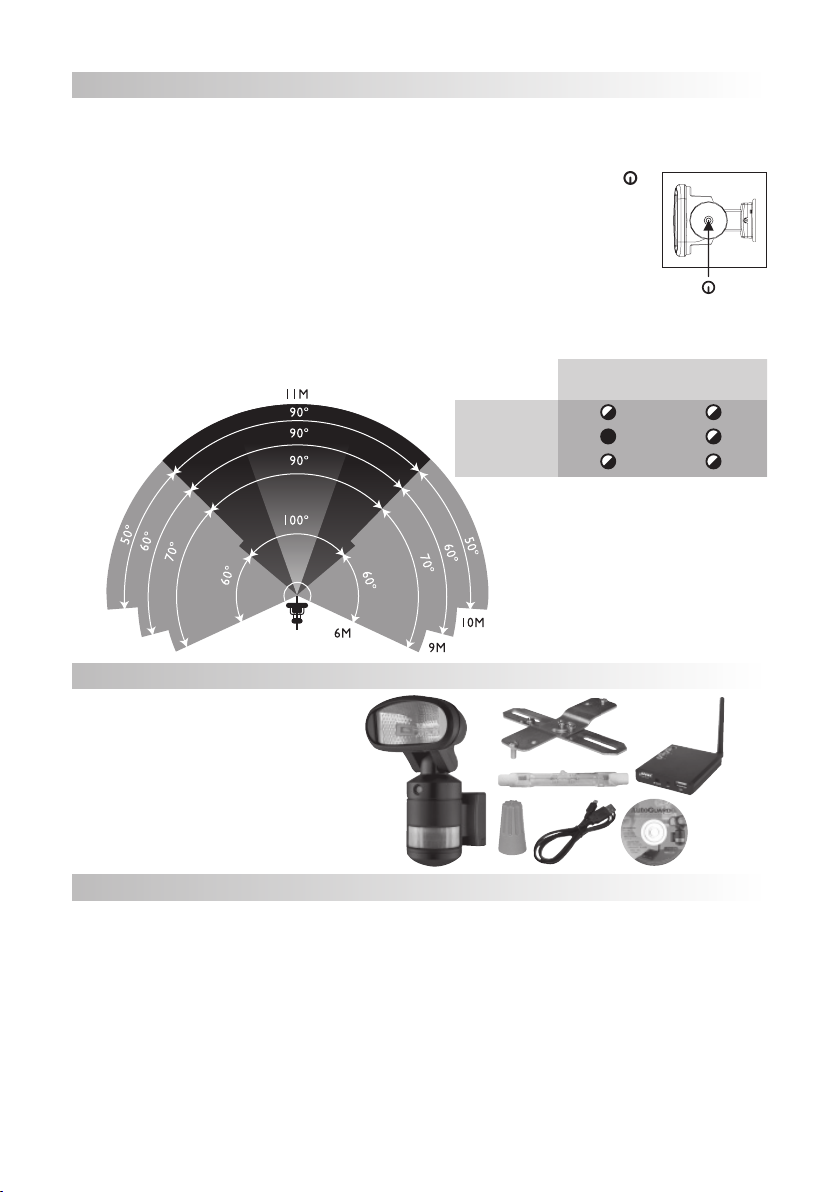
The AutoGuard Motion Tracker is equipped with 3 motion sensors: zone 1 covers 60 degrees, zone 2 covers 100 degrees, and zone 3
covers 60 degrees; totalling 220 degrees (maximum) in all three zones.
The AutoGuard Motion Tracker is set to “Energy-Saving” mode. To switch to 24HR mode, push the button ( )
at the bottom of the housing once.
• Energy Saving mode: heat/motion detection and camera works all day, light works at night - hidden LED
indicator will turn red under this mode.
• 24HR mode: heat/motion detection, camera and light works all day (24 hours).
When heat/motion is detected, the light will automatically switch on and track motion. The light will turn off after 3 minutes of
undetected heat/motion.
TOTAL DETECTION RANGE
ZONE 1
ZONE 2
ZONE 3
Motion Tracking
Light
Camera
Energy-Saving
mode
24-hour
mode
PACKAGE CONTENT
1 x AutoGuard Motion Tracker with camera
1 x Wireless receiver
1 x Mounting hardware
1 x 150W or 300W J-Type lamp
(depending on model)
1 x Software CD
SPECIFICATION
Detection Method: Passive Infrared Sensor (with continuously detect function)
Sensor Range: 10m x 220°
Camera: Color CMOS image sensor
View angle: 60°
Transmission frequency: ISM 2.4GHz
Operating temperature: -10°C
Power source: AC 120V 60Hz
Time adjustment: Fixed at 3 minutes approx.
Load rating: J-Type 150 Watts Max. for GMSA150 series
J-Type 300 Watts Max. for GMSA300 series
BULB INSTALLATION
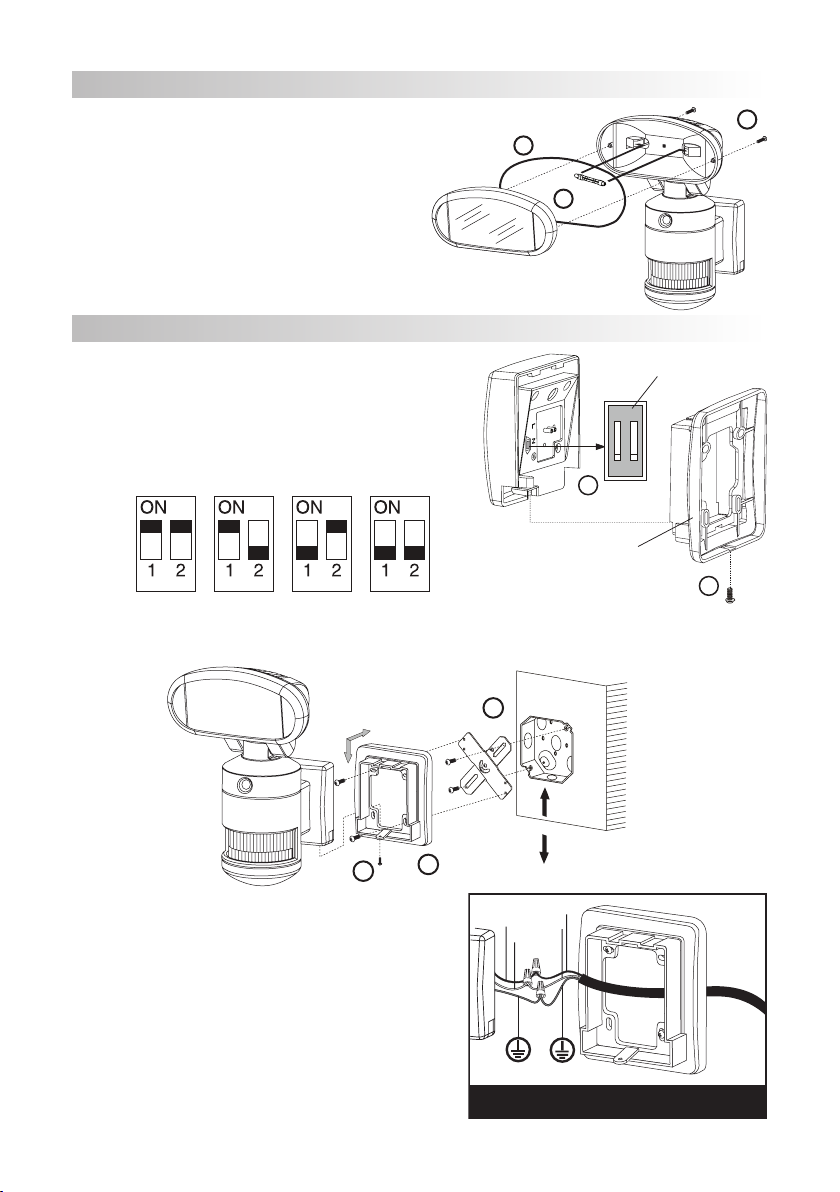
1. Remove the lamp cover of the luminaire and install a 150W or
300W (depending on model) J-type lamp.
2. Ensure that the gasket is seated properly on fixture.
3. Reinstall the lamp cover and tighten the screws.
1
3
2
INSTALLATION OF MOTION TRACKER
1
2
3
2-3 m
1. Remove the mounting plate from the back of the fixture by removing
the screw at the bottom.
2. Remove silicon cover from channel switch.
3. Set the channel you prefer.
4. Secure the silicon cover back in place.
MIN 75°C SUPPLY CONDUCTORS
N
black
white
L
5. Install mounting strap onto a junction box. The minimum installation height is 2 meters. And the maximum height is 3 meters.
6. Fit the mounting plate onto the mounting strap and tighten the screws.
7. Feed the cable through the back mounting plate.
8. Connect the green wire from the power source to the green wire on
the fixture. Connect the black wire from the power source to the black
wire on the fixture. Connect the white wire from the power source to
the white wire on the fixture.
9. Install the fixture to the back mounting plate.
10.Seal fixture to the wall with an outdoor waterproof silicone.
ON
12
Channel switch
Mounting Plate
1
2
Channel 1 Channel 2 Channel 3 Channel 4
OPERATION
1. Turn on the power to activate the light/camera, the light is now in start up mode. Light will turn on for 1 minutes, then return to
Energy-saving mode.
2. To test, walk through the sensor’s detection area.
3. Your body heat will activate the sensor and turn the light on, the light will turn the face to the detected zone.
4. After the light is activated, keep out of detection area and the light will switch off automatically after 3 minutes. The light will be
activated again when detecting any heat/motion.
NOTE: Pre-set to Energy-Saving mode, fixture will track heat/motion, light will not turn on during daylight hours.
LAMP REPLACEMENT
1. To isolate the unit, first switch off the unit from the mains power.
2. Unscrew the lamp cover and take the old lamp out and replace with new one.
3. Close the lamp cover and tighten the screws.
WIRELESS TV/PC RECEIVER
OVERVIEW
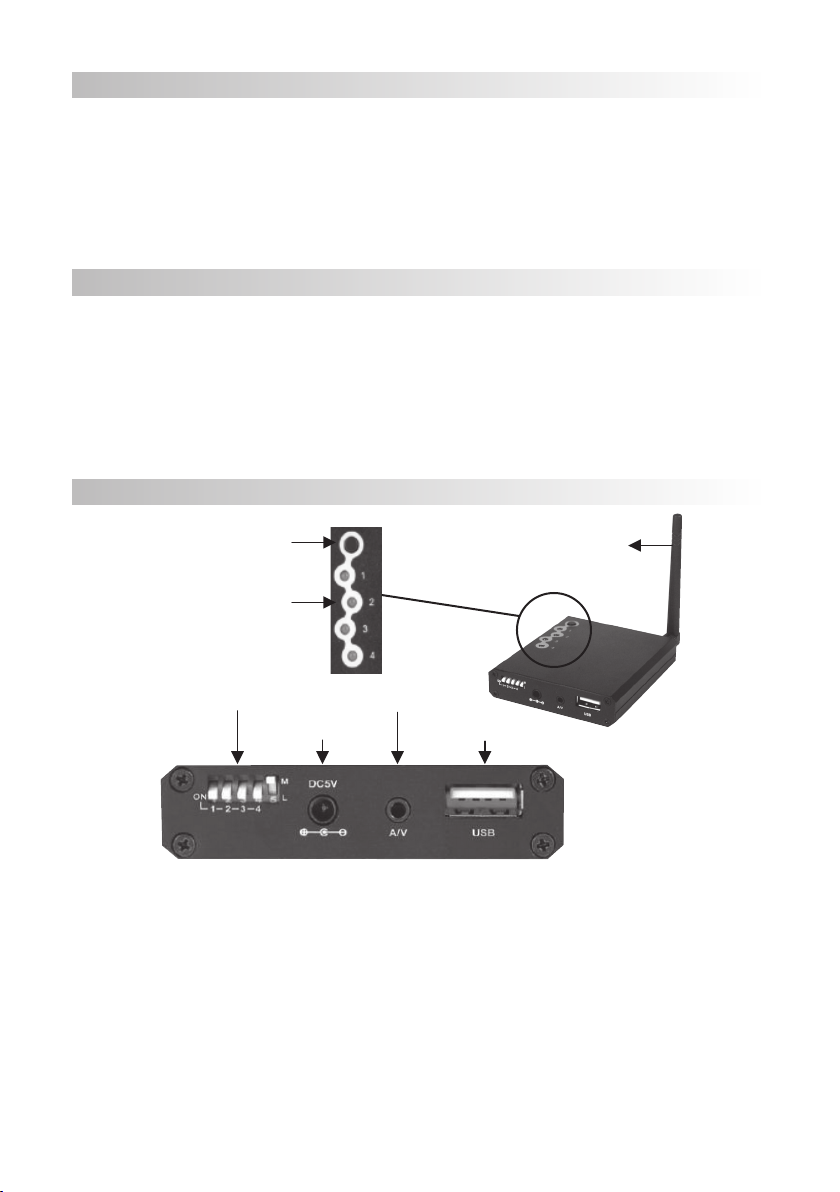
The wireless receiver supports up to 4 cameras working at the same time.
• Channel Setup:
You may slide the channel switch 1, 2, 3, and 4 to either ON, to enable the channel, or OFF, to disable the channel.
• Channel-looping Switch:
You may slide the channel-looping switch to either L, to enable the channel-looping function, or M, to disable it. In channel-looping
mode, the channels are looped and shown on the monitor/TV one by one every 5 seconds.
Antenna
USB 2.0 Port
AV Output
Power Socket
Mode Control
Channel Button
Channel Indicator
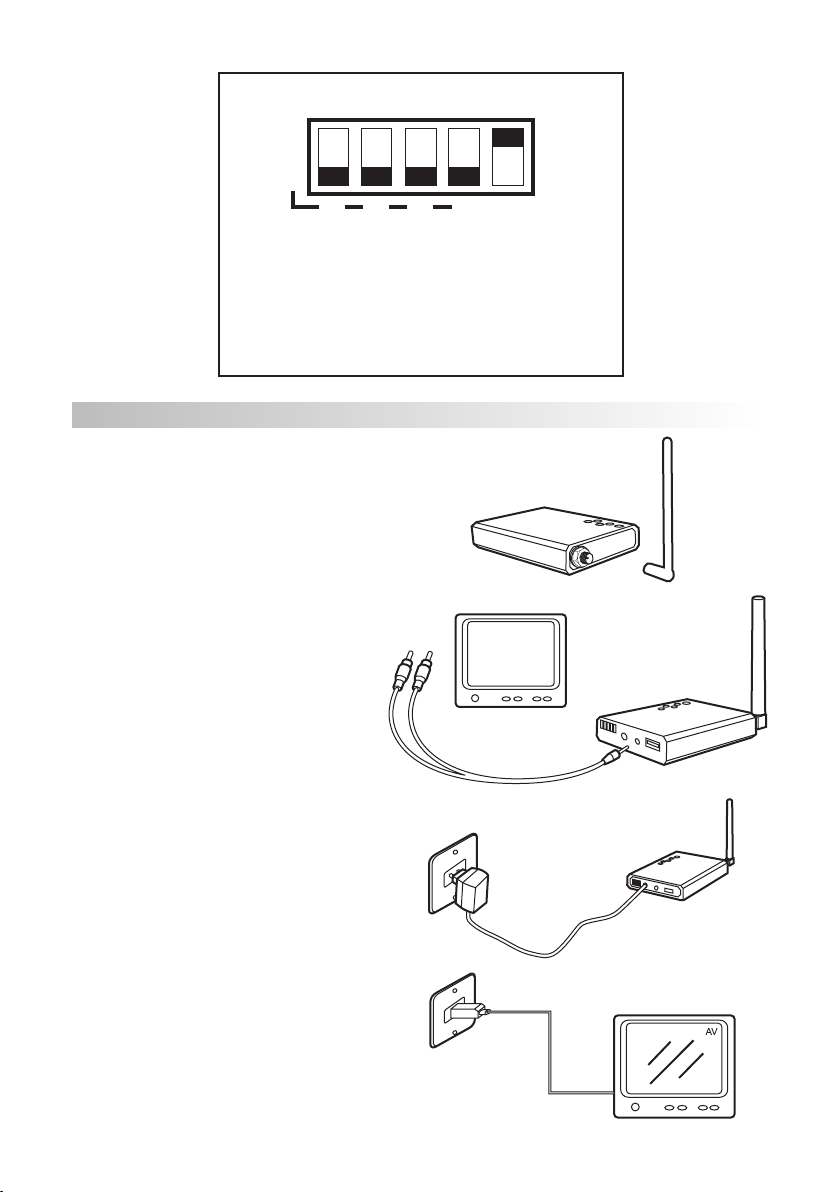
MODE CONTROL DEFAULT SETTING
OFF
ON
1234
L
M
CHANNEL SETUP (1-4):
ON : Channel available
OFF : Channel disabled
CHANNEL-LOOPING SETUP:
L: Channel Looping available (L = Auto Loop)
M: Channel Looping disabled (M = Loop disabled/Manual Set)
INSTALLATION TO MONITOR / TV
1. Connect the antenna to the receiver.
2. Before connecting the receiver and monitor/TV to the
mains power, connect the receiver to a monitor/TV
with AV cable (yellow for video and red for audio).
* Note: audio is not available for this item.
3. Connect the adapter to the receiver.
4. Power on the monitor/TV and select AV mode.

5. Set the channel of receiver same as the tracking light (1, 2,
3, or 4) by pressing the channel button continuously, and the
pictures are displayed on the monitor/TV.
6. Adjust the brightness, contrast and color of the monitor/TV for
the perfect effect.
INSTALLATION TO PC
System Requirements:
• Microsoft Windows 2000 / Windows 2000 Server / Windows XP SP2 / Windows Vista (32-bit)*
• Pentium IV 1.5GHz or better
• Upwards of 128MB Memory
• Upwards of 32MB VGA graphic card
• Sound card
• CD-ROM
• USB 2.0 Port**
* This product is only suitable for PC with USB 2.0 port. It won’t work when connected with PC with USB 1.1 or previous version. If you want to connect it with PC with
USB 1.1, you should install a PCI -> USB 2.0 commutator for conversion.
** This product does not work on any Microsoft Windows 64-bit.
1. Insert the installation CD into the CD-ROM drive,
waiting for the setup wizard to run automatically, and
you will see the window shown below.
2. Connect the antenna to the receiver.
Note: Liteline Corporation is not liable for any software or hardware damaged during installation.
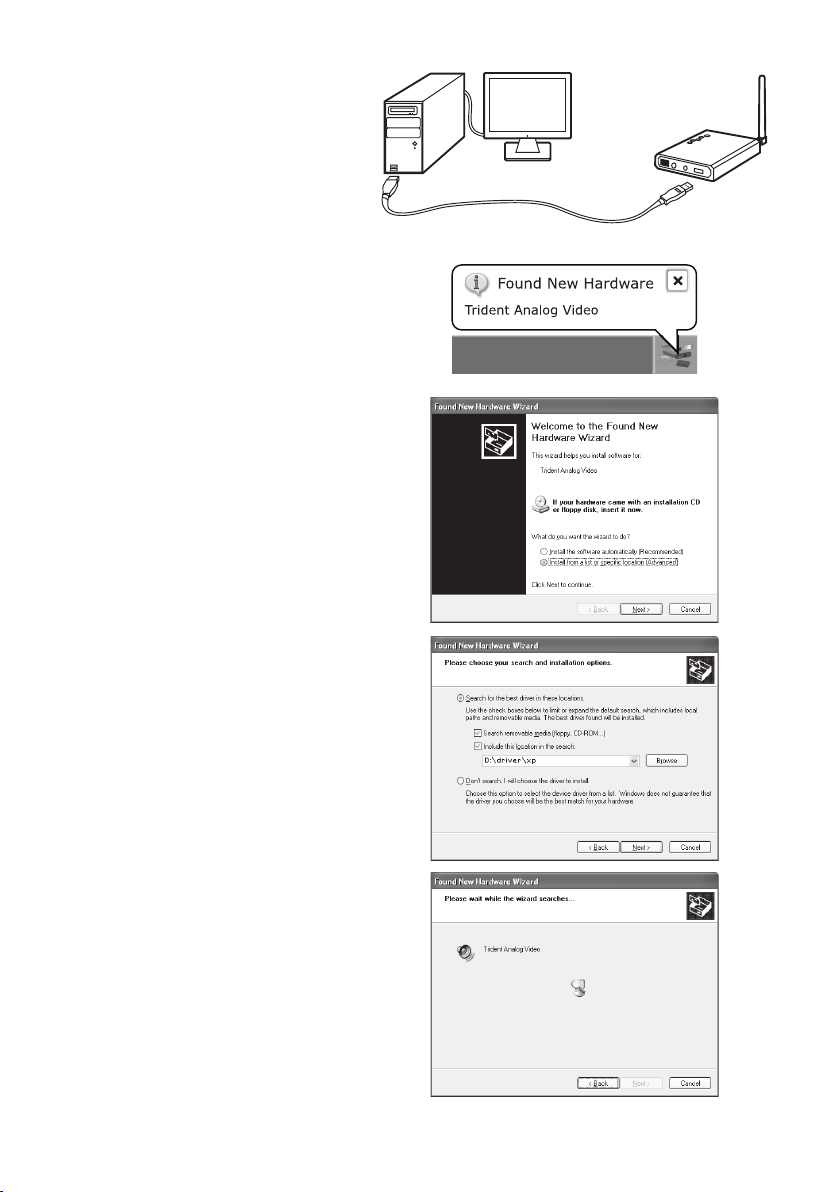
3. Start up the PC. Connect the receiver to the PC using
the USB cable.
4. A “Found new Hardware” hint box will appear at the
bottom right edge of the PC screen.
5. “Found New Hardware Wizard” window will pop up.
Choose “Install from a list or specific location” and
click Next to continue.
6. Search and installation window will pop up. Choose
“Search removable media (floppy, CD-ROM ...)” and
“include this location in the search:”. Click Browse
and direct to the directory (\driver\xp) on you CD.
7. Click Next, then wait for the wizard searching
window to pop up as follows:

8. A hardware compatibility warning window will pop
up. Click “Continue Anyway” to continue the
installation.
9. When “Completing the Found New Hardware Wizard”
window pops up, click Finish to finish the installation.
10.The channel indicator turns on. Press the channel
button to make the frequency channel same to that of
the camera.
To install DirectX and WinDVR, please refer to the User’s Manual in the CD.

Manuel d’utilisation
Séries GMSCR150 & GMSCR300
IMPORTANT : L’INSTALLATION DE L’APPAREIL DOIT ÊTRE EFFECTUÉE PAR UN ÉLECTRICIEN
AVERTISSEMENT : AVANT D’EFFECTUER L’INSTALLATION OU L’ENTRETIEN, S’ASSURER QUE LE COURANT EST COUPÉ ET LE FUSIBLE ENLEVÉ OU LE
DISJONCTEUR DÉSENGAGÉ.
• Cet appareil doit être branché à la terre.
• N’installez pas le luminaire sur une surface inflammable.
• Le détecteur de mouvement ne fonctionnera pas bien s’il est installé :
(I) près de la prise de courant d’une fournaise centrale;
(II) pointant directement à des véhicules automobiles;
(III) pointant vers les reflets d’une eau en mouvement;
(IV) là où la lumière d’une lampe peut réfléchir en direction du détecteur.
• Vérifiez la charge totale du circuit, incluant ce luminaire. Ne dépassez pas la charge nominale du circuit.
NOTE : Cette unité très sensible pourra, à l’occasion, se déclencher suite à un changement rapide du milieu. Laissez-le réchauffer environ 30 secondes
avant que le détecteur puisse reprendre son fonctionnement normal.
AVERTISSEMENT : CET APPAREIL DEVIENT CHAUD EN COURS D’USAGE. LAISSER L’AMPOULE REFROIDIR AVANT DE LA TOUCHER.
NOTE : NE PAS ENLEVER LE RUBAN TANT QUE L’INSTALLATION N’EST PAS TERMINÉE. SI LE RUBAN TOMBE, LE REMETTRE SUR LA LAMPE ET TENIR LA
LAMPE AFIN D’ÉVITER QU’ELLE PIVOTE ET ENDOMMAGE LE PRODUIT.
AVERTISSEMENT : RISQUE D’INCENDIE, DE BRÛLURE ET DE CHOC. GARDER LOIN DES MATIÈRES INFLAMMABLES, EXPLOSIVES OU COMBUSTIBLES.
ÉTEINDRE L’APPAREIL ET LE LAISSER REFROIDIR AVANT DE CHANGER L’AMPOULE. GARDER L’APPAREIL À AU MOINS 1 MÈTRE DE TOUT MATÉRIAU
ADJACENT.
MISE EN GARDE : RISQUE D’EXPOSITION À UNE IRRADITION ULTRAVIOLETTE (UV) EXCESSIVE. NE PAS L’UTILISER SANS LENTILLE EN PLACE.
MISE EN GARDE : AFIN DE RÉDUIRE LE RISQUE D’INCENDIE, UTILISER UNE AMPOULE T3 120 V, 60 Hz DE 150 W OU MOINS POUR LUMINAIRE DE
150 W; UTILISER UNE AMPOULE T3 120 V, 60 Hz DE 300 W OU MOINS POUR LUMINAIRE DE 300 W. Peut s’installer dans des endroits détrempés.
MISE EN GARDE : RISQUE DE CHOC ÉLECTRIQUE. Garder la lampe à au moins 4 mètres d’une piscine ou d’un spa.
NE PAS PLONGER DANS L’EAU. GARDER LA LENTILLE DE PROTECTION EN PLACE.
FRANCAIS
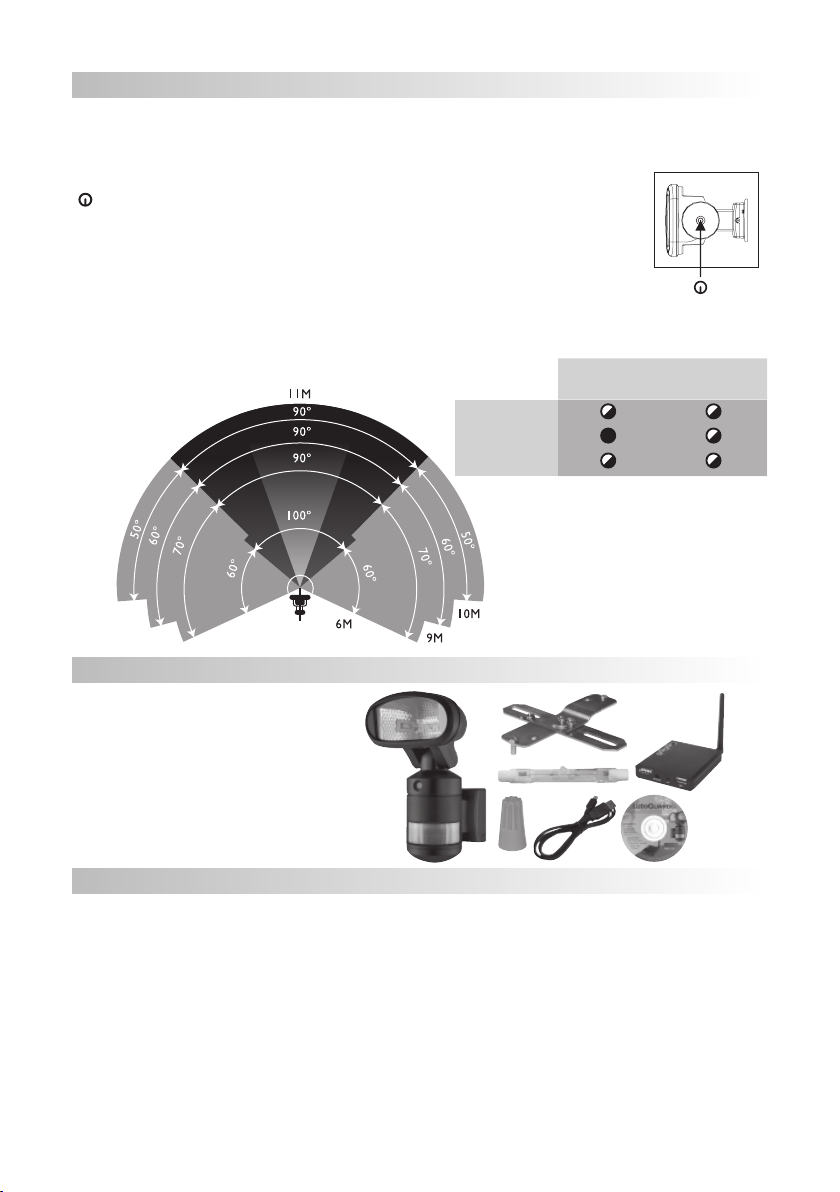
ZONE 1
ZONE 2
ZONE 3
PLAGE TOTALE DE DÉTECTION
GÉNÉRALITÉS
Le détecteur de mouvements AutoGuard comprend 3 détecteurs : zone 1 sur 30 degrés, zone 2 sur 100 degrés et zone 3 sur 60
degrés, pour un total de 220 degrés (maximum) sur les trois zones.
Le détecteur AutoGuard est réglé au mode éconergétique. Pour passer au mode 24 h, appuyez sur le bouton
( ) sur le fond du boîtier.
• Mode éconergétique : détection de mouvement / chaleur et caméra toute la journée; la lampe fonctionne la
nuit- la DEL dissimulée s’allume rouge à ce mode.
• Mode 24 heures : détection de mouvement, caméra et lampe fonctionnent sur 24 heures.
Sur détection de mouvement / chaleur, la lampe s’allume et la caméra enregistre. Le dispositif s’éteint sans détection. Elle s’éteindra
aprés 3 minutes de inaperçues de mouvement / chaleur.
Détection
Éclairage
Caméra
Mode
éconergétique
Mode
24 heures
CONTENU DE L’ENSEMBLE
1 x AutoGuard Motion Tracker avec caméra
1 x récepteur sans fil
1 x quincaillerie d’installation
1 x ampoule de type J 150 W ou 300 W (selon
le modèle)
1 x logiciel sur CD
CARACTÉRISTIQUES TECHNIQUES
Détection : Détecteur à infrarouge passif (détection en continu)
Plage de détection : 10 m x 220°
Caméra : Capteur d’image CMOS couleur
Angle de visionnement : 60°
Fréquence de transmission : ISM 2,4 GHz
Température de fonctionnement : -10° C
Alimentation : 120 VCA 60 Hz
Réglage temporel : Fixé à 3 minutes environ.
Charge : J-Type 150 Watts Max. pour séries GMSA150
J-Type 300 Watts Max. pour séries GMSA300
Ce manuel convient aux modèles suivants
3
Table des matières
Langues :
Autres manuels AutoGuard Caméra de sécurité


