Aura AMH-88DSP Manuel utilisateur
OWNER’S MANUAL
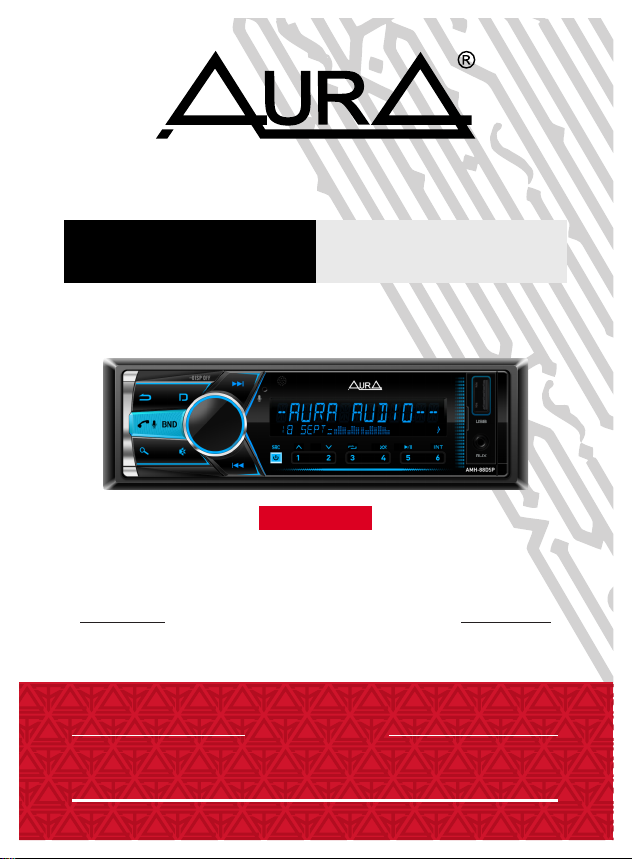
AMH-88DSP
HI POWER
WARNING!
PLEASE READ CAREFULLY BEFORE USING
CAR BLUETOOTH / USB RECEIVER
Trademarks and product names are used for editorial purposes only
and for the benefit of such companies only.
is a registered trademark. All rights reserved. This
document in whole or in part may not be reproduced or copied without
the prior written permission of the manufacturer.
The manufacturer does not accept any responsibility for the use of this
manual and decisions based on its use.
All brand and product names used in this document are trademarks or
registered trademarks of their respective companies.
In order to improve product quality, product specifications and
features are subject to change without notice.
The Directive WEEE 2012/19/EU on waste electrical and electronic
equipment.
Waste electrical equipment should not be disposed of with your other
household waste. Please recycle it. Please contact your local authority
for the required information.
1
Copyrights
All illustrations in this manual are schematic images of objects and may differ
slightly from their real appearance.
Product service life - 3 years.

2
Content
Precautions...........................................................................................
Package bundle and installation...........................................................
Connection............................................................................................
Appearance, control elements..............................................................
Overall size............................................................................................
Remote control......................................................................................
Main functions.......................................................................................
Settings.................................................................................................
Radio.....................................................................................................
USB.......................................................................................................
Bluetooth...............................................................................................
Phone app.............................................................................................
Technical features..................................................................................
3
4
5
6
7
7
9
9
13
14
15
16
18

This user manual contains important safety advice and information on the correct
use of the device. Please follow all instructions in this manual carefully.
2. Make sure that the device and especially its installation accessories are out of
the reach of children.
5. Do not disassemble the device yourself. This may void the warranty.
1. While installing the device, avoid places with high temperature, humidity, or
dusty places.
4. The manufacturer will not be held liable for any loss of data caused by device
damage, repairs or any other reason.
3. Do not drop the device and make sure do not hit it, as this may damage it.
6. Do not use alcohol, solvents or gasoline for cleaning plastic parts and device.
Use only dry soft cloth for cleaning.
7. Avoid contact with liquids.
8. The product is designed for use with 12-volt negative-grounded electrical
systems only. Using the device on systems with a positive ground and / or
voltage other than 12 volts may damage the vehicle and the device.
3
Precautions
Open the package and make sure that it contains:
1. USB receiver - 1 pc.
2. Remote control - 1 pc.
3. Keys for removing the receiver - 2 pcs.
4. ISO - connector - 1 pc.
5. Instruction
6. Warranty card
7. Cover for the front panel - 1 pc.
8. External VT microphone - 1 pc.
Package bundle and installation
4
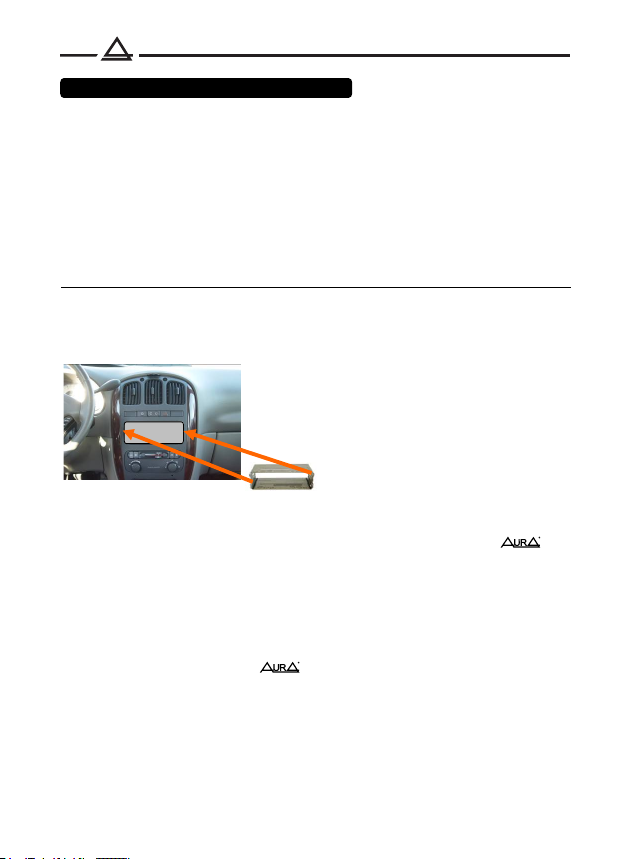
1DIN hole
If the car has a standard 1DIN hole for installing the head unit, use it as
described below.
2. Use a screwdriver to pry out the metal tabs on the mounting cover to lock it
in place.
3. Check electrical connections, ISO connector or individual wires (depending
on the equipment of the specific car model).
5. Insert the device into the mounting cover and slide it inward until it clicks into
place.
4. Connect the ISO connector to the device. And check the functionality of the
system before fixing it in the mounting box.
If necessary, use ISO adapters brand
1. Install the mounting cover into the 1DIN hole provided by the manufacturer. If
the standard place has a 2DIN size, use adapter frames and adapters
brand
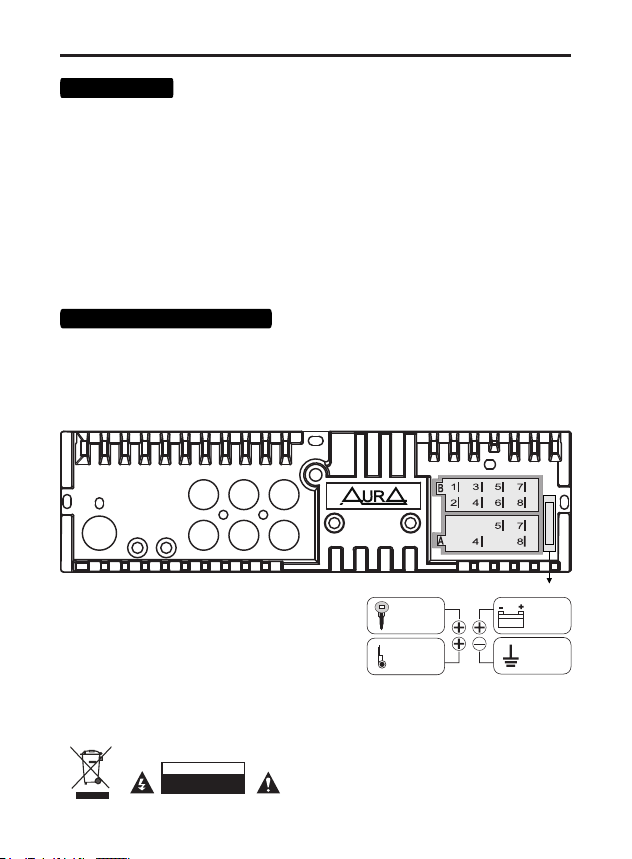
B7 Left channel + (green)
B2 Right channel - (purple-black)
B6 Left channel - (white-black)
B8 Left channel - (green-black)
B1 Right channel + (purple)
Front speakers
B3 Right channel + (gray)
B4 Right channel - (gray-black)
B5 Left channel + (white)
Rear speakers
WARNING
DO NOT OPEN
5
Connection
Note: Each time the yellow wire is disconnected from the 12 volt power circuit or the battery
terminal is removed, the device will revert to factory settings.
To avoid increased current consumption and unstable operation of the receiver, do not connect
the red wire (A5) to a constant +12 volt!
4. Connect the red wire (A7) to the ACC terminal of the ignition switch.
3. Connect the yellow (A4) wire to the +12 Volt DC power circuit.
7. Connect the rest of the wires according to the diagram.
1. Make sure that the on-board voltage of your vehicle is +12 volts
2. Remove the fuse from the device before connecting the wires.
5. Connect the black wire (A8) to the metal part of the car body.
6. Blue wire (A5) - connect to the amplifier's remote turn-on input or the antenna motor control
input
fuse
RED
ACC +12V
YELLOW
constant
power
+12V
BLACK
ground
MINUS
BLUE
control
wire
+12V
Mode 2 WAY (standard)
SUB - RCA subwoofer
FL - RCA front (left)
FR - RCA front (right)
RL - RCA rear (left)
RR - RCA rear (right)
ANT
MIC SWC
SUB FL RL
SUB FR RR
15 A
Mode 3 WAY (network)
SUB - RCA subwoofer
FL - RCA mid-range speaker (left)
FR - RCA mid-range speaker (right)
RL - RCA tweeter (left)
RR - RCA tweeter (right)
Connecting RCA wires
SWC - steering wheel control wired adapter input
(not included)
ANT - radio antenna connection input
(not included)
MIC - external microphone input (not included)
6
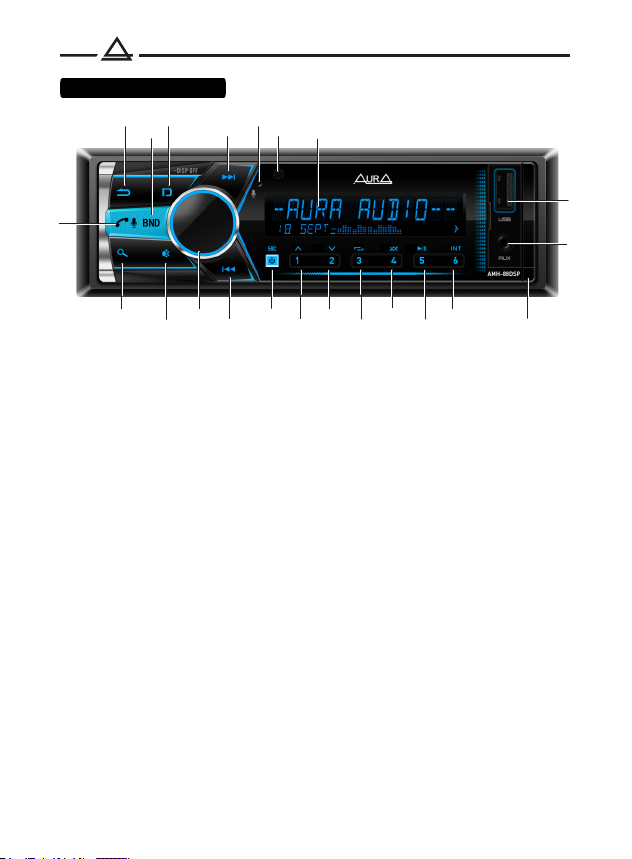
1. Return
2. Switching radio bands (FM1 / 2, FM3 (VHF), AM1 / 2)
3. Type of information on the display / Turn off the display
4. Next track / Fast forward / Radio tuning
5. Microphone
6. IR receiver
7. LCD display
8. Answering / ending a call / Voice assistant
9. Search
10. Muting the sound (Mute)
11. Adjust volume / Switch settings / Confirm selection
12. Previous track / Rewind / Radio tuning
13. Turn on / off device / Select source
14. Preset button 1 / Next folder
15. Preset button 2 / Previous folder
16.Preset Button 3 / Repeat Mode
17. Preset button 4 / Shuffle mode
18. Preset button 5 / Pause
19. Preset button 6 / Track scan mode
20. AUX input
21. USB connector
22. Front panel release button
6
5
23
7
9
12
8
1
13
4
11 14 15 16 17 18 19
21
20
10 22
Control elements
7
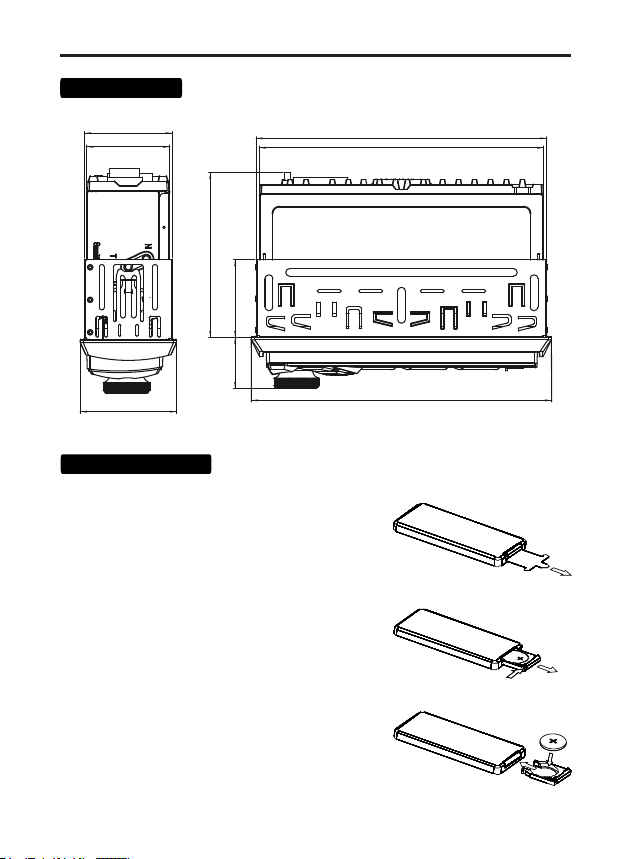
106
32,5 49,5
188
178
182
53
50
58
Removing the battery protection (CR-2025).
Remote control supplied with battery protection.
The remote control will not work
until the protection is removed.
Battery replacement:
1. When the lithium battery has lost capacity,
replace it as shown in the figure.
2. Press and hold the release latch in the
direction of arrow 1.
At the same time, pull the compartment out
of the remote control in the direction of arrow 2.
3. Replace the old battery with a new one.
Observe polarity! Make sure the (+) is on top!
4. Insert the battery holder into the remote control.
12
4
3
Overall sizes
Remote control

8
1. Turn on/ off the device
2. Volume control
3. Switching radio bands
/ answer call
4. Previous track / Rewind
/ Radio setup
5. Source selection
6. Next track / Fast forward
/ Radio setup
7. Mute mode
8. End call / Clock
9. Preset 1 button / Pause
10. Preset 2 button
/ Track scanning mode
11. Preset 3 button / Repeat mode
12. Preset 4 button / Shuffle mode
13. Preset 5 button
/ Skip back 10 tracks
14. Preset 6 button
/ Skip forward 10 tracks
15. Radio reception mode (mono / stereo)
16. Loudness (LOUD)
17. Scanning stations in memory / Automatic search and storage of stations (AMS)
18. Source selection
19. Selecting a preset equalizer
20. Attenuation of the tuner sensitivity (LOC)
2
Using the remote control (RC):
• Place the emitting window of the remote control in the direction of the sensor
window on the device.
• The working angle for receiving remote control signals is about 30 degrees.
• Distance between the emitting window of the remote control and the touch
window of the device should be less than 5 meters.
• A depleted battery can damage the remote control.
• Keep batteries out of the reach of children!
Remote control

Volume control
Rotate the volume knob to set the desired level.
ON / OFF Power
Press any button to turn on the device.
Press and hold the button (13) /SRC, to turn on the device.
Source selection
Press the (13) / SRC button to switch between sources
playback: Radio -> USB -> AUX in -> Bluetooth.
Press the button (11)
Mute mode
Settings menu
Press the volume knob button and rotate to select
desired setting section: AUDIO (sound settings), DISPLAY (display settings),
TUNER (radio settings), CLOCK (clock), BEEP (button sound), ANIMATION
(display animation), DEMO MODE (demo mode).
Press the volume knob to select the desired section.
9
Manual EQ (Equalizer) - equalizer setting
Manual setting of 25 band equalizer (from -9 dB to +9 dB).
Tuning is possible at frequencies: 32 / 45 / 63 / 100 / 125 / 160 / 250 / 315 /
400 / 500 / 630 / 800 / 1 / 1.25 / 1.6 / 2.5 / 3.15 / 4/5 / 6.3 / 8/10 / 12.5 / 16 / 20.
Q-factor - Q-factor setting
Setting the value of the quality factor (quality factor).
Values: 1 / 1.5 / 2.5 / 3.5.
IMPORTANT! Before entering the AUDIO menu when the AUDIO section
name is displayed on the screen, press and hold the volume knob button
to select 2-way or 3-way crossover configuration mode:
2 WAY (normal) or 3 WAY (network).
AUDIO - sound settings
Main functions
Preset EQ - pre-set equalizer.
Values: Custom / Natural / Rock / Pop / Easy / Top 40
Bass boost
Turns on and adjusts the bass boost (5 levels).
Table des matières
Autres manuels Aura Récepteur de voiture


