
Asotel LP - 201/H Manuel utilisateur
I
IP
P
P
Ph
ho
on
ne
e
U
Us
se
er
r
M
Ma
an
nu
ua
al
l

Chapter 1 Introduction ...................................................................................................................... 3
Product Description.................................................................................................................. 4
1.Features and Specification ............................................................................................... 4
2.Appearance......................................................................................................................... 6
Chapter 2 Operating Procedure – LCD Display Configuration .................................................. 9
1.Initialize IP PHONE ................................................................................................................ 9
2.LCD Configuration ................................................................................................................. 11
Chapter 3 Advanced Configurations via Telnet........................................................................... 17
1. [help] command..................................................................................................................... 17
2. [quit] command...................................................................................................................... 18
3. [reboot] command................................................................................................................. 18
4. [flash] command.................................................................................................................... 18
5. [commit] command ............................................................................................................... 19
6. [ifaddr] command .................................................................................................................. 19
7. [time] command..................................................................................................................... 20
8. [ping] command..................................................................................................................... 20
9. [pbook] command ................................................................................................................. 21
10.[ddns] command .................................................................................................................. 22
11.[pppoe] command ................................................................................................................ 23
12.[sysconf] command.............................................................................................................. 24
13. [h323] command ................................................................................................................. 25
14. [voice] command................................................................................................................. 27
14. [rbtone] command............................................................................................................... 28
15. [tos] command..................................................................................................................... 29
16. [tone] command .................................................................................................................. 30
17. [support] command............................................................................................................. 31
18. [bureau] command.............................................................................................................. 32
19.[rom] command .................................................................................................................... 32
20.[passwd] command.............................................................................................................. 33
Chapter 4 Web Configuration ..................................................................................................... 35
Step 1. Browse the IP Address predefined via Keypad or TELNET.................................. 36
Step 2. Input the login name and password.......................................................................... 36
Step 3. The web interface main screen ................................................................................. 37
Step 4. Start configure .............................................................................................................. 37
1.Network Configure ........................................................................................................... 38
2. H323 Configure ............................................................................................................... 40
3. System Configure ........................................................................................................... 42
4. PPPoE Configure............................................................................................................ 43
Chapter 5 Upgrade the IP PHONE ............................................................................................. 55
1

Download Procedure ............................................................................................................. 55
1.LCD Panel Control........................................................................................................... 55
2.Remote Control: Telnet ................................................................................................... 55
3.Web Management............................................................................................................ 57
2

Chapter 1 Introduction
The IP PHONE is a full-featured IP-based telephone system, which provides VoIP service
on LAN or any IP based environment. By using IP environment for voice communication,
company or individual can save lots of expenses and make data and voice network
converged.
IP PHONE also supports PSTN analog line connection. Therefore, it can perform as the
same as traditional POTS (Plain Old Telephone Service).
3

Product Description
1.Features and Specification
Basic Features:
ITU-T H.323 v3 compliance
DTMF detection/generation
TFTP/FTP software download
Remote configuration/reset via Telnet
LED indication for system statusSpeaker, Hold ,Mute , Message , PSTN
Network Interface :
- Switch Hub inside, providing 2 RJ-45 sockets for 10/100Base-T connection
- 1 RJ-11 socket for PSTN connection
Microsoft Net Meeting v3.0 compatible
SNTP (Simple Network Time Protocol)
Call HOLD/TRANSFER/FORWARD/MUTE
PSTN/IP side access switch
10 Direct Line Button for speed dial
Speaker Mode
System Configuration from keypads and displayed on LCD
Ring Tone selection
Password setting for security
Function Keys : Speaker , Redial , Mute , Hold , Transfer , Forward , Message , PSTN
Ten sets last Phone Number redial
Dial plan
Provide TOS(Type Of Service) function
GateKeeper mode or Peer to Peer mode selection
Caller ID:
IP side display H323-ID and E.164.
Display the count of total call received.
Display un-answered call name, number.
Show caller’s name, number, calling time.
Volume Adjustment:
Speaker volume level adjustable.
Handset Receiver volume level adjustable.
4

LCD:
2 lines, 24 character Dot Matrix display.
Indicator messages of HOLD, MUTE, PSTN, Directed Line 1~10.
Display current date and time.
Display of call duration.
Audio features:
Codec -- G.711 a/µlaw, G.723.1 (6.3Kbps),G.729, G.729a
VAD (Voice Activity Detection), CNG (Comfort Noise Generate)
G.168/165-compliant adaptive echo cancellation
Dynamic Jitter Buffer
Bad Frame Interpolation
Provide H.245 Out-band DTMF message
Call Transfer (H.450.2)
Call Forward (H.450.3)
Call Hold (H.450.4)
Gain (Voice Volume) Settings
Provide Call Progress Tone: Dial tone, busy tone, call-holding tone and ring-back tone
Firmware Upgrade:
Firmware version displayed on LCD.
Two ways to upgrade firmware:
- Download by KEYPAD configuration.
- Download by Telnet.
Management Features:
Two easy ways for system configuration
- TELNET
- IP PHONE KEYPAD (can only upgrade application rom file)
- Web Browser
5
2.Appearance
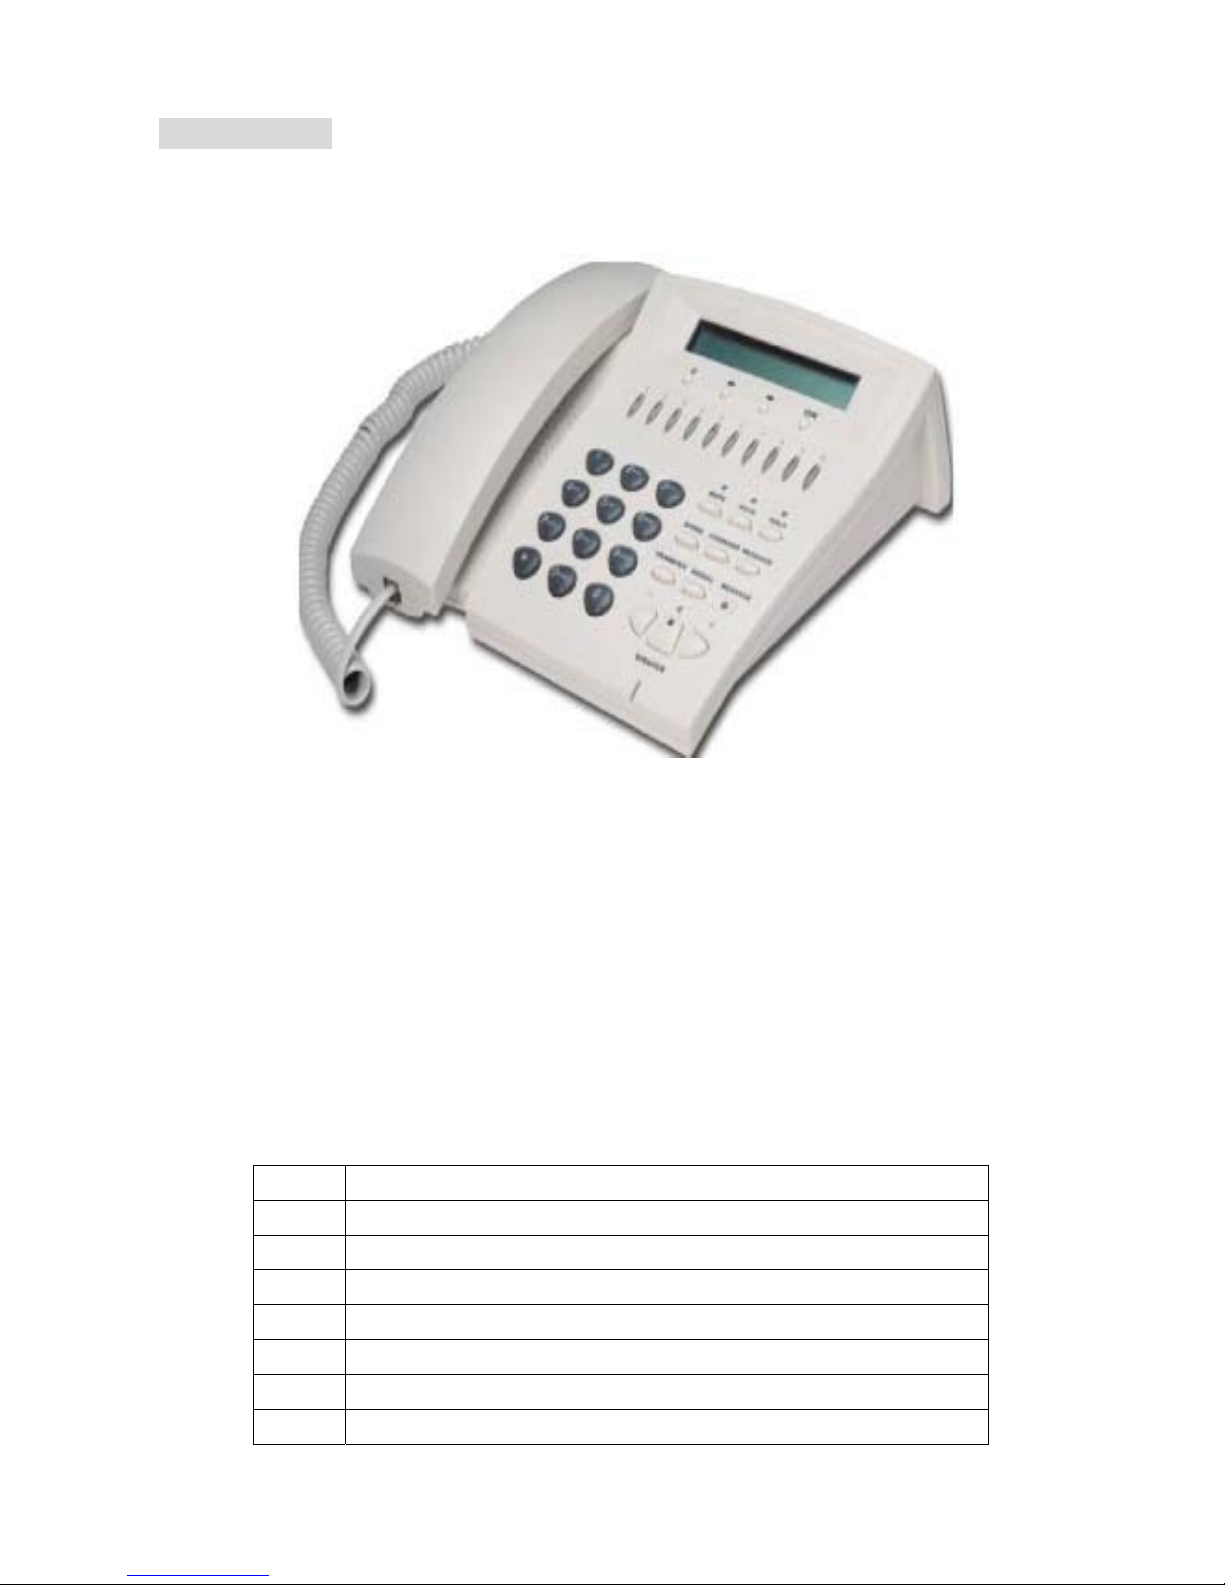
1.Front View and Keypad function
C: Cancel and Clear♦
♦
♦
♦
♦
: Move to left /previous and right/next .
OK: Press OK to confirm the modification.
Direct Line (DL) Button 1 – 10: User press DL button to do speed dial according to
phone book data 1-10 (please refer to LCD configuration-Phone Address Book or
Advanced Configurations via Telnet-[pbook] command ).
Number 1 –10, * and #: The function is as the same as the general phone set.
Corresponding list of keypad and symbol:
1 “Space” ; “,” ; “.” ; “!” ; “1”
2 “A” ; “ B” ; “C” ; “2”
3 “D” ; “E” ; “F” ; “3”
4 “G” ; “H” ; “I” ; “4”
5 “J” ; “K” ; “L” ; “5”
6 “M” ; “N” ; “O” ; “6”
7 “P” ; “Q” ; “R” ; “S” ; “7”
8 “T” ; “U” ; “V” ; “8”
6

9 “W” ; “X” ; “Y” ; “Z” ; “9”
* “-“ ; “?” ; “*”
0 “0”
# “_” ; “@” ; “#”
MUTE: Mute the voice of MIC and let others can’t hear from user in communication.♦
♦ PSTN: Press PSTN to switch IP PHONE as PSTN or IP Phone Mode. In PSTN mode,
“PSTN” characters will be displayed on LCD left bottom side, then users can dial out as
if standard telephone set in PSTN ; in IP Phone mode , “GK” characters will be
displayed on LCD left bottom side.
Note:1. When IP PHONE is in PSTN mode, only PSTN and SPEAKER function key can
work.
2. On LCD will display ”…Incoming Call... ” to notice user when IP PHONE has both
IP and PSTN side incoming calls.
3. If in communication with IP side, user can press HOLD to hold IP side, then press
PSTN to pick up PSTN side, after that can press HOLD again to retrieve IP side.
4. If in communication with PSTN side, user must hang up PSTN side before pick up
IP side.
HOLD: To hold a call with H.450 function.♦
♦
♦
♦
♦
♦
♦
♦
SPEED: Press SPEED and number (Phone book index) to do speed dial according to
phone book data (please refer to LCD configuration-Phone Address Book or Advanced
Configurations via Telnet-[pbook] command ).
FORWARD: Forward a incoming call to another IP device by H.450 forward
function.(please refer to LCD configuration-Indicate Forward Type)
MESSAGE and its indicated LED light: When missing the incoming calls, the
message LED will be flashing. User can know the information of miss call by pressing
the message button.
TRANSFER:
1. Transfer a call by H.450 transfer function. Press TRANSFER button in
communication and press phone No. which user want to transferred to can transfer
this call .
2. Change characters to be capital or lowercase: when press TRANSFER before press
letters can switch type of letters.
REDIAL: Redial the last outgoing call.
+ and - : Adjust the voice volume in communication.
SPEAKER: Speaking without picking up handset.
Note: All function keys mentioned above (except Number 1 –10, * and # ) are effective
7

only in IP Phone mode.
2.Back View
DC 9V: DC 9V power input outlet♦
♦
♦
♦
LAN: RJ-45 connector, connected directly to the Hub through the straight CAT-5 cable.
PC: RJ-45 connector, connected directly to the PC through the straight CAT-5 cable
Line: RJ-11 connector, connected directly to the PSTN analog line.
Note: There are two LED indicated lights: LINK/ACT and 10/100 for LAN port and PC port.
When network status is in normal, LED of LINK/ACT will be flashing; when transmit rate is in
10 mbps/100mbps, LED of 10/100 will light off/on .
3.Specification of connector
1 Ethernet Port
Ethernet port is for connecting IP PHONE to network, transmit rate supports 10/100
Base-T.
8
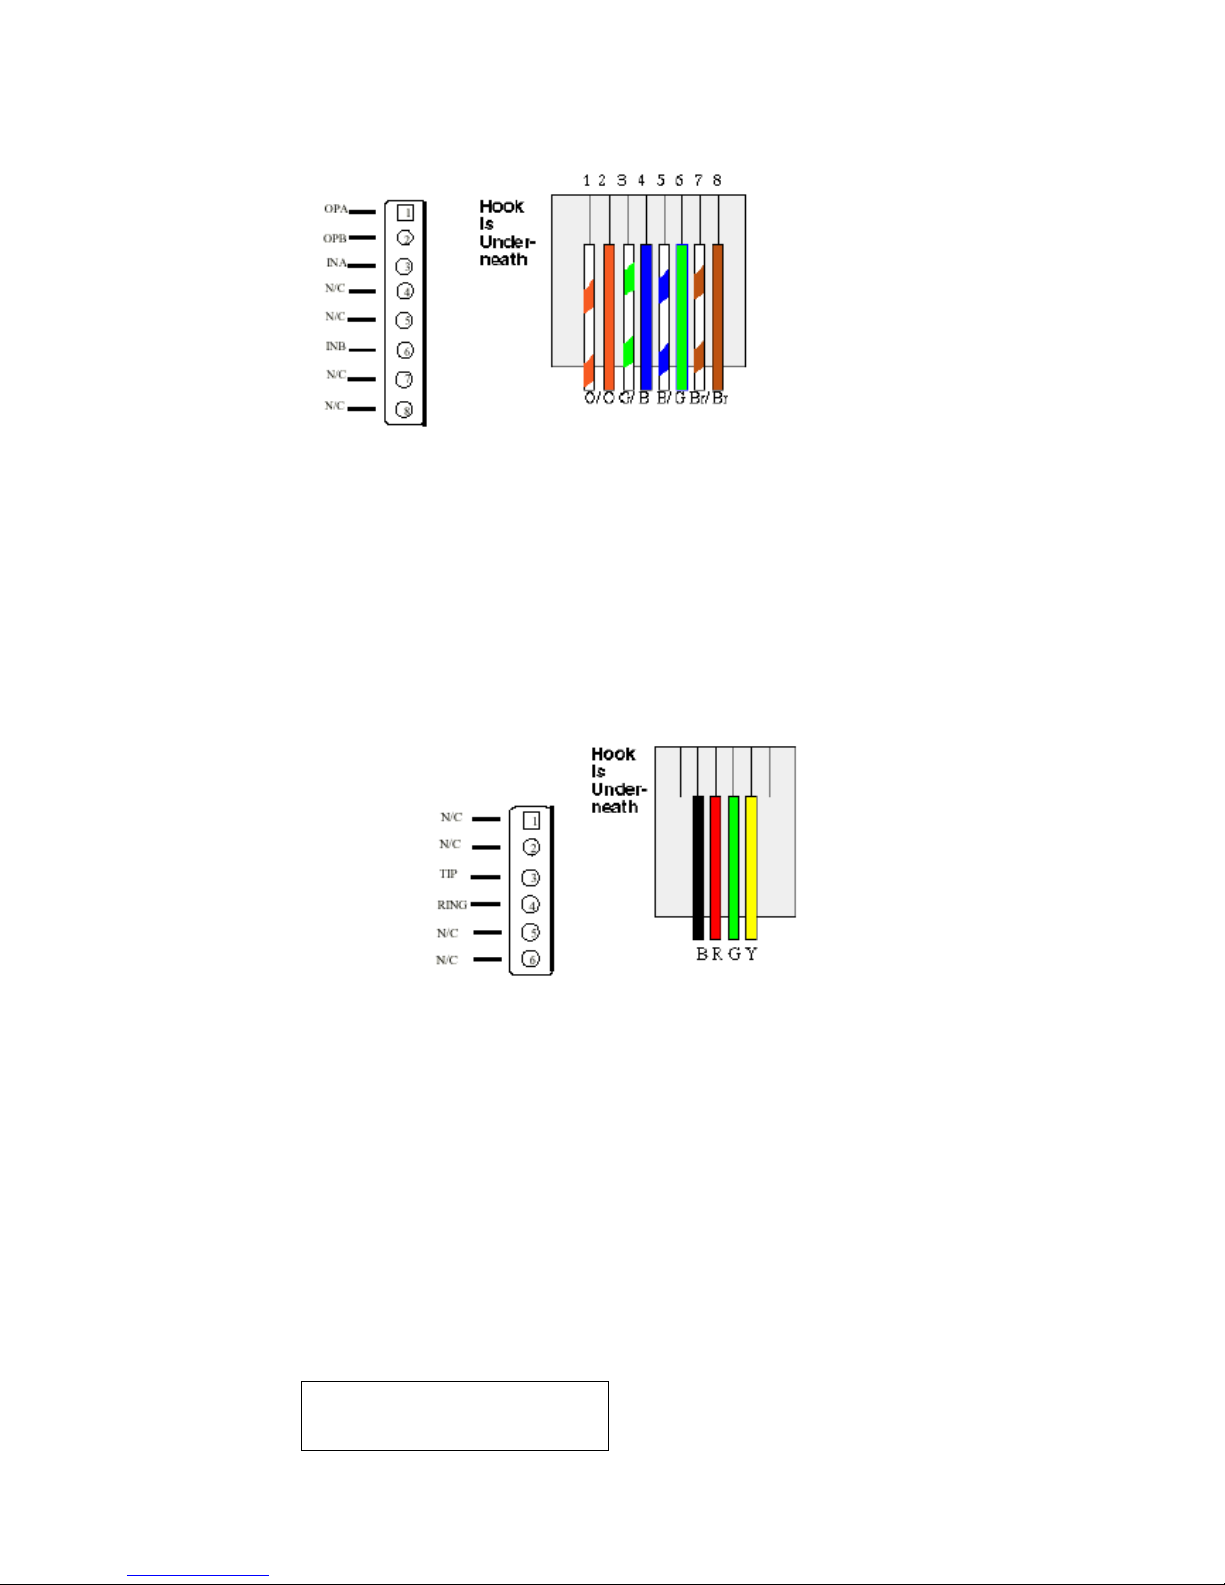
Ethernet connector LAN
2 RJ11connector
RJ11 connector is for connecting IP PHONE with PSTN.
RJ11connector
Chapter 2 Operating Procedure – LCD Display
Configuration
1.Initialize IP PHONE
1. When power on the IP PHONE, the LCD screen shows as below.
IP-Phone
Board Start Booting
9
Table des matières
Autres manuels Asotel Téléphone IP


