Asko CC96364W Manuel utilisateur

Instructions for use
COOKER
CC96364W
CC963614W
CC963614S
789046_en_naslovnica_drug_papir.indd 3789046_en_naslovnica_drug_papir.indd 3 8. 11. 2021 14:58:428. 11. 2021 14:58:42

EN Manual EN 3 - EN 34
Pictograms used
Important information
Tip
789046_en_naslovnica_drug_papir.indd 4789046_en_naslovnica_drug_papir.indd 4 8. 11. 2021 14:59:018. 11. 2021 14:59:01

EN 3
CONTENTS
Your cooker
Introduction 4
Control panel 5
Ceramic hob description 6
Oven description 7
Guide rails/Telescopic guide rails 7
Cooling fan 8
Accessories 8
Door 9
Push-pull knob 9
Drawer 9
Door lock 10
Initial use 11
Before using the oven 11
Before using the ceramic hob 11
Use
Using the oven 12
Using the ceramic hob 14
Operation
Operating the oven 16
Timer 16
Selecting additional functions 19
Meat probe (when available) 20
Operating the ceramic hob 22
Cleaning
Please note 23
General 23
Cleaning the glass ceramic surface 23
Cleaning the oven 25
Aqua Clean function 25
Removing and cleaning the guide rails 26
Removing the oven door 27
Removing the oven window 28
Replacing the oven lamp 29
Solving problems
General 30
Troubleshooting table 30
Installation
General 32
Electrical connection 32
Installation 33
Your oven and the environment
Disposal of the appliance and packaging 34
789046_en_naslovnica_drug_papir.indd 3789046_en_naslovnica_drug_papir.indd 3 8. 11. 2021 14:59:028. 11. 2021 14:59:02

EN 4
Introduction
Congratulations on the purchase of this cooker. This product is designed to offer optimum user-
friendliness. The cooker has a wide range of settings, so you can always select the
correct cooking method.
Read this manual to learn how to get the most out of your cooker. In addition to information
about operating the oven, you will also find background information that may be useful when
using the appliance.
Please read the separate safety instructions carefully
before using the appliance!
Read this manual before using the appliance and keep it in a safe place for future use.
YOUR COOKER
789046_en_naslovnica_drug_papir.indd 4789046_en_naslovnica_drug_papir.indd 4 8. 11. 2021 14:59:028. 11. 2021 14:59:02

EN 5
YOUR COOKER
Control panel
1. Control knob for cooking zone left front
2. Control knob for cooking zone left rear
3. Oven function knob
4. Display (cooking information and timer)
A. Child lock symbol
B. ECO oven function
C. Oven thermostat symbol
D. Cooking time symbol
E. End time symbol
F. Kitchen timer symbol
G. Clock symbol
H. Cooker symbol (depending on model)
I. Oven function symbol
J. Oven temperature display
K. Timer display
L. Meat probe symbol (depending on model)
5. Child lock (for the oven) key
6. Oven light key
7. Temperature key
8. Timer key
9. Start/Stop key
10. Settings knob
11. Control knob for cooking zone right rear
12. Control knob for cooking zone right front
For the best touch response, touch the keys with the main part of your fingertip.
Every time you touch a key during use, a short signal will sound.
0
103 54 6 7 8 9
1 2 11 12
K L
GFEDCA
JI
H
B
789046_en_naslovnica_drug_papir.indd 5789046_en_naslovnica_drug_papir.indd 5 8. 11. 2021 14:59:028. 11. 2021 14:59:02

EN 6
Ceramic hob description
34
12
1. Cooking zone rear left, 1.2 Kw / Ø 145 mm
2. Cooking zone (double) rear right, 0.7/1.7 Kw / Ø 120/180 mm
3. Cooking zone (double) front left, 0.7/2.1 Kw / Ø 120/210 mm
4. Cooking zone front right, 1.8 Kw / Ø 180 mm
YOUR COOKER
789046_en_naslovnica_drug_papir.indd 6789046_en_naslovnica_drug_papir.indd 6 8. 11. 2021 14:59:038. 11. 2021 14:59:03

EN 7
Oven description
6
0
1
3
Level 1
Level 2
Level 3
Level 4
2
4
5
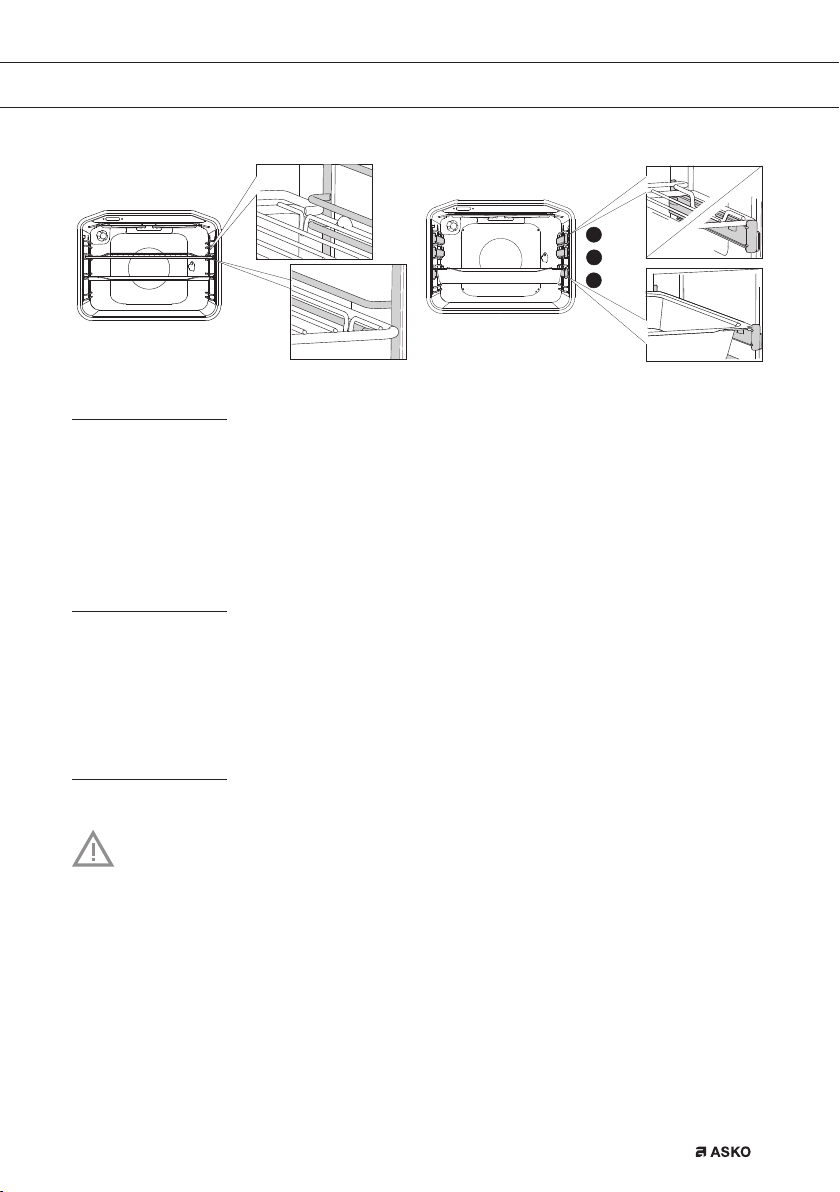
Guide rails/Telescopic guide rails
• The oven has four or five guide rails (Level 1 to 4/5), depending on the model. Level 1 is
mainly used in combination with bottom heat. The two upper levels are mainly used for the
grill function.
• Place the oven rack, baking tray or steam dish in the gap between the guide rail sliders.
• A number of shelf levels can have fully-retractable telescopic guide rails, depending on the model.
• Pull the telescopic guide rails out of the oven cavity completely and place the oven rack /
baking tray / steam dish on them. Then slide the oven rack / baking tray / steam dish on the
telescopic guide rails, back into the oven cavity.
• Only close the oven door when the telescopic guide rails have been returned completely
back into the oven cavity.
Cooling fan
• The appliance is fitted with a cooling fan that cools the housing, door and the appliance
control panel.
• After the oven is switched Off, the cooling fan continues to operate for a short while in order
to cool the oven.
YOUR COOKER
1. Control panel
2. Rack levels
3. Oven door
4. Handle
5. Storage drawer/flap door
(depending on model)
6. Leveling feet
789046_en_naslovnica_drug_papir.indd 7789046_en_naslovnica_drug_papir.indd 7 8. 11. 2021 14:59:038. 11. 2021 14:59:03

EN 8
Accessories
Your appliance is accompanied by a range of accessories, depending on the model. Only use
original accessories; they are specially suited to your appliance.
Not all accessories are suitable/available for every appliance (it may also differ by
country). All the accessories that are being used must be able to withstand the highest
temperature of the appliance. When purchasing, always provide the exact identification
number of your appliance. Please see the sales brochures or check online for more
details about optional accessories.
Accessories that can be supplied with your appliance (depending on the model)
Enamelled baking tray; to be used for pastries and cakes.
Oven rack; mainly used for grilling. A steam dish or pan with food
can also be placed on the oven rack. The oven rack is equipped
with a safety peg. Lift the rack slightly at the front to slide it out of
the oven.
Deep enamelled baking tray; to be used for roasting meat and baking
moist pastry. Never place the deep baking tray in the first level during
the cooking process, except when grilling food or using the roasting spit
and you are only using the deep tray as a drip tray.
Probe; can be used to measure the core temperature of the dish.
When the desired temperature is reached, the cooking process will
be stopped automatically.
Consult the cooking guidelines in this user manual to select the correct accessory
for your dishes.
As baking accessories heat up, their form may change. This does not affect
their functionality and their original form will be restored when they cool down.
• The grid or the tray should always be inserted into the groove between the two wire profiles.
• Insert the grid so that the small railing is in the oven interior (toward the back of the oven).
YOUR COOKER
789046_en_naslovnica_drug_papir.indd 8789046_en_naslovnica_drug_papir.indd 8 8. 11. 2021 14:59:038. 11. 2021 14:59:03
EN 9
Door
• The door switches interrupt the operation of the oven when the door is opened during use.
The oven continues operating when the door is closed.
• Some cookers have a ‘Soft close door system’ (depending on the model). When closing the
oven door, this system dampens the movement, from a certain angle, and silently closes the
oven door.
Push-pull knob
Some models can have push-pull knobs.
• Slightly push the knob until it pops out. The knob can be used now.
• After each use, rotate the knob back to the “Off” position and push it back in.
• The push-pull knob can only be pushed back when it is in the “Off” position.
Drawer
Your appliance has a drawer to store accessories like trays, shelves, grids, small pots and pans.
Warning! The inside surface of the drawer may become hot during use.
Do not store any food, plastic or inflammable materials in the drawer.
YOUR COOKER
2
3
4
789046_en_naslovnica_drug_papir.indd 9789046_en_naslovnica_drug_papir.indd 9 8. 11. 2021 14:59:048. 11. 2021 14:59:04

EN 10
Door lock
Some models can have a door lock. This avoids children to open the door unwanted.
• When the door lock is activated:
▷Open the door slightly and move the latch in the middle top site of the door to the right.
▷Open the door fully.
Deactivate the door lock
1. Open the oven door.
2. Push the latch to the right by 90º until you feel a click (A).
▷The door lock is deactivated.
Activate the door lock
1. Open the oven door.
2. Pull the latch towards you (B).
▷The door lock is activated.
90°
click
AB
YOUR COOKER
789046_en_naslovnica_drug_papir.indd 10789046_en_naslovnica_drug_papir.indd 10 8. 11. 2021 14:59:058. 11. 2021 14:59:05
Ce manuel convient aux modèles suivants
2
Table des matières
Autres manuels Asko Cuisinière


