Ariston CP90510MFIXAUS Manuel utilisateur

COOKER AND OVEN
Operating Instructions
CP90510MFIXAUS
Contents
Important warnings, 2
Electrical connection, 5
Gas connection, 6
Introduction of the appliance, 9
Control panel, 9
Accessories, 10
Technical features, 11
Installation of the appliance, 12
Installation of the appliance feet, 13
Chain lashing illustration, 13
Using the gas burner, 14
Using the heating elements, 14
Using the grill, 15
Using the timer, 15
Program types, 18
Cooking table, 18
Maintenance and cleaning, 19
Installation of the oven door, 19
Cleaning and maintenance of the oven's front
door glass, 20
Rack positions, 20
Changing the oven lamp, 21
Troubleshooting, 22
Handling rules, 23
Recommendations for energy saving, 23
Environmentally-friendly disposal, 24
Package information, 24

2
IMPORTANT WARNINGS
1. Installation and repair should always be performed by "AUTHORIZED SERVICE".
Manufacturer shall not be held responsible for operations performed by unauthorized persons.
2. Please read this operating instructions carefully. Only by this way you can use the appliance
safely and in a correct manner.
3. The appliance should be used according to operating instructions.
4. Keep children below the age of 8 and pets away when operating.
5. WARNING: The accessible parts may be hot while using the grill. Keep away from children.
6. WARNING: Fire hazard; do not store the materials on the cooking surface.
7. WARNING: The appliance and its accessible parts are hot during operation.
8. Setting conditions of this device are specified on the rating plate.
9. WARNING: This appliance is intended for cooking. It should not be used for other purposes
like heating a room.
10. To clean the appliance, do not use steam cleaners.
11. Ensure that the oven door is completely closed after putting food inside the oven.
12. NEVER try to put out the fire with water. Only shut down the device circuit and then cover
the flame with a cover or a fire blanket.
13. Children under 8 years of age should be kept away, if they cannot be monitored
continuously.
14. Touching the heating elements should be avoided.
15. CAUTION: Cooking process shall be supervised.
16. This device can be used by children over 8 years of age, people with physical, hearing or
mental challenges or people with lack of experience or knowledge; as long as control is
ensured or information is provided regarding the dangers.
17. This device has been designed for household use only.
18. Children must not play with the appliance. Cleaning or user maintenance of the appliance
shall not be performed by children unless they are older than 8 years and supervised by adults.
19. Keep the appliance and its power cord away from children less than 8 years old.
20. Put curtains, tulles, paper or any flammable (ignitable) material away from the appliance
before starting to use the appliance. Do not put ignitable or flammable materials on or in the
appliance.
21. Keep the ventilation channels open.
22. The appliance is not suitable for use with an external timer or a separate remote control
system.
23. Do not heat closed cans and glass jars. The pressure may lead jars to explode.
24. Oven handle is not a towel drier. Do not hang towels, etc. on the oven handle.
25. Do not place the oven trays, plates or aluminium foils directly on the oven base. The
accumulated heat may damage the base of the oven.
26. While placing food to or removing food from the oven, etc., always use heat resistant oven
gloves.
27. Do not use the product in states like medicated and/or under influence of alcohol which
may affect your ability of judgement.
28. Be careful when using alcohol in your foods. Alcohol will evaporate at high temperatures
and may catch fire to cause a fire if it comes in contact with hot surfaces.
29. After each use, check if the unit is turned off.
30. If the appliance is faulty or has a visible damage, do not operate the appliance.
31. Do not use the appliance with its front door glass removed or broken.
32. Place the baking paper together with the food into a pre-heated oven by putting it inside a
cooker or on an oven accessory (tray, wire grill etc.).

3
33. Do not put objects that children may reach on the appliance.
34. It is important to place the wire grill and tray properly on the wire racks and/or correctly
place the tray on the rack. Place the grill or tray between two rails and make sure it is balanced
before putting food on it.
35. Against the risk of touching the oven heater elements, remove excess parts of the baking
paper that hang over from the accessory or container.
36. Never use it at higher oven temperatures than the maximum usage temperature indicated
on your baking paper. Do not place the baking paper on the base of the oven.
37. When the door is open, do not place any heavy object on the door or allow children to sit
on it. You may cause the oven to overturn or the door hinges to be damaged.
38. The packaging materials are dangerous for children. Keep packaging materials away from
the reach of children.
39. Do not use abrasive cleaners or sharp metal scrapers to clean the glass as the scratches
that may occur on the surface of the door glass may cause the glass to break.
40. Do not place the appliance on a surface covered with carpets. Electric parts gets
overheated since there will be no ventilation from below. This will cause failure of the
appliance.
41. Do not hit glass surfaces of vitro-ceramic cookers with a hard metal, resistance can get
damaged. It may cause an electric shock.
42. User should not handle the appliance by himself.
43. User shall be careful when cleaning gas burners. It may cause personal injuries.
44. Food can spill when foot of the appliance is dismantled or gets broken, be careful. It may
cause personal injuries.
45. During usage, the internal and external surfaces of the oven get hot. As you open the oven
door, step back to avoid the hot vapour coming out from the interior. There is risk of burning.
46. User should not dislocate the resistance during cleaning. It may cause an electric shock.
47. Do not remove ignition switches from the appliance. Otherwise, live electric cables can be
accessed. It may cause an electric shock.
48. Appliance supply can be disconnected during any construction work at home. After
completing the work, re-connecting the appliance shall be done by authorized service.
49. Do not place metal utensils such as knife, fork, spoon on the surface of the appliance,
since they will get hot.
50. To prevent overheating, the appliance should not be installed behind of a decorative cover.
51. Cable fixing point shall be protected.
52. Please don't cook the food directly on the tray / grid. Please put the food into or on
appropriate accessories before putting them in the oven.
53. Do not use or store flammable materials in the appliance storage drawer or near this
appliance.
54. Do not spray aerosols in the vicinity of this appliance while it is in operation.
55. Do not modify this appliance.
56. Do not use this appliance as a space heater.
57. This cooktop is not suitable for installation and operation with aftermarket lids or covers
fitted.
Electrical Safety
1. Have an authorized electrician set grounding equipment. Our company shall not be
responsible for the damages that shall be incurred due to using the product without grounding
according to local regulations.
2. The circuit breaker switches of the appliance shall be placed so that end user can reach

4
them when the appliance is installed.
3. The power supply cord shall not contact the hot parts of the appliance.
4. If the power supply cord is damaged, this cord shall be replaced by the manufacturer or its
service agent or an equally qualified personnel to prevent a hazardous situation.
5. Never wash the product by spraying or pouring water on it! There is a risk of electrocution.
6. WARNING: To avoid electric shock, ensure that the device circuit is open before changing
the lamp.
7. WARNING: Cut off all supply circuit connections before accessing the terminals.
8. WARNING: If the surface is cracked, turn off the appliance to avoid risk of electric shock.
9. Do not use cut or damaged cords or extension cords other than the original cord.
10. Make sure that there is no liquid or humidity in the outlet where the product cord is
connected.
11. The rear surface of the oven also heats up when the oven is operated. Electrical
connections shall not touch the rear surface, otherwise the connections may be damaged.
12. Do not tighten the connecting cables to the oven door and do not run them over hot
surfaces. If the cord melts, this may cause the oven to short circuit and even a fire.
13. Do not use steam cleaners for cleaning the appliance, otherwise electric shock may occur.
14. Fixed connections shall be connected to a power supply enabling omnipolar disconnection.
For appliances with over voltage category below III, disconnection device shall be connected to
fixed power supply according to wiring code.
Gas Safety
1. This appliance is not connected to burning products evacuation apparatus. This appliance
must be connected and installed according to the installation regulations in force. Conditions
regarding ventilation must be considered.
2. When a gas cooking appliance is used, humidity, heat and burning products are generated
in the room. First of all, make sure the kitchen is well ventilated when operating the appliance
and maintain natural ventilation openings or install a mechanical ventilation equipment.
3. After using the appliance heavily for an extended period of time, additional ventilation may
be required. For example open a window or adjust a higher speed for mechanical ventilation, if
any.
4. This appliance must be used only in well ventilated locations in accordance with the
regulations in force. Please read the manual before installing or using this product.
5. Before positioning the appliance, make sure local network conditions (gas type and gas
pressure) meets appliance requirements.
6. The mechanism cannot be run for longer than 15 seconds. If the burner is not on after 15
seconds, stop the mechanism and wait for at least one minute before trying to ignite the burner
again.
7. All kinds of operations to be performed on gas installation must be performed by authorized
and competent people.
8. f you have to use your product with a This appliance is adjusted for natural gas (NG). I
different gas type (Universal LPG), you have to apply to authorized service for the conversion.
9. For proper operation, hood, gas pipe and clamp should be replaced periodically according to
manufacturer recommendations and when required.
10. Gas should burn well in gas products. Well burning gas can be understood from blue flame
and continuous burning. If gas does not burn sufficiently, carbon monoxide (CO) can be
generated. Carbon monoxide is a colourless, odourless and very toxic gas; even small
amounts have lethal effect.
11. Ask your local gas supplies about the phone numbers for emergencies related to gas and
the measures to be taken upon gas odour is detected.

5
What To Do When Gas Odour Is Detected
1. Do not use naked flame, and do not smoke.
2. Do not operate any electrical switch. (For example: lamp switch or doorbell)
3. Do not use telephone or mobile phone.
4. Open the doors and windows.
5. Close all valves on the appliances that utilize gas and the gas counters.
6. Call fire brigade from a telephone outside the home.
7. Check all hoses and their connections against leaks. If you still smell gas, leave the house
and warn your neighbours.
8. Do not enter into the house until authorities clarify it is safe.
Intended Use
1. This product is designed for home use. Commercial use of the appliance is not permitted.
2. This appliance may only be used for cooking purposes. It shall not be used for other
purposes like heating a room.
3. This appliance shall not be used to heat plates under the grill, drying clothes or towels by
hanging them on the handle or for heating purposes.
4. The manufacturer assumes no responsibility for any damage due to misuse or mishandling.
5. Oven part of the unit may be used for thawing, roasting, frying and grilling food.
ELECTRICAL CONNECTION
1. Your appliance requires 16 Ampere fuse according to the appliance’s power.
2. Your appliance is adjusted in compliance with 220-240V AC 50/60Hz. electric supply. If the
mains are different from this specified value, contact your authorized service.
3. Electrical connection of the appliance should only be made by the sockets with earth system
installed in compliance with the regulations. If there is no proper socket with earth system in
the place where the appliance will be placed, immediately contact a qualified electrician.
Manufacturer shall never be responsible from the damages that will arise because of the
sockets connected to the appliance with no earth system. If the ends of the electrical
connection cable are open, according to the appliance type, make a proper switch installed in
the mains by which all ends can be disconnected in case of connecting / disconnecting from /
to the mains.
4. If your electric supply cable gets defective, it should definitely be replaced by the authorized
service or qualified electricians in order to avoid from the dangers.
5. Electrical cable should not touch the hot parts of the appliance.
6. Please operate your appliance in dry atmosphere.
Electrical connection scheme
6
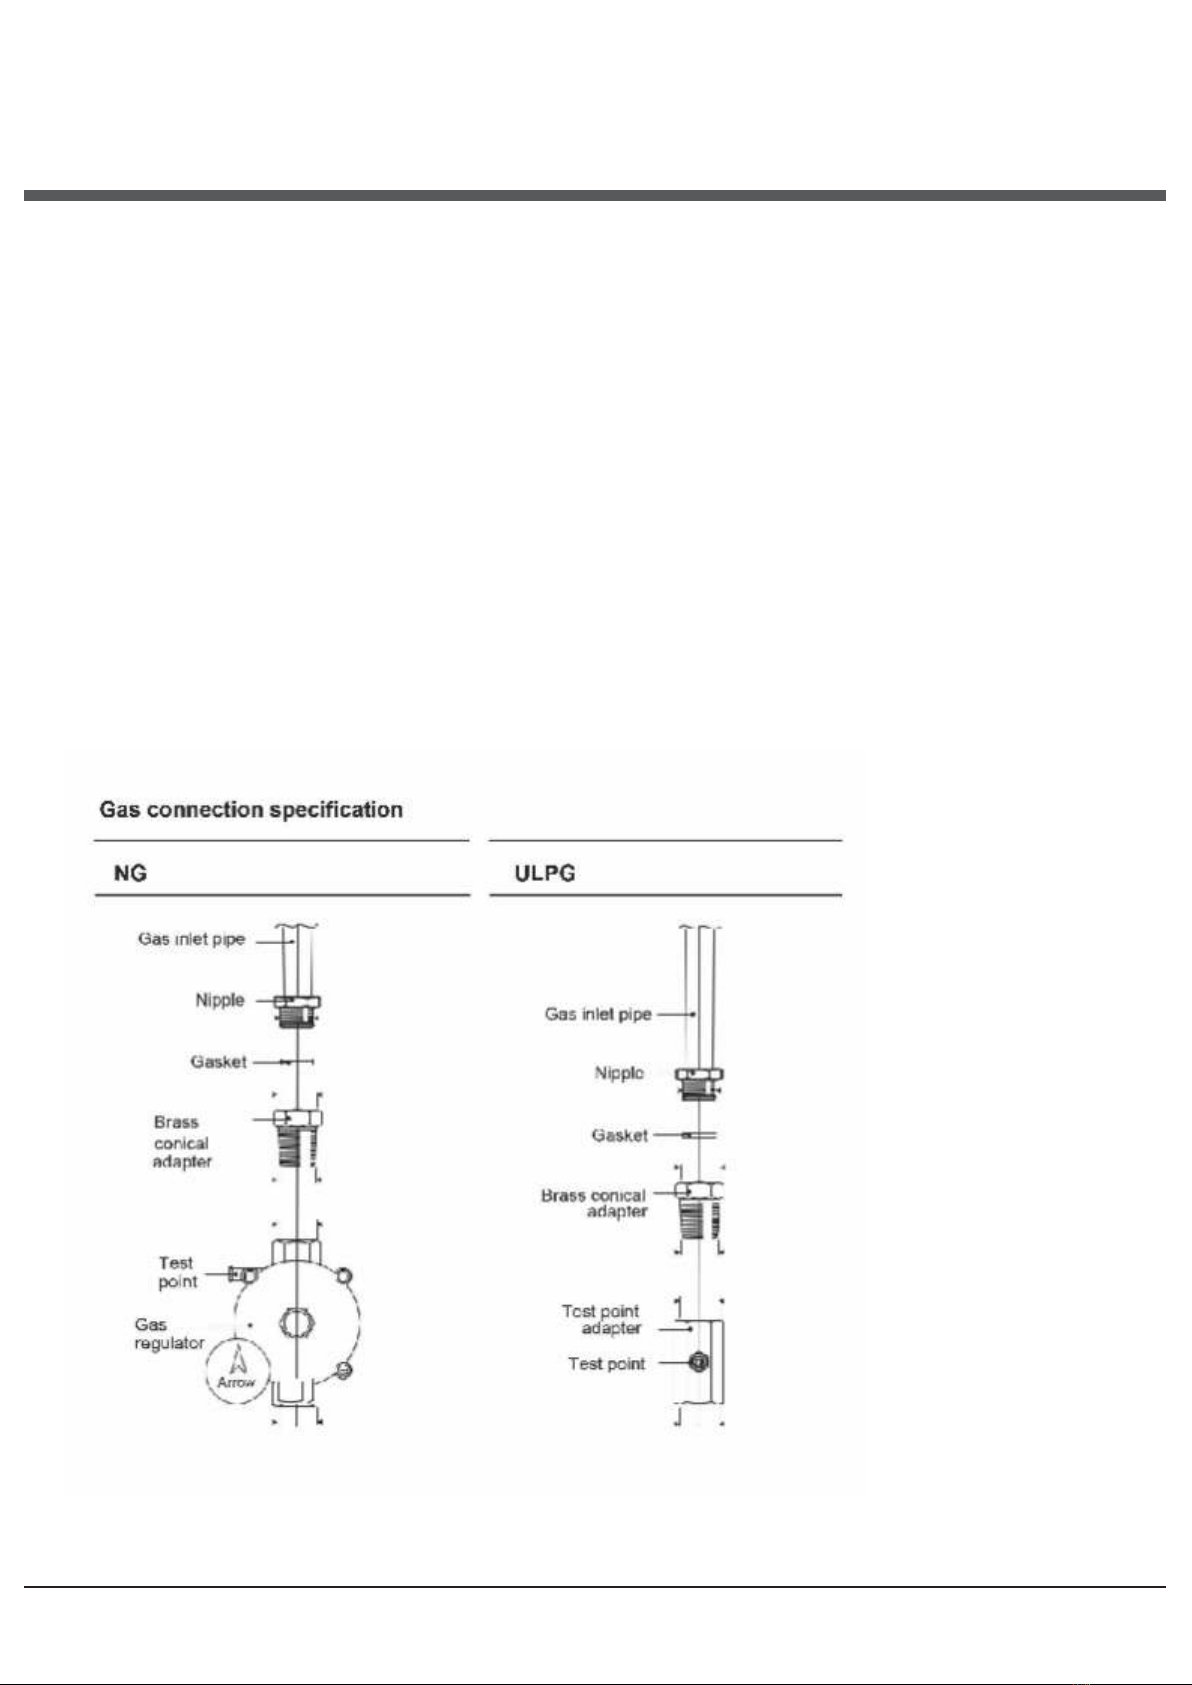
GAS CONNECTION
This appliance must be installed by an authorised person in accordance with this instruction manual
AS/NZS 5601.1 – Gas installations (installation and pipe sizing), local gas fitting regulations, local
electrical regulations, Building Code of Australia and any other government authority.
ŸThe connection must be performed by an authorised person according to the relevant
standards.
ŸThis appliance is suitable for use with Natural Gas or ULPG. The gas range is shipped from
the factory set and adjusted for Natural Gas. It can be converted for use with ULPG
following the instructions in this manual.
ŸThe connection must be made at the rear of appliance. Ensure the pipe does not cross the
cooker.
ŸThe inlet not used must be closed off with the cap and sealing gasket supplied.
ŸThe gas connection is male ½” BSP female thread (in compliance with ISO 7 thread) and is
situated 55mm from the right and 560mm from the floor.
ŸEnsure the hose is long enough to allow for removal of the appliance for servicing. The hose
assembly must be AS/NZS 1869 Class B or D certified. The hose assembly must be no
longer than 1.2 m in length with minimum internal diameter of 10 mm and comply with
relevant AS 5601 / NZS 5261 requirements. The hose must not be kinked, subjected to
abrasion or permanently deformed. The hose must not be near or in contact with any hot
surfaces (e.g. base of metal hotlplate, flue, or chassis of underbench oven etc.)
IMPORTANT! Check the correct positioning of the gas regulator. The arrow on the back of the
gas regulator must be oriented toward the connector.

7
Adjustment to different gas types
To perform the adjustments to different types of gas, the qualified installer shall follow the
instructions given on this section.
Make sure that the gas supply pressure respects the values presented on rating plate and in
the spec on page 11.
Natural gas
This appliance leaves the factory set to operate using Natural Gas.
Make sure that the Natural Gas regulator supplied with the appliance is installed and, with
the triple ring burner operating at its maximum, adjust the test point pressure to 1.0kPa.
Universal LPG
To convert from Natural Gas to Universal LPG, ensure that the Natural Gas regulator is
replaced by the Test Point Assembly supplied with the appliance. Adjust the test point
pressure to 2.75kPa.
To adapt the appliance to a gas different from that for which it was set up (see rating label)
proceed as follows:
1. Remove the trivets
2. Remove the burners caps and diffusers
3. With a 7 mm socket spanner unscrew and remove the injectors.
4. Replace the injectors with those supplied corresponding to the gas available (see burner
and injector characteristics table)
5. Replace the various parts proceeding in reverse.
Setting the minimum flame
The flame on the small output is regulated by the factory.
When the injectors have been replaced or there are special
mains pressure conditions, it may be necessary to regulate the
minimum flame again. The operations necessary to set the
minimum flame are as follows:
1. Light the burner.
2. Turn the knob to the minimum position.
3. Take out the knob (and gasket if there is one).
4. LPG to NG: use a thin blade screwdriver to turn the bypass screw located above gas valve
shaft as shown on the image above. Turn gently the bypass screw clockwise to the end
completely then turn it anti-clockwise 1 turn for the triple ring, 3/4 turn for the rapid, 1/2 turn for
the semi-rapid and 3/8 turn for the auxiliary.
5. NG to LPG: use a thin blade screwdriver to turn the bypass screw located above gas valve
shaft as shown on the image above. Turn gently the by pass screw clockwise to the end.
6. Put the knob back on and turn it quickly from the maximum position to the minimum position,
checking that the flame does not go out.
7. For burners with safety valve make sure that the regulation obtained is sufficient to maintain

8
heating of the thermocouple. If it is not, increase the minimum.
Before leaving check all connections for gas leaks with soap and water.
WARNING: Do not use a naked flame for detecting leaks.
Ignite all burners both individually and combined to ensure correct operation of gas valves,
burners and ignition.
Abnormal operation
If the appliance cannot be adjusted to perform correctly, it is an abnormal situation and you
should contact the authorised service provider.
Any of the following are considered to be abnormal operation and may require servicing:
•• Yellow tipping of the burner flame.
•• Sooting up of utensils.
•• Burners not igniting properly.
•• Burners failing to remain alight.
•• Burners being extinguished by oven door.
•• Gas valves which are difficult to turn.
Ventilation of room
The air needed for burning is received from room air and the gases emitted are given directly
in room. For safe operation of your product, good room ventilation is a precondition. If no
window or room to be utilized for room ventilation is available, additional ventilation should be
installed. However, room has a door opening outside, it is no needed to vent holes.
Room size Ventilating opening
Smaller than 5 m³ min. 100 cm²
Between 5 m³ - 10 m³ min. 50 cm²
Bigger than 10 m³ no need
In basement or cellar min. 65 cm²

9
INTRODUCTION OF THE APPLIANCE
control panel
wire grill
deep tray
lamp
plastic leg
lower cabinet door
door
semi-rapid burner
rapid burner
auxiliary burner
work burner
handle
CONTROL PANEL
1 2 3 3 3 5 5 6 7 8
1. Thermostat knob
Used for determining the cooking temperature of the dish to be cooked in the oven. After
placing the food inside the oven, turn the switch to adjust desired temperature setting between
50-280°C. For cooking temperatures of different food, see cooking table.
2. Function selection knob
For switching the oven on by selecting a function. Turn to the position to switch the oven off.
3. Timer & +/- button
For selecting the various settings: duration, cooking end time, timer.
4. Display
5. Semi-rapid burner knob
6. Work burner knob
7. Auxiliary burner knob
8. Rapid burner knob
4

10
ACCESSORIES
Deep tray
Used for pastries, deep fried foods and
stew recipes. In case of frying directly on
the grill for cakes, frozen foods and meat
dishes, it can be used of oil pick-up tray.
Wire grill
Used for frying and/or placing the foods to
be baked, fried and frozen foods on the
desired rack.
Telescopic rail
With the help of telescopic rails, the trays
and/or wire racks can be easily placed and
removed.
Splash back
The resulting temperature of the oven
chimney avoid contact with the wall.
Coffee pot support unit
Can be used for coffee pot.
Table des matières
Autres manuels Ariston Gamme

Ariston
Ariston A6TMC2 C X AUS Manuel utilisateur

Ariston
Ariston CX65SFA I Mode d’emploi

Ariston
Ariston CE6VM3 R S Manuel utilisateur

Ariston
Ariston CX65SFA I Manuel utilisateur

Ariston
Ariston PZ 640 Manuel utilisateur
 DE S Manuel utilisateur")
Ariston
Ariston CP 0V9 M (X) DE S Manuel utilisateur

Ariston
Ariston PZ 640 Manuel utilisateur

Ariston
Ariston CX61SP6 T S Manuel utilisateur

Ariston
Ariston CX65SM2 X AUS Manuel utilisateur

Ariston
Ariston C3VP6R Manuel utilisateur


