ArcVision ARC19817 Manuel utilisateur

8 CH MJPEG DVR
USER MANUAL

Contents
1. SAFETY PRECAUTIONS..................................................................................3
2. FEATURES .........................................................................................................4
3. PACKING LIST .................................................................................................. 5
4. NAME and FUNCTION of EACH PART .......................................................... 6
4.1 FRONT PANEL BUTTONS and CONTROLS......................................6
4.2 REAR PANEL BUTTONS and CONTROLS........................................7
5. INSTALLATION................................................................................................. 8
5.1 CAMERA and MICROPHONE INPUT CONNECTION......................8
5.2 MONITORCONNECTION.........................................................................9
5.3 DVR and NETWORK CONNECTION.................................................. 9
5.4 POWER-IN ........................................................................................... 10
6. OPERATION DESCRIPTIONS........................................................................ 11
6.1 LIVE MODE......................................................................................... 11
6.2 RECORD MODE..................................................................................13
6.3 PLAYBACK MODE............................................................................. 14
6.4 SEARCH ...............................................................................................15
7. MENU SETUP DESCRIPTION ....................................................................... 16
7.1 DATE/ TIME SETUP ........................................................................... 17
7.2 CAMERA SETUP................................................................................. 17
7.2.1 EDIT CAMERA TITLE 1-8 .............................................................. 18
7.2.2 VIDEO ADJUST................................................................................ 18
7.2.3 MOTION DETECTION..................................................................... 19
7.3 RECORD SETUP..................................................................................20
7.4 SCHEDULE SETUP.............................................................................21
7.5 HARD DISK SETUP............................................................................ 22
7.6 CF CARD SETUP................................................................................. 22
7.6.1 CF CARD COPY ............................................................................... 23
7.7 OTHERS ............................................................................................... 24
7.7.1 PASSWORD ......................................................................................25
7.7.2 BUZZER ............................................................................................25
7.7.3 RELAY OUTPUT.............................................................................. 26
7.7.4 ALARM INPUT................................................................................. 27
7.7.5 SQUENCE DWELL TIME................................................................ 28
7.8 FACTORY DEFAULT......................................................................... 28
8. NETWORK DVR SETUP ................................................................................29
8.1 Connecting Network DVR.................................................................... 29
8.1.1 Online using Intranet or Fixed IP.......................................................29
8.1.2 Online using ADSL (PPPoE) Router ................................................. 29
8.1.3 Online using DDNS Server................................................................ 29
8.2 Online with DHCP Server.....................................................................30
8.3 Online without DHCP Server................................................................ 31
8.4 Online Connection.................................................................................32
8.4.1 Install ActiveX ...................................................................................32
1

9. FUNCTION SETUP.......................................................................................... 35
9.1 Main Display......................................................................................... 35
9.1.1 View ...................................................................................................36
9.1.2 Image Recording ................................................................................36
9.1.2.1 Save as JPEG:.................................................................................. 36
9.1.2.2 Save as AVI:.................................................................................... 37
9.2 Advanced Setup.....................................................................................39
9.2.1 Network Setting..................................................................................39
9.2.2 User Setup .......................................................................................... 40
9.2.3 DDNS Setup.......................................................................................41
10. TROUBLESHOOTING .................................................................................. 42
11. NETWORK INSTALLATION........................................................................ 43
11.1 System Configuration.......................................................................... 43
11.2 Suggested PC Equipment....................................................................43
12. HARD DISK INFORMATION....................................................................... 44
13. APPENDIX......................................................................................................45
13.1 DB25 Alarm Input/Relay Output Definition....................................... 45
14. SPECIFICATION............................................................................................ 46
The author assumes no responsibility for any errors or omissions that may appear in this
document nor does the author make a commitment to update the information herein.
VER.:1.0, P/N.: 040114/1
2

3
1. SAFETY PRECAUTIONS
CAUTION
RISK OF ELECTRIC SHOCK.
DO NOT OPEN!
CAUTION :
TO REDUCE THE RISK OF ELECTRICAL SHOCK,
DO NOT OPEN COVERS (OR BACK).
NO USER SERVICEABLE PARTS INSIDE.
REFER SERVICING TO QUALIFIED
SERVICE PERSONNEL.
It is advised to read the Safety Precaution Guide through carefully before operating the
product, to prevent any possible danger.
WARNING: Alert the user to the presence of un-insulated “dangerous voltage”.
CAUTION: Alert the user the presence of important operating and maintenance (Servicing)
instructions in the literature accompanying the appliance.
Disposal of Old Electrical & Electronic Equipment (Applicable in the European
Union and other European countries with separate collection systems).
This symbol on the product or on its packaging indicates that this product shall not be
treated as household waste. Instead it shall be handed over to the applicable collection
point for the recycling of electrical and electronic equipment. By ensuring this product is
disposed of correctly, you will help prevent potential negative consequences for the
environment and human health, which could otherwise be caused by inappropriate
waste handling of this product. The recycling of materials will help to conserve natural resources.
For more detailed information about recycling of this product, please contact your local city
office , your household waste disposal service or the shop where you purchased the product.
The power cord is the main power connection. Therefore, constantly plug and unplug of the
power cord might result in malfunction of the product.
Do not install the product in an environment where the humidity is high.
Unless the product is waterproof or weatherproof, otherwise poor image quality may occur.
Do not drop the product or subject them to physical shocks.
Except for vandal-proof or shockproof product, otherwise malfunctions may occur.
Never keep the product to direct strong light.
It can damage the product.
Do not spill liquid of any kind on the product.
If it gets wet, wipe it dry immediately. Alcohol or beverage can contain minerals that
corrode the electronic components.
Do not expose to extreme temperatures.
Use the product at temperatures within 5℃~ 40℃.

4
2. FEATURES
8-Channel video recording and 1-Channel audio recording.
1-Video outputs to monitor, 1-video output to SPOT, and 2-audio outputs.
Auto NTSC/ PAL video format detection.
Auto video loss detection and alarm alert.
8-Alarm signal input and 1-Relay output (auto alarm recording).
High-capacity removable hard disk (up to 500 GB capacity), digital image
storage replaces tape-based mechanical systems.
Auto overwrite or alarm notification when hard disk is full, reduces manpower
management.
Power-loss memory function, designed to reboot and continue recording.
Motion-JPEG video and G.711 audio compression format.
Maximum recording rate is 60fps@704x240 (NTSC) or 50pfs@704x288
(PAL).
Adjustable recording quality and frame rates for recording.
4 Types of record mode: Manual, Schedule Alarm, Schedule Motion Detection
and Schedule Continue.
Monitoring or recording can be shown by full, quad screen, 9-split and by auto
sequential switching.
Quick efficient playback search by Date & Time.
Recorded images backup is applicable by Compact Flash card (PC supports
AVI file playback).
Includes RJ-45 interface for network connection.
Firmware update by Compact Flash card.

5
3. PACKING LIST
Check and make sure all the items shown below are included in your product package.
If something is missing, contact your dealer as soon as possible.
No. Item Picture Quantity
1 DVR
(Digital Video Recorder)
1
2
Power Adaptor
and Power Cord
Input: AC 100~240V
Output: DC 12V/4.2A
1
3 Manual
1
4
Hard Drive Cartridge Key Lock
(optional)
And Fixed Screws
1

6
4. NAME and FUNCTION of EACH PART
4.1 FRONT PANEL BUTTONS and CONTROLS
1. Camera Select (1-8 Video Channel Button)
2. LED Indicator (Alarm/ Playback/ HDD/ Record).
3. Removable Cartridge Casing: 3.5” IDE HDD, Max.: 500 GB (optional).
4. Function Button:
REC: Manual Record.
STOP: Stop Button (Manual Record/ Play).
PLAY: Play Button.
PAUSE: Pause Button.
SPLIT: Full Screen/ Quad Screen/ 9-Split Screen (switching).
SEQ: Auto Sequencing Button.
SEARCH: Quick Search on Data Recorded.
MENU: Menu Setup Button.
EXIT/ INFO: Return to Previous Menu/ System Information Display Switch.
ENTER/ DISP: Confirm Button/ Message Display Switch.
5. CF Card Slot
6. Direction Button:
LEFT: Decreases the Setting Value under the Menu/ Step Rewind
Playback/ Fast Rewind Playback (speed adjustable).
RIGHT: Increases the Setting Value under the Menu/ Step Forward
Playback/ Fast Forward Playback (speed adjustable).
UP: Moves the Cursor Upward/ Forward Switching Channel Display.
DOWN: Moves the Cursor Downward/ Rewind Switching Channel Display.
2
4 65
3
1

4.2 REAR PANEL BUTTONS and CONTROLS
1
7
4 5 6 7
3
2 98
1. Video Input: 8-Channel BNC Input Terminal
2. DC Power Input: 12V/4.2A
3. Alarm Input/ Relay Output: DB25 Female Terminal (Please refer to appendix)
4. Audio Input: 1-Channel RCA Input Terminal
5. Speaker Output: 2-Channel RCA Output Terminal
6. Main Monitor Output: 1-Channel BNC Output Terminal
7. Network Connection: 1-Ethernet Connection Terminal
8. SPOT Monitor Output: 1-Channel BNC Output Terminal
9. Fan

8
5. INSTALLATION
Spot Monitor
N
etwork Function (purchase separately)
Main Monitor
5.1 CAMERA and MICROPHONE INPUT CONNECTION
Connect the camera output (1 - 8) to video input (VIDEO IN) terminal of the DVR.
Connect the microphone output (1) to audio input (AUDIO IN) terminal of the DVR.
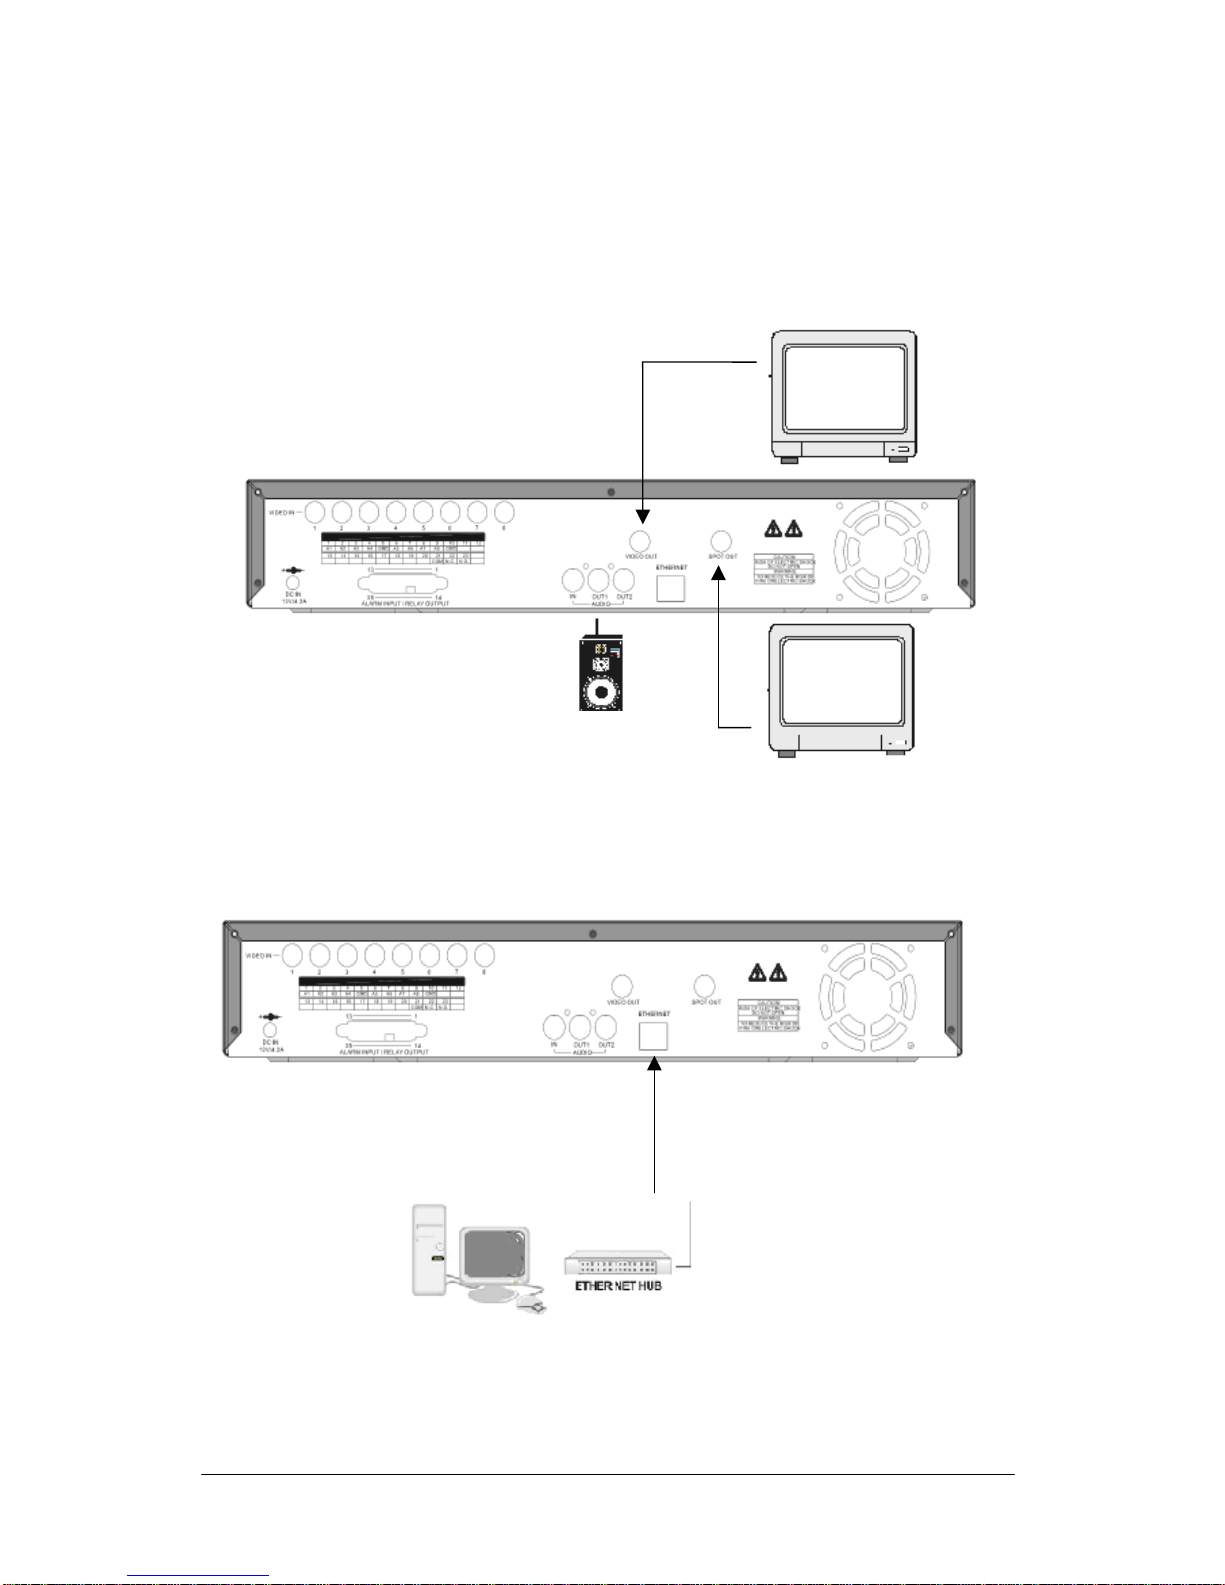
5.2 MONITORCONNECTION
Connect the main monitor to the main monitor output (VIDEO OUT) terminal of the DVR.
Connect SPOT monitor to the SPOT monitor output (SPOT OUT) terminal of the DVR.
Connect the speaker to the speaker output (AUDIO OUT) terminal of the DVR.
Main Monitor
Speaker
SPOT Monitor
5.3 DVR and NETWORK CONNECTION
網路影像連接
N
etwork Connection
9
Table des matières
Autres manuels ArcVision DVR


