APART PR4000R Manuel utilisateur

PR4000R
Instruction manual


Instruction manualPR4000R 1
PR4000R Manual

2Music Sources & Sound Systems
Safety information
• Please check the carton box for any kind of damage on
reception of the goods. In case of a damaged carton, please
contact your dealer before opening the carton.
• !!!! Danger !!!! Exposure to extremely high noise levels may
cause a permanent hearing loss. Individuals vary considerably to
noise induced hearing loss but nearly everyone will lose some
hearing if exposed to sufficiently intense noise for a sufficient
amount of time. Therefore it is recommended that all persons
exposed to equipment capable of producing high sound
pressure levels, such as this amplifier, be protected by hearing
protection while installing or operating this unit.
• Read all documentation before operating your equipment.
• Keep all documentation for future reference.
• Save the carton and packing material even if the equipment has
arrived in good condition.
• Should you ever need to ship the unit, use only the original
factory packing.
• Do not spill water or other liquids into or on the unit.
• Make sure power outlets conform to the power requirements
listed on the back of the unit.
• Do not use the unit if the electrical power cord is frayed or
broken.
• Have gain controls on amplifiers turned down during power-up
to prevent speaker damage if there are high signal levels at the
inputs.

Instruction manualPR4000R 3
• Do not connect the inputs / outputs of amplifiers or consoles
to any other voltage source, such as a battery, mains source, or
power supply, regardless of whether the amplifier or console is
turned on or off.
• Power down & disconnect units from mains voltage before
making connections.
• Do not use the unit near stoves, heat registers, radiators, or
other heat producing devices.
• Do not remove the cover. Removing the cover will expose you
to potentially dangerous voltages.
• In case of mal-function this device should be serviced by
qualified service personnel only.
• The apparatus shall not be exposed to dripping or splashing
and that no objects filled with liquids, such as vases, shall be
placed on the apparatus.
features
• Versatile design, easy to integrate in rack mounted professional
audio distribution systems, stereo hifi systems, multi-room
audio systems and computer controlled audio systems.
• Removable 19 inch rack-ears (included).
• Galvanically separated antenna and RS232 connectors to avoid
hum.
• Integrated antenna splitter/amplifier.
• FM tuner with adaptive noise suppression. Compatible with

4Music Sources & Sound Systems
cable antenna signal networks and standard wire antennas
(included).
• Quad FM RDS tuner with adaptive noise suppression, 4 fully
independent FM tuners (PR4000R).
• RDS information: program type, song name identification, radio
station identification.
• Standalone operation and/or remote controlled by infrared and/
or RS232.
• Adjustable audio output level, 4 independent stereo outs.
• High class brushed aluminum front.
• Low power consumption.
• Attractive clearly readable dot matrix gas display and led status
indicators.
• Excellent real world performance.
• Infrared remote control unit included.
• Separate infrared minijack input for seamless integration in
multi-room audio systems, allowing link through of infrared
signals via the multiroom system (check your multi-room
system’s specifications for compatibility).
• 4 x 10 station memory presets.

Instruction manualPR4000R 5
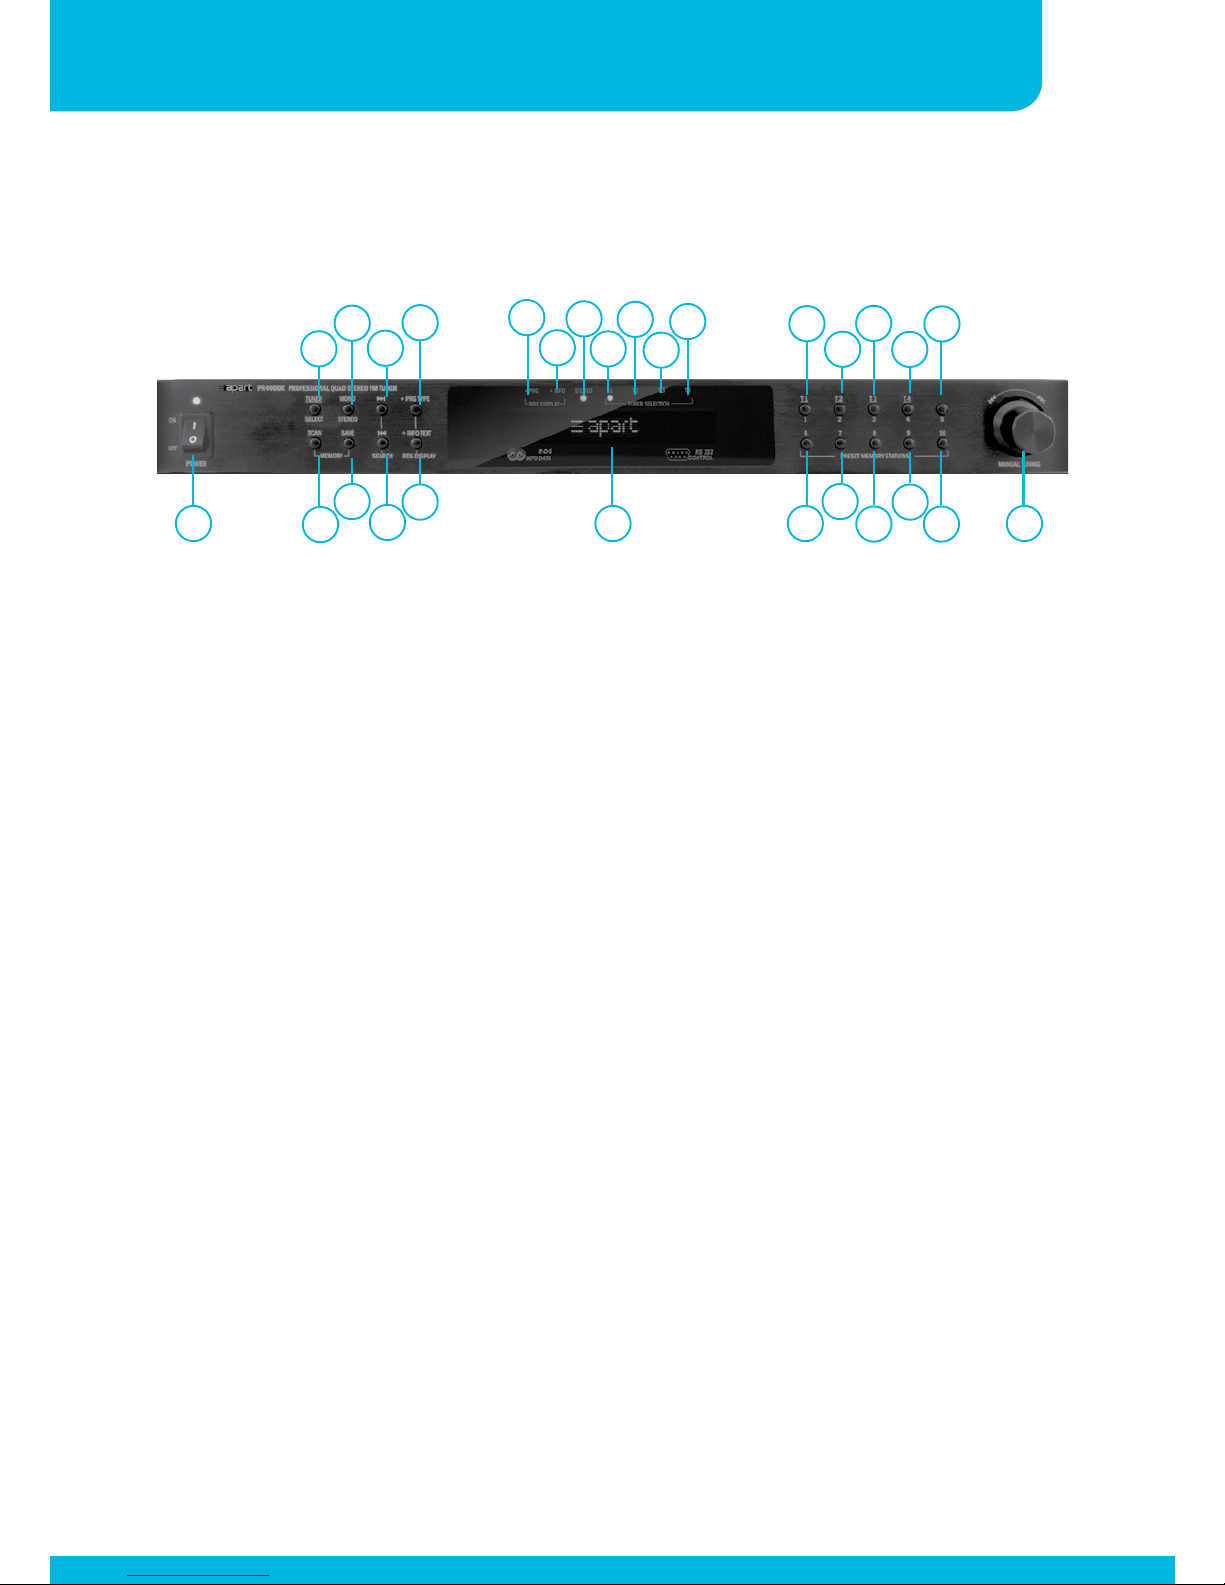
Front panel
3
2
7
6
5
4
9
810 18
19
22
23
26
27 28
12 14 16
11 13 15 20
21
24
25
17
1. Power knob / power led: flip the switch to turn the unit on and
off. In standby mode, the power led lights up slightly dimmed.
In the off position the unit is fully turned off.
2. Tuner select button: push this button, and immediately
afterward push button ‘18’, ‘20’, ‘22’ or ‘24’ (labeled T1 – T4)
to select tuner 1, 2 ,3 or 4. Led’s ‘13’, ‘14’, ‘15’ or ‘16’ will light
up to indicate the selected tuner to be edited (T1 – T4).
3. Scan: push this button to automatically scan the stored preset
radio stations, with every push on the scan button, you will
jump to the next preset. When you keep the button pushed for
a few seconds, M-SCAN appears in the display and the tuner
will automatically scan all presets once.
4. Mono / stereo selector: use this switch to activate stereo or
mono mode. In case of weak reception, mono mode will
drastically reduce noise. In case of stereo reception, the stereo
led ‘12’ will light up.
5. Save button: push this button to save the currently selected
radio station, push a numeric button (or button combination,
see below) afterwards and confirm your selection by pressing
the save button a second time.
1

6Music Sources & Sound Systems
6. Search forward button: push this button to search for a radio
station upward in the radio band.
7. Search downward button: push this button to search for a radio
station downward.
8. + PRG TYPE: push this button to activate and display program
type information if RDS is available. This has no function when
no RDS or PRG information is transmitted by the radio station.
Led ‘10’ lights up when the function has been activated.
Activating this function will automatically deactivate the + INFO
TEXT function.
9. + INFO TEXT: push this button to activate and display RDS
information, such as song name identification. This has no
function when no RDS or PRG information is transmitted. Led
‘11’ lights up when the function has been activated. Activating
this function will automatically deactivate the + PRG TYPE
function.
10. RDS PRG led: lights up when the + PRG TYPE function is
activated.
11. RDS INFO led: lights up when the + INFO TEXT function is
activated.
12. FM stereo led: lights up when FM reception is stereo.
13. T1 led: this led lights up when tuner 1 is selected for editing.
14. T2 led: this led lights up when tuner 2 is selected for editing.
15. T3 led: this led lights up when tuner 3 is selected for editing.
16. T4 led: this led lights up when tuner 4 is selected for editing.

Instruction manualPR4000R 7
17. Dot matrix gas display: multifunctional display showing radio
station frequency and preset number or RDS information.
18. Numeric button 1/T1: push this button to select or save radio
station preset number 1 or to select tuner 1 for editing (after
pushing button ‘2’).
19. Numeric button 6: push this button to select or save radio
station preset number 6.
20. Numeric button 2/T2: push this button to select or save radio
station preset number 2 or to select tuner 2 for editing (after
pushing button ‘2’).
21. Numeric button 7: push this button to select or save radio
station preset number 7.
22. Numeric button 3/T3: push this button to select or save radio
station preset number 3 or to select tuner 3 for editing (after
pushing button ‘2’).
23. Numeric button 8: push this button to select or save radio
station preset number 8.
24. Numeric button 4/T4: push this button to select or save radio
station preset number 4 or to select tuner 4 for editing (after
pushing button ‘2’).
25. Numeric button 9: push this button to select or save radio
station preset number 9.
26. Numeric button 5: push this button to select or save radio
station preset number 5.
27. Numeric button 10: push this button to select or save radio
station preset number 10.

8Music Sources & Sound Systems
Back panel
1. FM antenna input: connect the supplied FM antenna here, or
use the signal from a cable distribution network. This input
is galvanically separated from the audio ground and serial
interface.
2. Output level control tuner 1: turn this control to match tuner
1’s output with the output level of other music sources such as
CD players.
3. Tuner 1 line level output on cinch connectors.
4. Output level control tuner 2: turn this control to match tuner
2’s output with the output level of other music sources such as
CD players.
5. Tuner 2 line level output on cinch connectors.
6. Output level control tuner 3: turn this control to match tuner
3’s output with the output level of other musicsources such as
CD players.
134 5 679
8
210 11 12 13
28. Tuning : turn left or right to manually tune the frequency in
steps of 50 kHz.
Autres manuels pour PR4000R
1
Table des matières
Autres manuels APART Tuner


