annke I41CL Manuel utilisateur
Smart Security Light
www.annke.com
Safety Regulation
FCC Regulation
This equipment conforms to the fifteenth article of Federal Communication Commission. Operation
must meet the following two conditions:
1. This equipment will not cause harmful interference.
2. This equipment provides the ability to avoid all sorts of harmful interference, including which will
lead to improper functioning.
FCC Requirement
This equipment conforms to the fifteenth article of Federal Communication Commission. Operation
FCC regulation: according to the fifteenth article of Federal Communications Commission, this equipment
passed the tests. It also meets with A class digital equipment standard. When equipment operates
under the business circumstance, this regulation is designed to provide reasonable protection and
to prevent harmful interference. This equipment can generate radiation frequency energy. Interference
to wireless communication cloud occur if the install and operation didn’t follow the manual. If there
was interference caused by violation operation in residential area, users shall take full responsibility.
EU Request Statement
The product and attached accessory should meet the safety regulations of CE and have “CE”
sign. In addition, it should comply with the listed applicable Uniform European Standard in EMC
Directive 2014/30/eu, which is 2014/35/eu, RoHS Directive 2011/65/eu.
2012/19/eu (WEEE Directive): In European Union, the product with this symbol cannot be
handled as unclassified municipal waste. In order to be recycled, the used product should be returned
to local vendor or recycled at assigned recycled spot while you are buying new equivalent equipment.
For more information, please refer to www.recyclethis.info
2006/66/ec (Battery Directive): This product concludes a type of battery that cannot be
handled as unclassified municipal waste in European Union. Please refer to related material for
specified battery requirement. Batter with this symbol might contain the letters that indicates Cadmium,
lead and mercury. In order to recycle properly, please return the batteries to vendor or assigned
gathering spot. For more information, please refer to www.recyclethis.info

Safety Instruction
This statement is to ensure users’ proper operation of products in case of danger or
property loss.
Please be aware of fire danger and shock hazard. The working voltage of this smart
safety light is 120V(for US) / 240V(for EU). While install, please be aware of the electric
system of this light.
Please contact qualified electrician to install without knowing it.
Please cut off power fuse or breaker before install or maintain.
To avoid electric shock, don’t disassemble the product.
To avoid circuit damage or abrasion, don’t expose wire on metal board or edges of other
sharp objects.
This product applies 120V/60Hz(for US);240V/50Hz(for EU) alternating current bulb.
The max power of bulb is 15W.
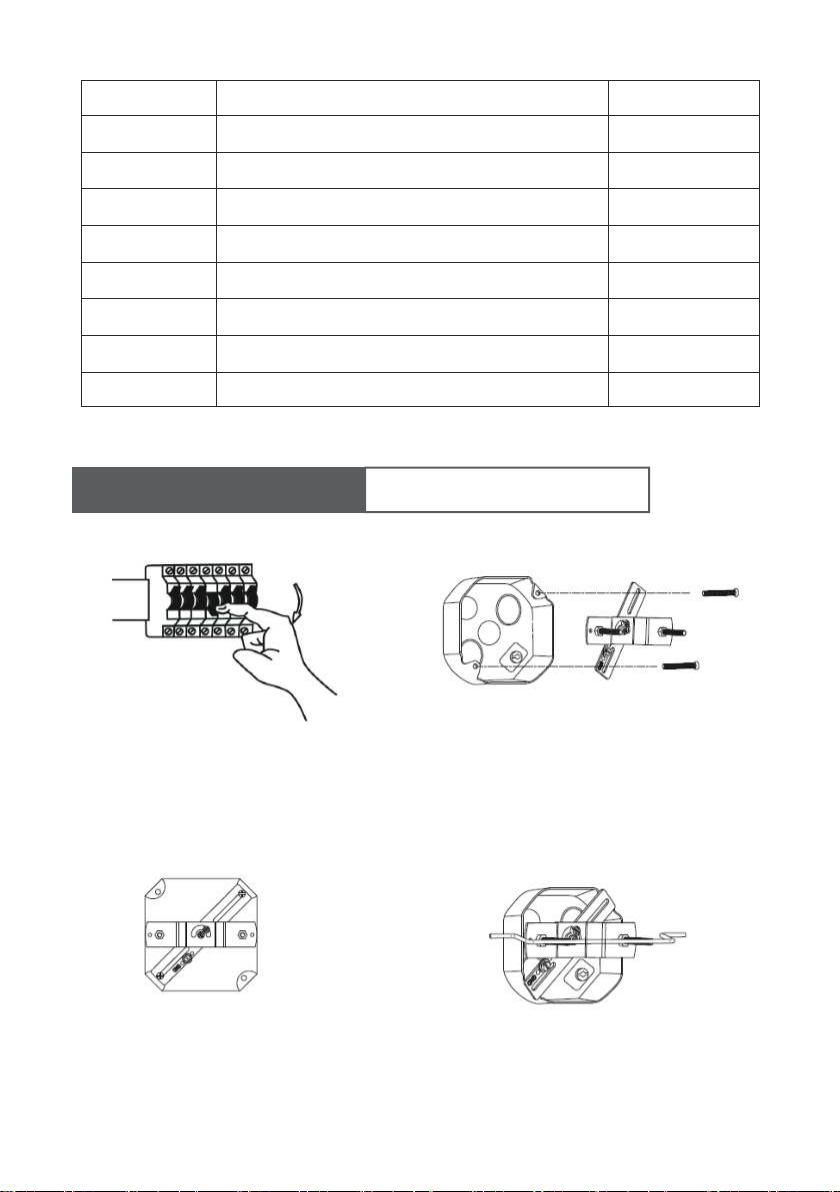
Accessories Instructions ( for U.S. regulations )
NO. Description Quantity
ASmart Safety Light 1
BBulb 1
CCross Plate 1
DHook 1
EAdjustable Holder 1
FCup Head Screw 2
GDecorative fixture nut 2
HWiring Cap 3
1.Cut off the power 2.Install cross plate to junction box.
4.Use adjustable holder, adjust the
length of cap head screws on cross
plate.
3.Adjust cross plate to make it horizontal,
fasten the cap head screws.
Installation Instruction ( for U.S. regulations )

5. Use hook, one hook the Smart Safety
Light, one fixed on the Cross Plate
6.Connect the corresponding wire and bare
copper wire with wiring cap, make sure to
screws.
7.Put the light through cap head screws on
cross plate, adjust its position, fasten the
decorative fixture nuts.
8.Install light bulb.
9.Turn the power on. 10.Debugging.
Black (Hot) Supply Wire
Supply ground wire
Fixture ground wire
White Fixture Wire
Black Fixture Wire
White (Neutral) Supply Wire

NO. Description Quantity
ASmart Safety Light 1
BBulb 1
C
D
Base 1
E
Nut 2
F
Tapping Screw 2
G
Expansion Tube 2
H
I
Decorative fixture nut
Terminal
Round head screw
2
1
2
JHook 1
AB C D
EF G HI J
Accessories Instructions ( for European regulations )
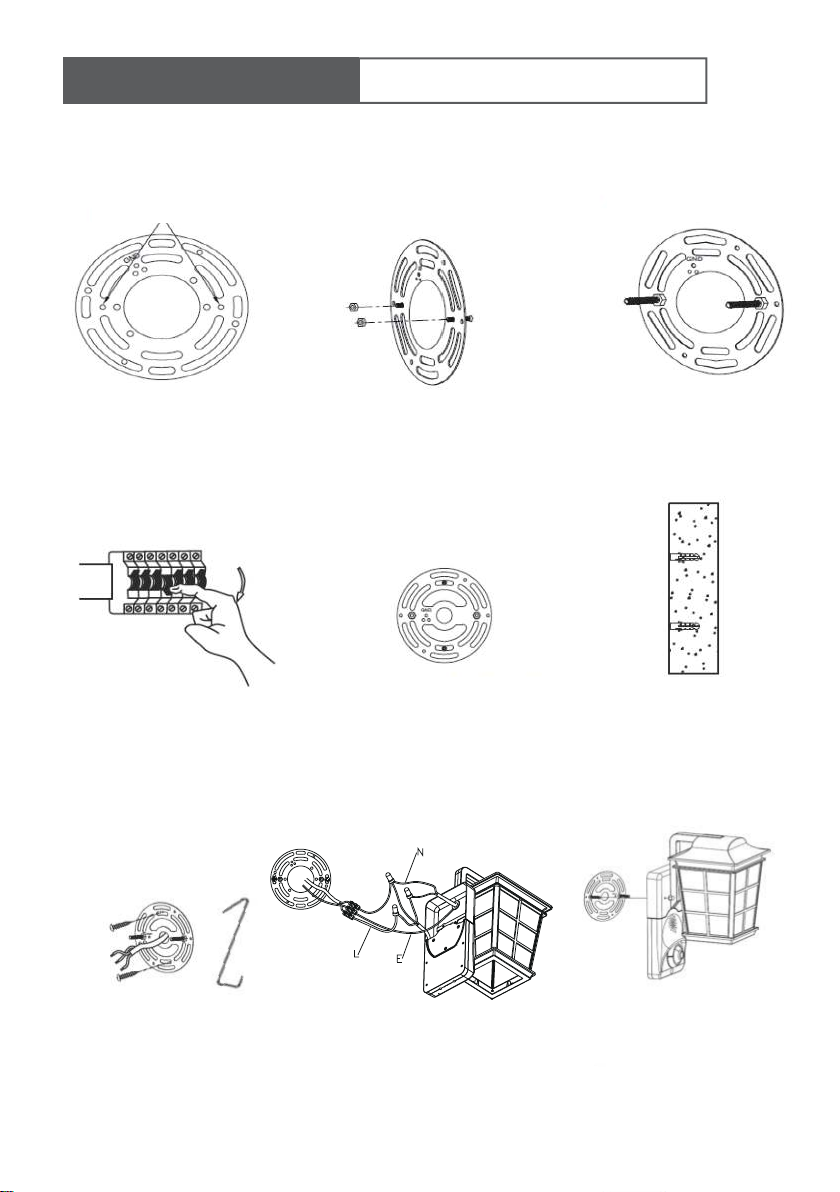
Base Installation
Product Installation
Thread the round-headed screw through the hole Tighten the nut
Step 1 Step 2 Step 3
1.Cut off the power 2.Selected two symmetry points
in the base U-shaped slot
arbitrarily , and mark
3 Drilling two holes, bury the
expansion tube
4 Install the base. Use hook,
one hook the Smart Safety
Light, one fixed on the Cross
Plate
5 Connect the corresponding wires
and ground wires through the
terminals
6 Turn the lamp through the
round head screw on the
base and tighten the nut
Installation Instruction ( for European regulations )
GND

APP Installation
Step 1: Download and install 'Annke Light' APP from APP Store or Google Play.
Step 2: Click “Annke Light” open.
Step 3: Sign up with e-mail address.
Step 4: Log in with e-mail address and password.
APP User registration APP user login
(2)(1)(3)7 Install the lamp 8.Turn the power on. 9.Debugging.
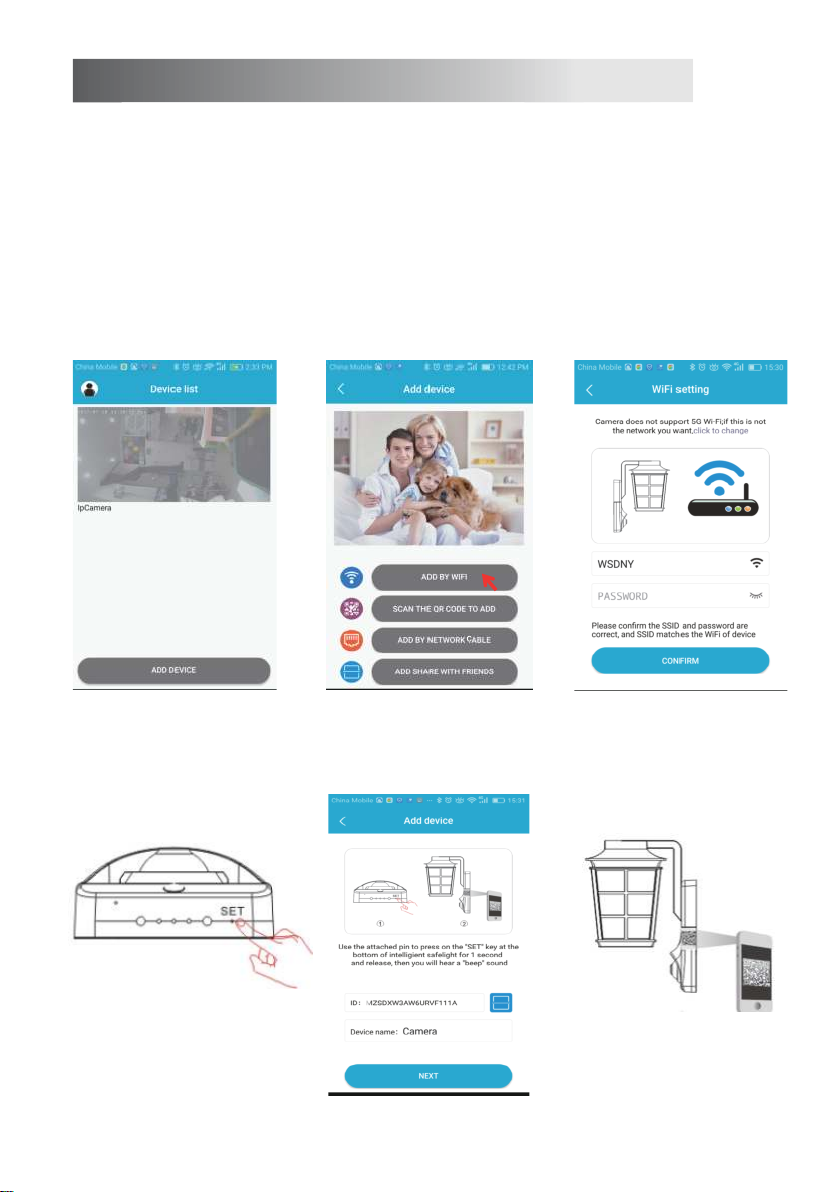
WiFi Connection:
Step 1: Click “add camera”
Step 2: Click “add by WIFI”
Step 3: Configure WIFI, input the password.
Step 4: Use needle push the “SET” button for one second to reset.
Step 5: Enter device name and click scan QR code.
Step 6: Scan QR code.
Step 7: Click “NEXT”, APP will search device automatically until connection.
Step 8: When LED light turns green, it means connection is completed.
Step 9: After connection, the monitor view is live.
Click “add camera” Click “add by WIFI” Configure WIFI, input the password.
(1)(2)(3)(4)(5)(6)Use needle push the “SET”
button for one second to reset.
Enter device name and
click scan QR code.
Scan QR code.

Click “NEXT”, APP will search
device automatically until
connection
When LED light turns green,
it means connection is
completed.
After connection, the
monitor view is live.
(7)(8)(9)Wireless Connection (QR connection)
Step 1: Click “add camera”
Step 2: Click “add by WIFI”
Step 3: Configure WIFI, input the password.
Step 4: Use needle push the “SET” button for one second to reset.
Step 5: Enter device name and click scan QR code.
Step 6: Scan QR code.
Step 7: Put QR code in front of the camera within 5-10 cm. If the scan was completed, you can
hear “beep” sound.
Step 8: When LED light turns green, it means connection is completed.
Step 9: The monitor view is live.
Click “add camera” Click “add by WIFI” Configure WIFI, input the password.
(1)(2)(3)
Autres manuels pour I41CL
1
Table des matières
Manuels Équipement d'éclairage populaires d'autres marques


Qazqa
Qazqa Suplux SL 3 Black 103062 Manuel utilisateur

Commercial Electric
Commercial Electric 54568141 Manuel utilisateur

CREE LIGHTING
CREE LIGHTING 304 Series Manuel utilisateur

Goobay
Goobay 49867 Manuel utilisateur

ECOMAN ITALIA
ECOMAN ITALIA LED T8 Manuel utilisateur

Alkalite
Alkalite Krypton KT-81 Manuel utilisateur


