Alpha Revo 4000 Manuel utilisateur

ALPHA SPORTS 1-800-922-9024 1
Revo 4000
Stringing Machine
• 360° Racquet Rotation
• Diamond-dusted swivel clamps with
dial adjustments
• Spring-Action Locking Levers
• 6-Point “Wide-Stretch” Mounting Arms
• Linear String Gripper
• Crank Tension Mechanism
• Reversible Crank Handle
• Convenient Tool Storage Area

ALPHA SPORTS 1-800-922-9024
2
ALPHA SPORTS 1-800-922-9024 3
GENERAL INFORMATION
The Revo 4000 has a 5-year limited warranty. The
string clamps have a 2-year limited warranty. The
limited warranty pertains to any parts deemed defective
by the manufacturer.
• The string clamps will have to be cleaned on a
regular basis. Take rubbing alcohol and clean inside the
jaws of the stringing clamp. This procedure will remove
oil and grit buildup.
• Use silicon spray to lubricate the rails that the swivel
bases run on. This will allow the swivel bases to slide
smoothly.
• Always keep the machine covered and in a dry area
when not in use.
For any questions regarding the use of your stringing
machine, please call Alpha Racquet Sports. Alpha
Racquet Sports does not provide stringing patterns. To
obtain patterns, contact the racquet’s manufacturer or
join the United States Racquets Stringers Association
at (858) 481-3545.
WARRANTY
MAINTENANCE
TECH SUPPORT

ALPHA SPORTS 1-800-922-9024
2
ALPHA SPORTS 1-800-922-9024 3
TABLE OF CONTENTS
I. DIAGRAM................................................4
II. COMPONENT PARTS LIST...................5
III. MOUNTING THE FRAME.....................6
IV. PREPARATION OF STRINGING..........8
V. STRINGING THE FRAME..................9
VI. CALIBRATION OF THE MACHINE....14
VII. CLAMP BASE ADJUSTMENT............16

ALPHA SPORTS 1-800-922-9024
4
ALPHA SPORTS 1-800-922-9024 5
DIAGRAM
12
3
4
5
6
8
9
10
11
12
13
14
15
16
17
18
19
21
20
7

ALPHA SPORTS 1-800-922-9024
4
ALPHA SPORTS 1-800-922-9024 5
COMPONENT LIST
MOUNTING ARM-MAIN
MOUNTING ARM
VISE POST
FRAME SUPPORT
DIAL ADJUSTMENT STRING CLAMP
CLAMP BASE LOCKING LEVER
HEAD/THROAT FRAME SUPPORT
LOCKING LEVER CATCHER
MOUNTING ARM ADJUSTMENT KNOB
STRING GRIPPER
LOCKING LEVER
TENSION HEAD
TENSION ADJUSTMENT KNOB
TENSION ARM
REVERSIBLE TENSION CRANK
TENSION HEAD COVER
BRAKE KNOB
TABLE TOP BASE
TOOL TRAY
VISE POST LOCKING KNOB
MOUNTING SYSTEM BASE
1.
2.
3.
4.
5.
6.
7.
8.
9.
10.
11.
12.
13.
14.
15.
16.
17.
18.
19.
20.
21.

ALPHA SPORTS 1-800-922-9024
6
ALPHA SPORTS 1-800-922-9024 7
Place clamp on the swivel
bases.
MOUNTING THE FRAME
Loosen and remove the
ne adjustment knobs,
ip the head/throat frame
supports so that they
(supports) are each in an
upward position. Replace
the ne adjustment knobs.
To accommodate the
length of each racquet,
adjust the mounting
arm post by loosening
the mounting post
adjustment knob. Once the correct adjustment is
reached, tighten the mounting post adjustment knob.
CAUTION: Make sure that both the mounting post
and the adjustment knobs are tightened and secured.
Not doing this will allow the mounting arms to creep
forward during the stringing process and cause
damage to the racquet. NOTE: Both mounting arms
are identical, the racquet can be mounted either way.

ALPHA SPORTS 1-800-922-9024
6
ALPHA SPORTS 1-800-922-9024 7
Insert the frame supports
into the appropriate slots
located on the end of
the mounting arms. The
two slots are designed
to accommodate most
racquets.
Make adjustments by
turning the ne adjustment
knobs. The t should be
snug.
Turn the mounting arm
adjustment knobs so that
the angled frame support
the t up against the
frame. The t should be
snug, but use caution.
NOTE: Over-tightening
can cause premature
stress on the frame.
MOUNTING THE FRAME CONT’D.

ALPHA SPORTS 1-800-922-9024
8
ALPHA SPORTS 1-800-922-9024 9
PREPARATION OF STRINGING
To clamp the string, squeeze
the toggle to close.
To release the
string, pull the
toggle to open.
To tighten, turn the dial
clockwise. To loosen, turn the
dial counter-clockwise. NOTE:
Before stringing a racquet, the
tension on the string clamp has
to be adjusted with the type of
string gauge being used. If the
string is of a thin gauge (16L,
17, or 18) then the string clamp
may need to be tightened. If the
string gauge is thick (15, 15L, or
16) then the string clamp may
need to be loosened.
ALPHA SPORTS 1-800-922-9024
8
ALPHA SPORTS 1-800-922-9024 9
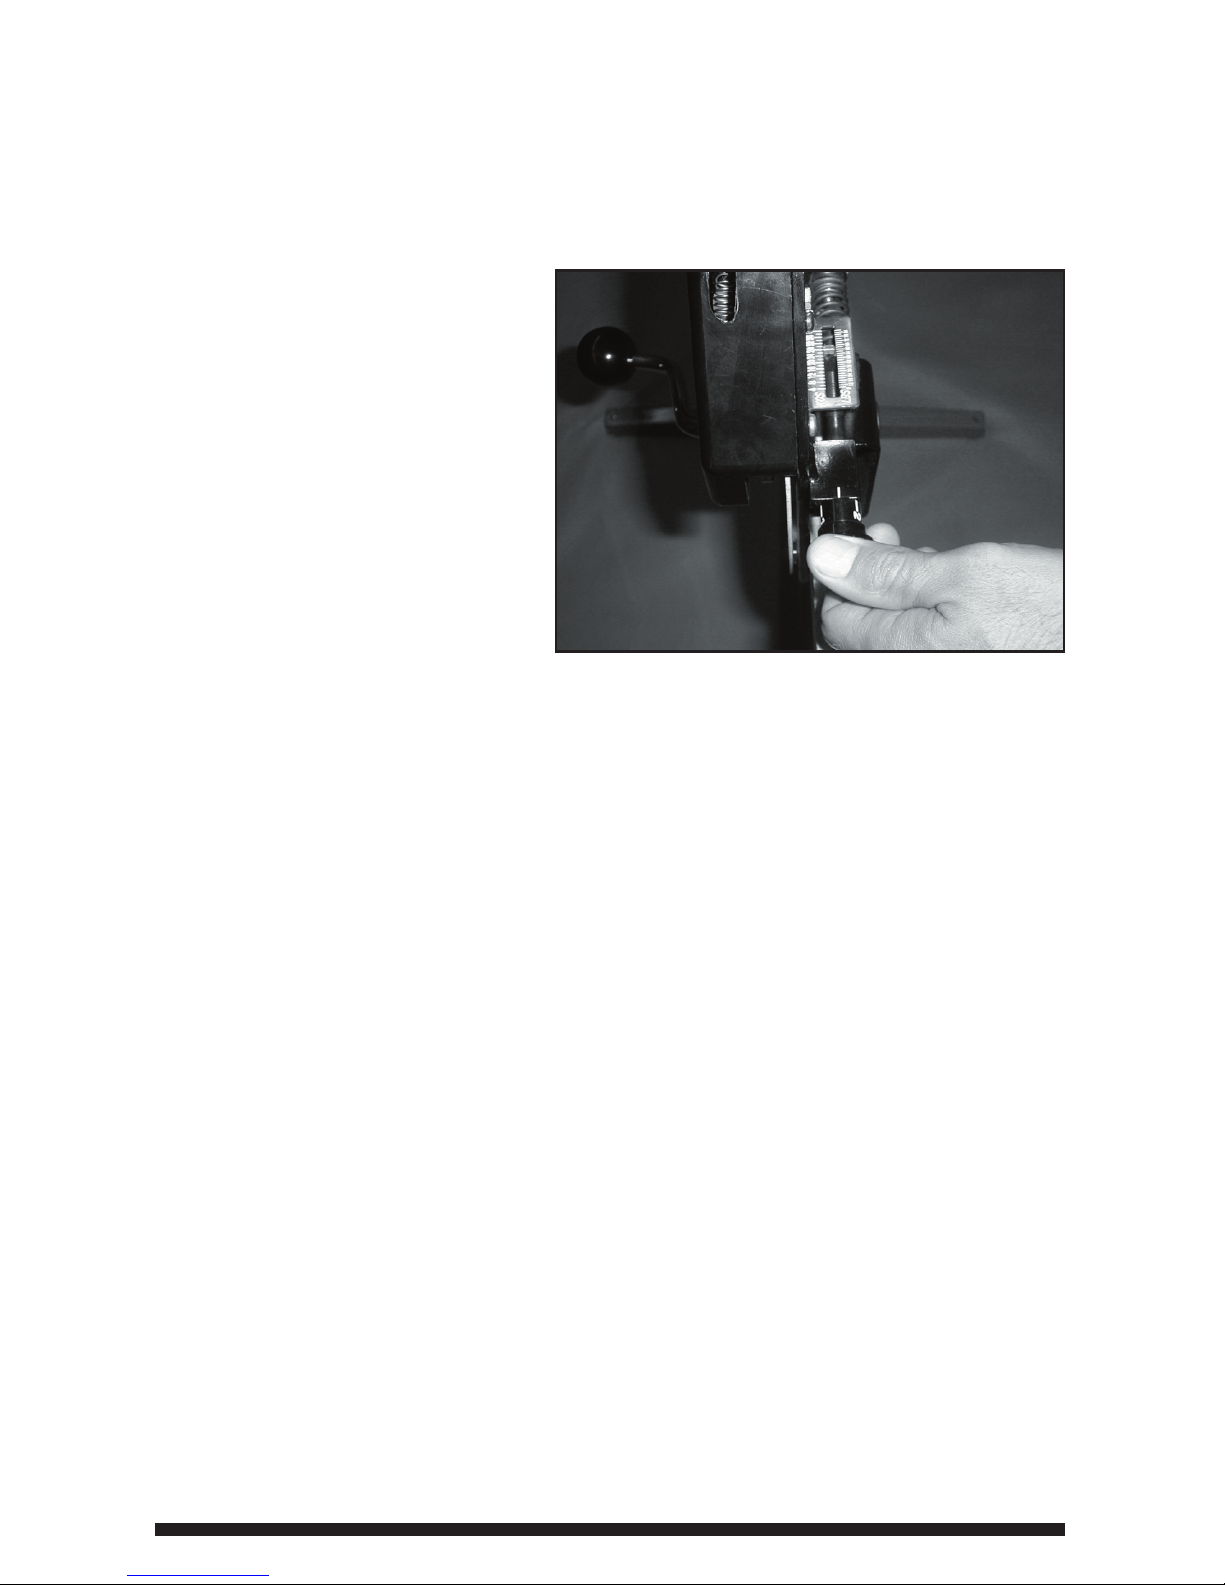
STRINGING THE FRAME
To set the tension,
there are two
adjustments. The
rst is to move the
marker to the nearest
hash mark of the
desired tension. The
hash marks on the
scale are in three-
pound increments. The second adjustment is to ne
tune the tension with the hash marks located on the
knob’s collar. The hash marks on the collar are in one-
pound increments. For example, to set the tension at
62 pounds, turn the knob so that the marker matches
to 60 pound hash mark on the scale. The 0 hash mark
should be lined up with the platform’s hash mark. Next,
turn the collar two one-pound increments. The 2 pound
hash mark should now be aligned with the platform’s
hash mark. Your tension setting is now 62 pounds.
NOTE: When the machine is not in use, release the
tension on the spring by setting back down to 9 pounds.

ALPHA SPORTS 1-800-922-9024
10
ALPHA SPORTS 1-800-922-9024 11
To determine whether the mains are at the top or the
boom of the frame, count the number of holes in the
open throat area. For 4 to 8 holes, start at the top of the
frame. For 2, 6, or 10 holes start at the throat. You must
also determine whether the racquet requires a one-piece
stringing or two piece string pattern. One-piece stringing
means that you will use one continuous piece of string
for the whole racquet. This is where 25% of the string
length will be used to string the short side (one half of
the main strings). The other 75% of the string will cover
the other half of the mains and all the crosses. DO
NOT cut the string for a one piece string job. Two-piece
stringing means that you will use two pieces, usually the
same string set (unless it is a hybrib). The string must
be cut to accommodate the appropriate length for the
mains (usually 20’). The rest of the string set will be
used the crosses.
The center of the frame supports (6 and 12 o’clock
positions) divide the racquet in half. Looking at the
racquet form the butt end, the rst hole on the left would
be considered the 1st left main and the rst hole on the
right would be the 1st right main. Thread the two ends of
the main strings through the 1st left main and the 1st right
main. Do this at the throat of the racquet.
STRINGING THE FRAME CONT’D.
Table des matières
Autres manuels Alpha Machine à corder


