Alogic Smartbox Manuel utilisateur

Charge and store up to 5 laptops and tablets
Notebook/Chromebook & Tablet
Charging Locker (5 Bays)
- Includes Digital Number Lock

Contents
The product is designed to allow you to easily store, secure, charge up to
5 devices per unit.
1. Product Specification .......................................................................... P.1
2. Introduction ......................................................................................... P.02
Package Contents .................................................................... P.02
Cabinet Diagram ...................................................................... P.02
Interior View .............................................................................. P.03
3. Quick Start Guide ................................................................................ P.03
4. Adminstration Software ....................................................................... P.05
4-1 For Windows OS User ....................................................................... P.05
4-2 For Mac OS User ............................................................................... P.09
5. Safety ………...................................................……..…………………... P.17

1. Product Specification
Cabinet Dimension
Product Spec
Capacity
Support Device
(H)109.22 x (W)325.12 x
(D)452.12mm
Laptop/Chromebook/Tablet
up to 17" sreen size
5 Bays
Compartment
Dimension
(H)574.04 x (W)444.5 x (D)482.6mm
Cart Dimension
(H)683.26 x (W)576.58 x
(D)619.76mm
Packaging
Dimension
Weight
Lock Type
C100~125V/9A,
AC200~240V/10A(50/60Hz)
USB DC5V/2.4A
Electronic type:
Digital Key Lock
Mechanical type:
3-Dial Lock
N.W: 21kg
G.W.: 26kg
Power
Specification
Support AU types AC power
outlet x 1pc
USB Charging Port x 1pcs (MAX
2 ports)
Australia/N.Z.: AS/NZS CISPR 22,
AS/NZS 60950-1
Charging Type
Regulation/
Certification
1
A pair of optional bracket kit must be ordered separately for
joining the lockers when they are being stacked on top of each
other. A daisy chain power cable is also included in the kit for
connecting the lockers. (Do not stack over 2 lockers in AC110V
environment or over 4 lockers in AC220V environment.
Optional Accessory
DAISY-CHAIN KIT
444.5mm
574.04
482.6mm
DAISY-CHAIN Power Cable
Bracket Kit
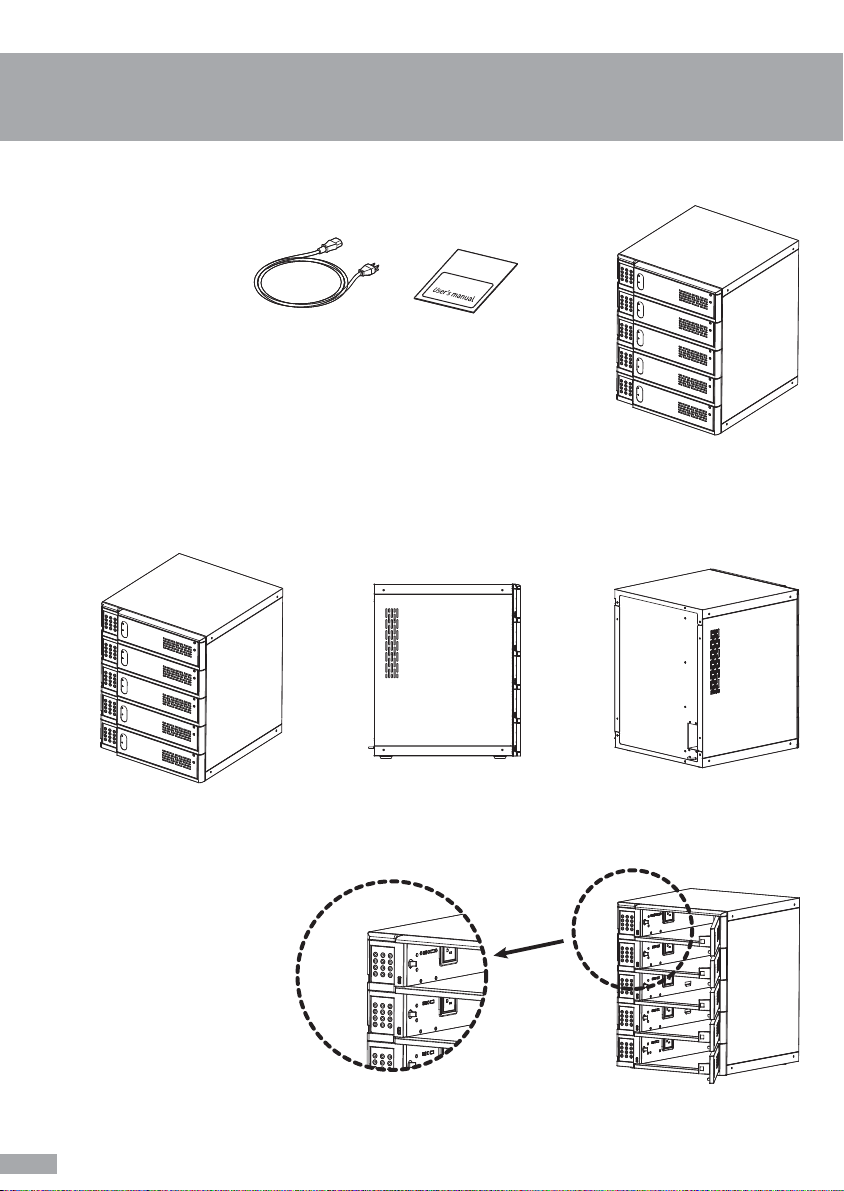
2. Package Contents
2
SB-CL05D x 1
Power cable x 1
User manual x 1
Package Contents
Cabinet Diagram
(Side View)
Interior View
(Rear View)(Front view)
One AC Port
One USB Port
(Max 2 USB Ports)

3. Quick Start Guide
3
Identification of LED Indicators
Code Status of Door Lock
Solid Red: Door is locked with code
Solid Green: Door is locked without code, press to open
Blink Green: Able to insert the code
Keypad Indicator
Red: lights when key buttons are pressed
Door indicator
Red: when door is closed
Green: when door is opened
USB charging indicator
Red: USB port is charging
Green: USB device is fully charged

4
How To Start Quickly
- Plug in the power cord
- Press to open the door
(code indicator will flash GREEN)
- Close door and insert 4 digital code when code indicator is ashing
(Re-press button if indicator becomes SOLID GREEN)
- Press button after the code is entered
- Ensure the code has been successfully entered and accessed . After this
the code indicator will turn Red.
- Insert the code as set by user then press button to open
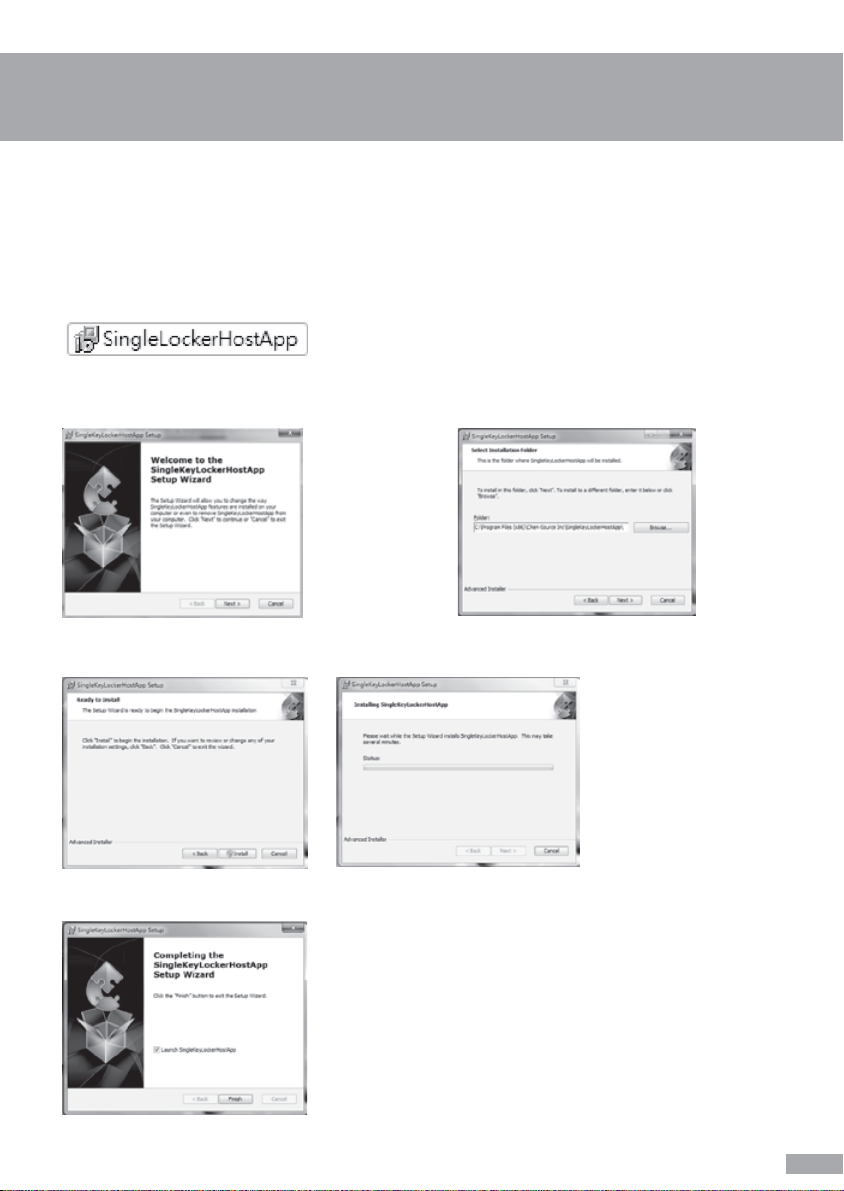
4-1. Software Installation Guide
Double click “SingleLockerHostApp” to start the software installation
Press “Next” after the Setup Wizard pop up
Simply press “Install” to start the software installation, then Setup Wizard will come out with the
processing status of installation.
Installation is complete, press “Finish” to close the pop up window
Choose the target drive/folder to place
software then press “Next” to go to next stage
a. Software about administration platform
(For Windows OS only)
5

6
Before you start to use this administration platform, please make sure your “SingleLockerHostApp”
has been successfully installed on your laptop or refer to “Software Installation Guide” and
“SingleLockerHostApp” we have provided.
Please use a Micro USB cable to connect your computer with the charging locker. The Micro USB
port on the charging locker is placed at left bottom corner next to the keypad.
Double click the shortcut of “KeyLockerUSBHostApp” on windows desktop. Software will run
automatically.
After software opens, you will see the administration
platform on the right.
b. Administration User Guide
Operation guidance for administrator
(For Windows OS only)

Administrator Guidance
Unlock by administrator
Unlock & Reset by administrator
Select 1st option (Inspect,
Unlock Door Only (User Password Reserved)) »
Insert “Inspect Code” »Press “RUN” to proceed.
Door will open after “Successful” message pop up.
Tip: Default Inspect Code is 12345678
Select 2nd option (Reset,
Empty User Password And Reset Status To
Available) »Insert “Reset Code” » Press “RUN” to
proceed.
Door will open after “Successful” message pops
up, user’s personal code will be deleted and the
device will be reset to the default settings. (Doors
will open by pressing unlock button in default
setting)
Tip: Default Reset Code is 12345678
Allows you to open the locker and delete/reset the code that was set by the user to
default.
Unlock the door without user’s personal code
7

Inspect Code Set up by administrator
8
Select 3rd option (Set Inspect Code (MaxLen: 8,
Default: 12345678)) » Insert “Current Inspect
Code” » Insert “New Inspect Code” and “Confirm
Inspect Code” » Press “RUN” to proceed.
“Successful!” message will pop up after the code
has been configured successfully. Notice! You
may not set more than 8 digits for the code.
Tip: Default Inspect Code is 12345678
Select 4th option (Set Reset Code (MaxLen: 8,
Default: 12345678)) » Insert “Current Reset Code”
» Insert “New Reset Code” and “Confirm Reset
Code” » Press “RUN” to proceed.
“Successful!” message will pop up after the code
has been configured successfully. Notice! You
may not set more than 8 digits for the code.
Tip: Default Inspect Code is 12345678. It’s an
important code to reset code back to default
setting (refer to 2nd function option), suggest
administrator to take a note to avoid code missing.
Setting your own Inspect Code for confidentiality concern
Reset Code Set up by administrator
Setting your own Reset Code for confidentiality concern
Table des matières


