Akai VS-K207M-E3(S) Manuel utilisateur

Video Recorder
VS-K207M-E3(S)
4G0A001A[D] COVER-IN 3/9/04, 9:071

Features
•
•
•
•
•
•
•
•
•
•
•
High Quality (HQ) Images
On-Screen Displays (OSD)
CATV Tuner with Hyperband
80 Memories for Presets
Automatic TV station presetting
30 Minutes Back-Up in case of
Power Failure
Timer Recording of up to 8
Programs per Month
One-Touch Timer Recording
(OTR)
Video Index Search System
NTSC Video Cassette Tape
Playback on PAL TV
Auto Power ON and Auto
Playback when inserting a
Cassette Tape
•
•
•
•
•
•
•
•
•
Auto Rewind, Auto Eject, and
Auto Power OFF
Real-Time Tape Counter with
ZERO RETURN-Function
Auto Video Head Cleaning
System
2 Tape Speeds
Digital Auto Tracking (ATR
Function)
Repeat
On-Screen Language Display
in English, German, French,
Italian, or Spanish
Scart socket
CE Symbol Guaranteeing
Compliance to Currently
Effective European Standards.
4F37001A (E)COVER 5/6/2002, 16:402

1
Precautions ..........................................................2
Locations of Indicators and Controls.................... 4
Remote Control .................................................... 5
Connections and Installation ................................ 7
Setting the TV to the AV-Channel ........................ 9
On-screen Language Selection..........................10
Setting the Time and Date .................................10
Automatic TV station presetting .........................11
Mapping TV stations ..........................................11
Manual TV station presetting .............................13
Preparation
Recording a TV Program ...................................18
One-Touch Timer Recording (OTR)................... 19
Timer Recording.................................................20
Recording
Duplicating a Video Tape ................................... 22
Error Search.........................................................
23
Video Head Cleaning .........................................24
Specifications .....................................................25
Contents
Other Functions
Loading and Unloading a Cassette Tape........... 14
Playback.............................................................14
Special Playback................................................ 15
Repeat Playback ................................................ 16
Counter Display..................................................17
Video Index Search System.................................
17
Playback
4F37001A (E)P01-09 5/6/2002, 16:401
2
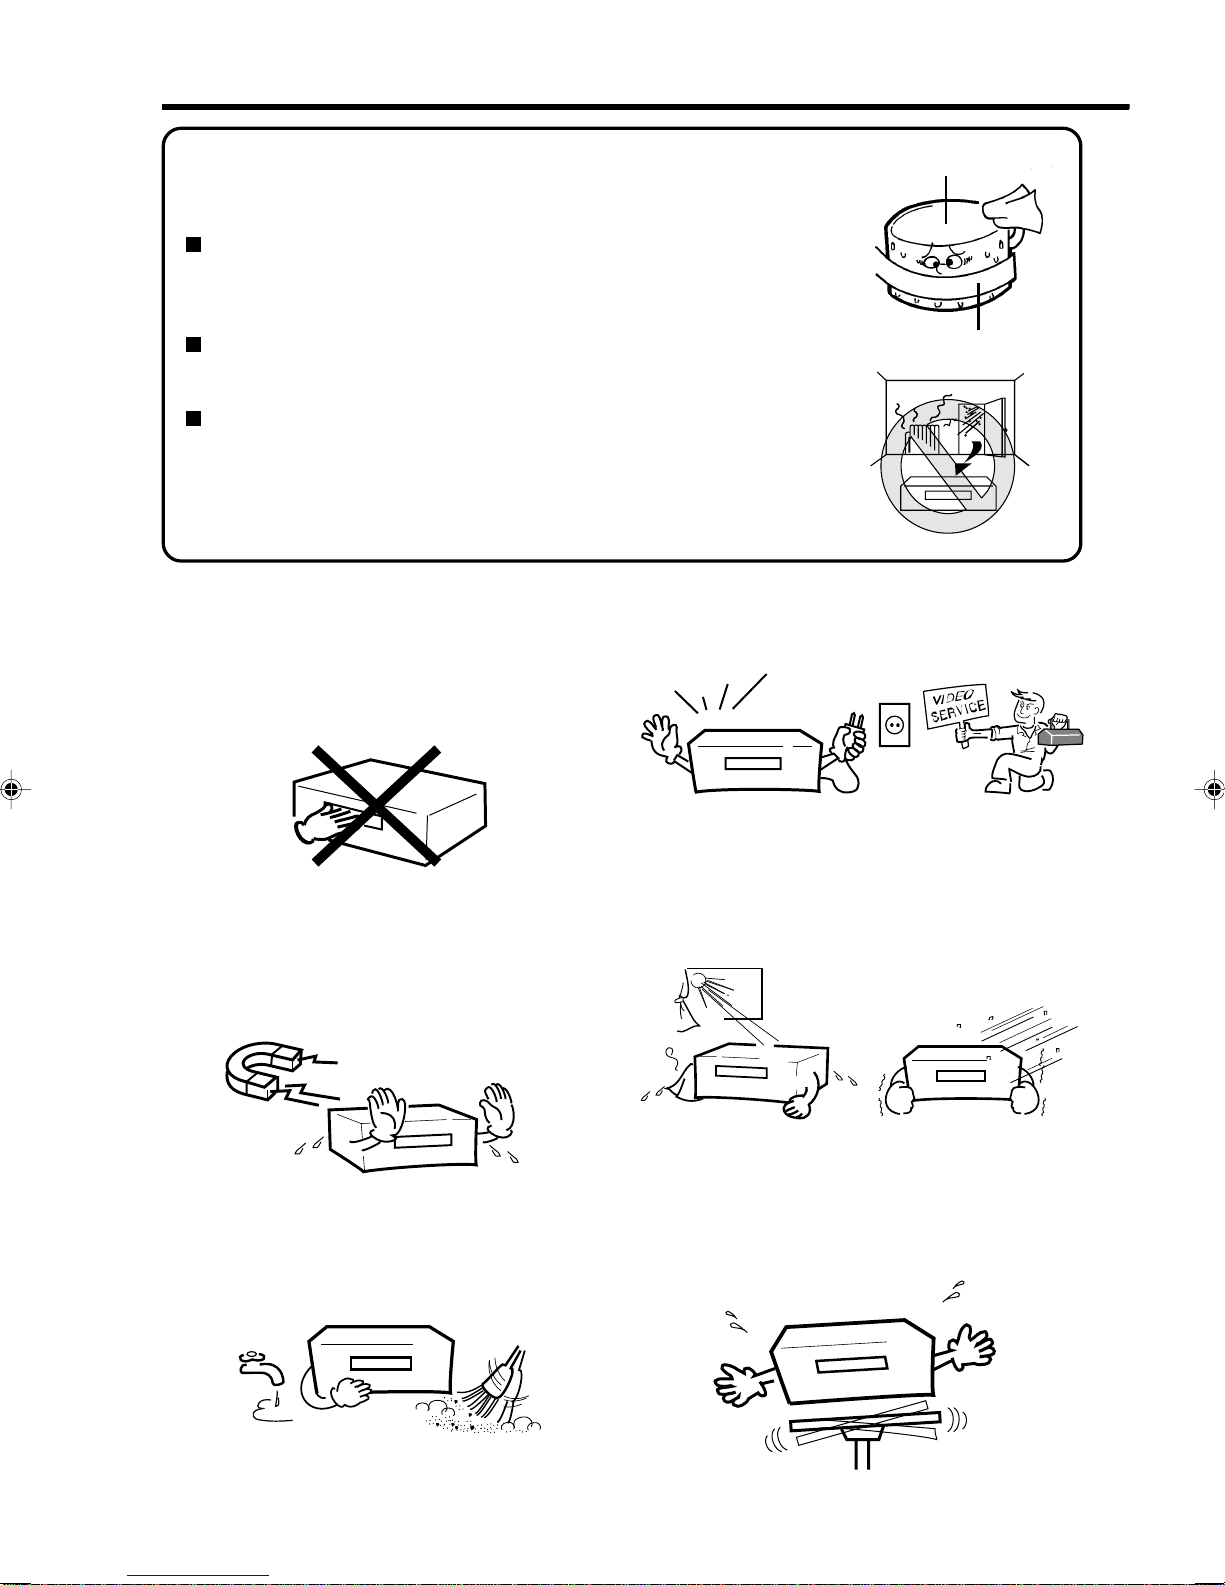
Precautions
2
To prevent injuries do not insert your hand into the
cassette loading slot.
Watch out for toddlers who often love to imitate the
behavior of adults. In some cases, toys inserted into
the cassette loading slot have resulted in expensive
repairs.
Leave repairs to a qualified service technician.
Video Tape
Video Head Drum
Moisture condensation
Do not place the unit near appliances which may
cause electromagnetic interference such as loud-
speakers, amplifiers, electric motors, etc. Magnetic
fields may affect picture or sound quality of video
recordings.
Avoidlocationssubjectedtoextremeheatandcold.
Avoid extreme moisture and dust. Avoid to place the unit on any surfaces that may by
subjected to vibrations or shocks.
Moisture will condense on the unit in the following cases;
If the unit is suddenly moved from a cold place to a warm place,
do not operate it for two or three hours.
When cold water is poured into a glass, for example, water vapour in
the air will condense on the surface of the glass. This is called moisture
condensation.
What is moisture condensation?
When you move this VCR from a cold to a warm place.
After heating a cold room or under extremely humid conditions.
If you experience the above conditions:
Plug the mains lead into an AC outlet, set the POWER button to ON
and leave at the room temperature until moisture condensation
disappears.
Depending on the surrounding conditions, this may take for two or
three hours.
NO !
****
4F37001A (E)P01-09 5/6/2002, 16:402

3
Do not place flower vases on top or next to the unit.
Water spilled into the unit could cause serious unit
damages. In case of water damage, do not unplug
the power cord from its wall outlet and call for
qualified service immediately.
Whenyouleaveyourhomeforalongperiodoftime,
unplug the power cord for safety reasons.
Do not insert fingers or any other objects into the
cassette loading slot. Also, when cleaning the unit,
never spray cleaner or furniture wax directly on the
unit housing.
Toprotecttheunitduringathunderstorm,unplugthe
power cord and disconnect the antenna.
OK !
OK !
OK !
Cleaning Precautions
For cleaning the VCR we recommend a mild soap
solution and a slightly moistened soft cloth as it is
used for furniture. To avoid electrical shocks unplug
the AC power cord from its wall outlet before
cleaning.Beespeciallycarefulwhencleaningplastic
components.
Precautions
NO !
4F37001A (E)P01-09 5/6/2002, 16:403

4
PLAY
REW
REC/OTR
STOP/
EJECT
CHANNEL
F.FWD
Front view
VCR Indicator
Clock/Counter/Deck Status/Channel
Display (see below)
VCR Indicators and Displays
One-touch Timer Recording
Timer Recording
ON Symbol
(Clock symbol) ATR Indicator (AUTO
TRACKING)
The following indications will light up or blink for several seconds on the display.
Tape In
Locations of Indicators and Controls
Program selection / Manual
Tracking adjustment
Stop / cassette eject
Recording / Instant recording
Infrared sensor
Display
Playback
Tape rewind
Tape fast forward
Power On/Off
Cassette loading slot
0:30
11:30
01:54
AU
CH 29
CUE
FF
OFF
Page
Remaining Time of OTR
Current Time
Elapsed Time
Scart Input
Channel selected
Forward picture search
Fast forward
AV-Channel is not output
19
10
17
22
18,19
15
14
9
RF:36
PAUS
PLAY
REC
REV
REW
Still
STOP
AV-Channel 36
Pause for recording
Playback
Recording
Reverse picture search
Tape rewind
Still picture
Tape stop
9
18,22
14
18
15
14
15
14,18~19
*
*
*
*
*will appear and change to counter display after approx. 4 seconds.
Display
Explanation
*
*
Display
Explanation Page
OTR VCR
ATR
4F37001A (E)P01-09 5/6/2002, 16:404

5
EJECT
ENTER
REC/OTR
PAUSE/STILL
CH/TRAV
MENU
123
456
7
0
89
INDEX CANCEL
–
CALL
SPEED
SP/LP
CLOCK/
COUNTER
TV/VCR
PROGRAM
TIMER REC
ZERO
RETURN
COUNTER
RESET
+
Page
10
Remote Control
On/Off
Select channel 11,13
Use as the Number buttons in
various setting modes 10~13
1
1
~
Scart Input 22
AV
CH/TR
–
+
Manual Tracking 15
Select channel step by step 11,18
Recording/OTR 18,19
REC/OTR
09
PAUSE/STILL
18
Still picture 15
Pause for recording On/Off
Playback
Menu setting 14
Menu setting 14,15
Reverse picture search/Tape rewind
Menu setting
Forward picture search/Fast forward 14,15
14,15
Tape Stop
Menu setting
Memorize
ENTER
INDEX
Index 17
21
11
CANCEL
Fade-out channel
Cancel Timer recording
MENU
Call Menu 10~13, 16,20
TIMER REC
Timer recording On/Off 20
Confirmation of Timer-Recording 21
PROGRAM
CALL
Display status 18
Clock / Counter 17
CLOCK/
COUNTER
17
COUNTER
RESET
Set Counter to zero
17Return to counter position 00:00
ZERO
RETURN
SPEED
SP/LP
Select Tape speed 18,19
TV/VCR
18
Switch to TV only at Scart connection
EJECT Tape eject 14
4F37001A (E)P01-09 5/6/2002, 16:405

6
How to install the batteries
Use micro batteries type UM-4 (AAA-Size).
Z
Z
Z
Z
Z
Z
If the batteries have not been installed according
to their polarities. If the batteries are weak.
Ifbright sunlight directly beams onto theunitfront. If an obstacle is placed between the unit and the
handset.
The remote control handset will not work properly in the following cases:
3
2
1Move cover in direction of
arrow and take it off. Install the batteries as shown
below, pay attention to
polarities.
Replace cover.
approx. 5m
Distance of Remote Control Operation
•Point the remote control
directly at the remote sensor.
Remote sensor
Effective angle: approx. 60°
Transmitter window
Remote Control
4F37001A (E)P01-09 5/6/2002, 16:406

7
IN
(ENTR)
RF
(ANT)
OUT
(SORTIE)
TV
(PRISE PERITEL)
Connect your VCR to your home's aerial and to your TV-set as shown in the illustration.
When you have finished these connections you connect your VCR to the 230 V / 50 Hz mains.
Connections and Installation
TV
Supplied Coaxial cable
AC power cord 230V/50 Hz
Video-Cassette-
Recorder (VCR)
Antenna-Input
RF-Input (from
house antenna)
TV Scart Socket
RF-Output (to TV)
(not supplied)
Antenna
If you don’t have a SCART-cable at hand just now, perform now the output channel adjustment (AV-channel)
(see pg. 9). This VCR will work without connecting a SCART-cable. Please note that not using a SCART-
cable makes installing procedure more complicated. Therefore we recommend to
Connect a TV through the SCART-Socket
Youcanconnect theVCRto yourTV withRFcable. Ifhowever,yourTVhas SCART-Socketyoucan connect
it to the VCR with a SCART cable as shown above for better quality pictures and sound.
If your TV-set does not switch to video-playback automatically, please turn your
TV's video switch to VIDEO position manually.
4F37001A (E)P01-09 5/6/2002, 16:407

8
The SCART-Socket is suitable to connect the video recorder to other units.
SCART-cable
(not supplied)
SCART-Socket
Video Cassette
Recorder (VCR)
From house aerial
SCART-Socket
TV
Connection to a Stereo Amplifier
If the VCR is connected to a stereo amplifier, the video soundtrack can be output through the loudspeakers
of the stereo system. (The playback sound is in Mono.)
Connections and Installation
Video Cassette Recorder (VCR)
From house antenna
To AUDIO-
Input (left) To AUDIO-
Input (right)
SCART-cable (not supplied)
Connection to a Satellite Receiver
If you install a Satellite Receiver, we recommend the following connection:
Satellite
antenna
TV
To Scart-
Input
Satellite
Receiver
or
Satellite
Receiver
From house antenna
TV
To RF-Input
SCART-Socket
Video Cassette Recorder (VCR)
Satellite
Antenna
To Scart-Output
SCART-cable (not supplied)
RF-Output
RF-Output
RF-Output
RF-Output
4F37001A (E)P01-09 5/6/2002, 16:408
Ce manuel convient aux modèles suivants
1
Table des matières
Autres manuels Akai DVR

 Manuel utilisateur")


 Manuel utilisateur")


