Aim CZ500 Instructions de montage

INSTRUCTIONS FOR USE AND CARE
Micro DVD Hifi
INSTRUCTIONS FOR USE AND CARE
CZ500

CONTENT
1
SAFETY INSTRUCTIONS .............................................................................................02
REMOTE CONTROL ....................................................................................................04
FRONT PANEL ...........................................................................................................05
REAR PANEL ..............................................................................................................06
CONNECTIONS ..........................................................................................................07
SYSTEM SETUP FOR DVD MODE ...............................................................................08
REMOTE FUNCTIONS ................................................................................................09
HOW TO SEARCH ......................................................................................................11
SYSTEM SETUP ..........................................................................................................12
TROUBLESHOOTING .................................................................................................14
USB COPY .................................................................................................................15
COMMON OPERATION .............................................................................................16
SPECIFICATIONS ........................................................................................................18

SAFETY INSTRUCTIONS
BasicSafety Requirements
1. Unplug the unit during lightning storms or when you do not intend to use it for a long period
2. To remove the plug from the electrical outlet, do not pull on the supply cable. Grasp the plug
firmly and pull to remove.
3. If the supply cord is damaged in any way, it must be replaced by the manufacturer, its service
agent or a similarly qualified person in order to avoid a hazard.
openings being blocked.
Only qualified service personnel should perform servicing. Take the unit to the authorised
en
10. There is a laser system inside this unit classified as CLASS ILASERPRODUCT. Do notstare
directly into the beam as this may harm your eyes.
9. Due to the high risk of fire or electric shock, do not expose this unit to rain or moisture. Do
not open the cabinet as dangerous high voltages are present inside the enclosure. Only
2

As adiscis rotated at a high speed, itis dangerous to play a broken ordeformed disc. Do not apply any
tape or glue to the discas this could lead to damage of the player. Should there be astrange noise or
immediately.
12. Always ensure that the product is unplugged from the electrical outletbefore movingor cleaning.
sourcing powderorsolvents such as alcohol as they may damage the surface of the unit.
11. If it is very cold, please place the unit in a warm room and turn the power on for about an hour.
Deformed
3

REMOTE CONTROL
1POWER
2EQ
3PBC
4NUMBER BUTTONS
5PROGRAM
6CLEAR
7RETURN
8GOTO
9DVD/USB
10 SETUP
11 UP
12 LEFT
13 ENTER
14 RIGHT
15 DOWN
16 TITLE
17 MENU
18 STOP/STOP SCAN
19 PLAY/PAUSE/SCAN
20 PREV/CH-
21 REV/FM-
22 VOL+
23 VOL-
24 NEXT/CH+
25 FWD/FM+
26 L/R
27 N/P
28 MODE
29 OSD
30 SLOW
31
A
NGLE
32
A
-B
33 ZOOM
34 REPEAT
35 SUBTITLE
36 RESET
37 MUTE
38 COPY/DEL
39 LANGUAGE
SCAN
STOP
DVD/USB
FM- CH-
FM+ CH+
MODE
12
3
45
6
7
8
9
10
12
11
13
15
14
16
17
18
19
20
21
22
23
24
25
26
27
28
29 30
31
32
33
34
35
36
37
38
39
4

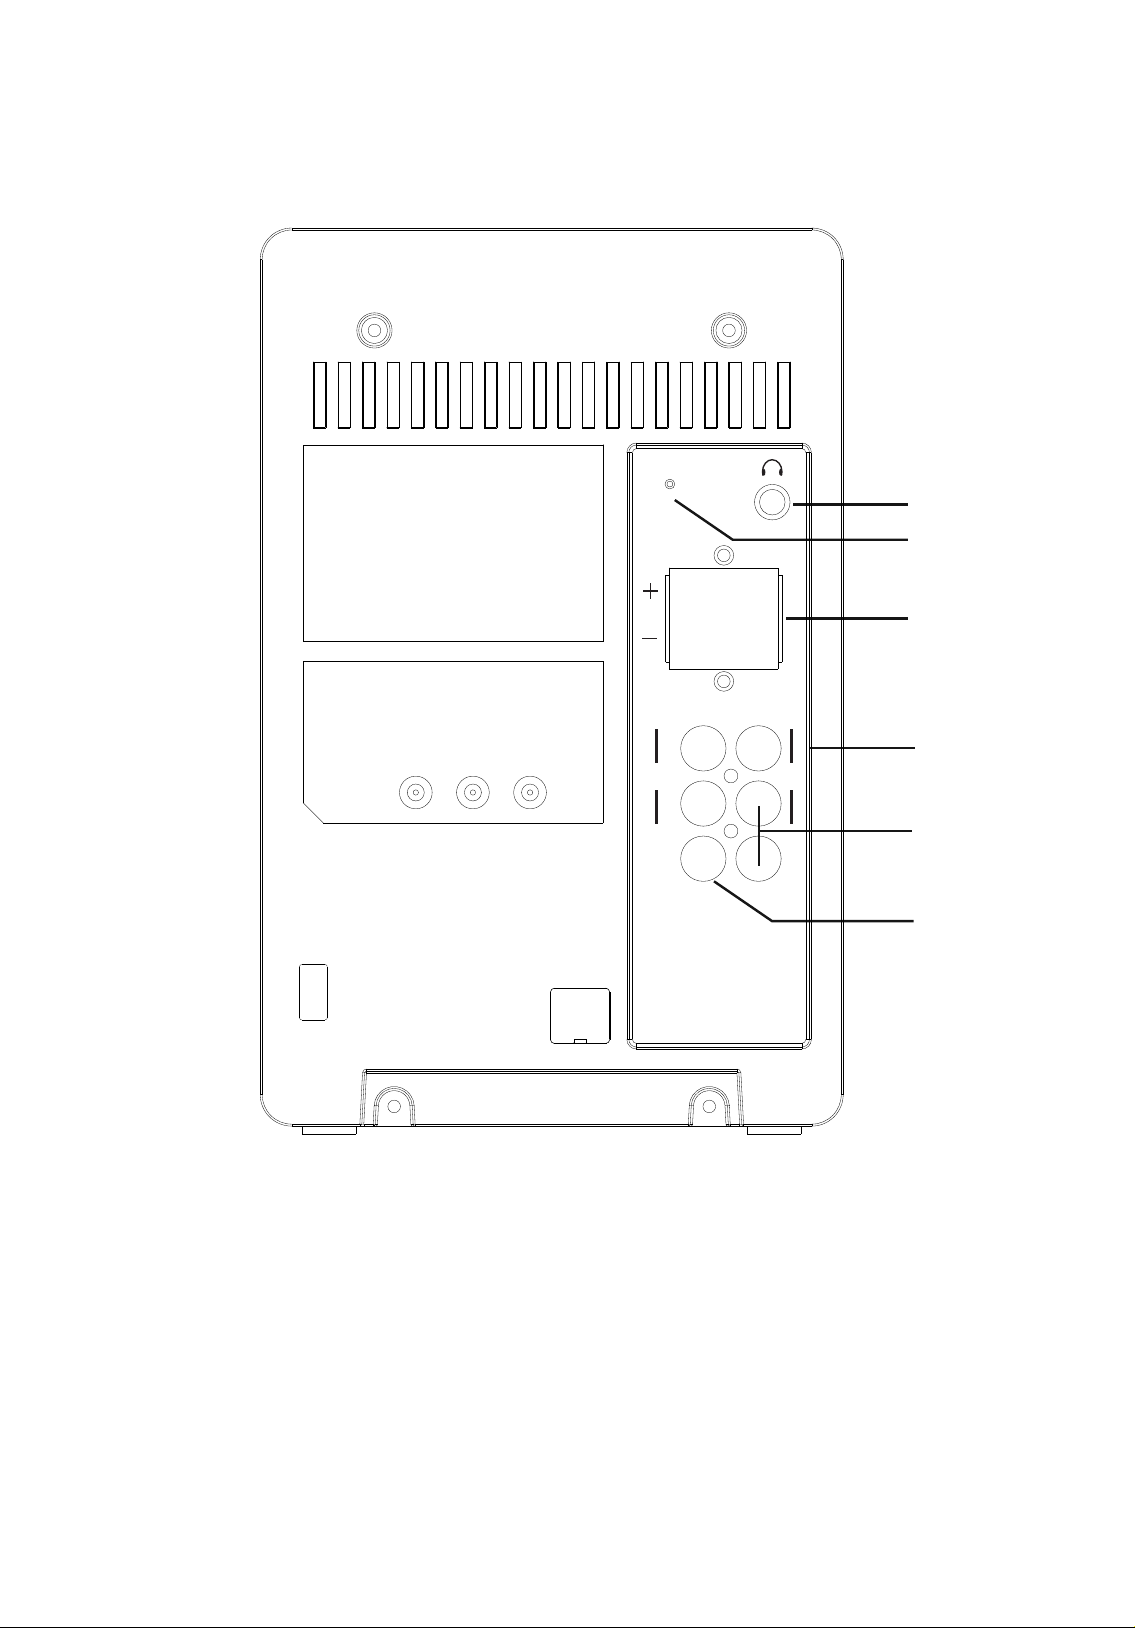
FRONT PANEL
5
1. STANDBY
2. REMOTE CONTROL SANSOR
3. DISPLAY WINDOW
4. PLAY/PAUSE / SCAN
5. PREV/CH-
6. REV/TUN-
7. VOLUME
11
10
9
12
13
14
1
3
5
7
8
2
4
6
MICRO SYSTEM
VOLUME
MODE
8. AUX IN
9. MODE
10. EQ
11. STOP
12. NEXT/CH+
13. FWD/TUN+
14. USB
1. AVX IN
2. FM ANT
3. R/L
4
1
3
2
5
6
REAR PANEL
6
FM ANT
LR
LY
R
Cr/Pr Video
Cb/Pb
4. Cr/Pr Cb/Pb Y
5. R/L
6. Video

L Speaker
R Speaker
CONNECTIONS
Connecting to a TV Set
7
FM ANT
LR
LY
R
Cr/Pr Video
Cb/Pb

SYSTEM SETUP FOR DVD MODE
Setup:
1. Turn on the TV and shi to “VIDEO INPUT” .
2. Turn on other units such as an audio or VCR if they are connected.
Turning the Unit On:
1.
if it has already been inserted in the player.
2.
3.
beginning of playback.
4. The DVD player will select the state of play according to the disc format.
DISC FORMAT STATE OFPLAY
CD/ MP3 First track.
VCD/SVCD with PBC
on the panel oron the remote control to play
back from the beginning.
VCD/SVCD without PBC m the beginning.
Please note: PBC is the a n for PLAYBACK CONTROL. If a disc has PBC, it means that
Playing a Disc:
Turning the Unit Off:
turned off. Remove the plugfrom the outleton the wall if the player willnotbeused fora
Play/Pause PLAY/PAUSE PLAY/PAUSE
Next track or chapter NEXT NEXT
Previous track or chapter PREV PREV
Stop STOP STOP
8
ACTION BUTTON ON PANEL KEY ON REMOTE CONTROL
Insert a disc onto the disc tray and close the cover, the screen will display what type of
disc is being played.
Raise the OPEN/CLOSE buon to open the disc tray to insert or replace a disc

REMOTE FUNCTIONS
NO. OPERATION DISC INSTRUCTION
1STOP
RESUME
ALL
FORMATS
Please note: The player will go into SCREEN SAVE MODE if
return to NORMAL mode.
display the starter logo. With certain disc types, such as DVD,
the player can resume playback from the point where it was
where playback was stopped or from the beginning of the disc.
2FAST
FORWARD DVD
SVCD
VCD
speed changes. Press PLAY to resume normal playback.
3REWIND
DVD
SVCD
VCD changes. Press PLAY to resume normal playback.
35
4SLOW
DVD
SVCD
VCD 6 7
all.
5 REPEAT DVD please see below:
- Press REPEAT once to repeat the contents of the chapter.
6 A-B REPEAT ALL
follow the steps below:
Press the key again to set Point B as the end point. The
part between A and B will be played repeatedly.
7ZOOM of the picture by x2, x3 or x4. Use the "UP", "DOWN, "LEFT"
x1/2, x1/3 or x1/4.
8 RETURN DVD
DVD
Press this key to return to the main menu.
9PBC(Playback
Control)
SVCD
select a track butonlyfrom the menu. If PBC is OFF,
the user can select the track directly.
10 TITLE DVD Press this key to play the selected menu.
9
DVD
SVCD
VCD
Table des matières
Autres manuels Aim Système stéréo


