ACU-RITE MILLPWR G2 Manuel technique
December 4, 2017
MILLPWRG2 2 & 3 Axis
Release of Version R6SP2
For Use with Consoles (ID#1113777-NN) ONLY
These release notes include enhancements/changes for both R6SP1 and R6SP2.
Please read below for the list of enhancements.
NOTE: HEIDENHAIN Corporation recommends making a backup image of the control with the
USB Recovery Drive before updating the control software. Please refer to the manual included
with the USB drive for the backup procedure. Reference compatibility chart below.
Prior to updating to R6SP2 you must have R6 loaded, if you have a previous version of
software, confirm that R5 SP1 is installed and that you have resized the hard drive
partitions. Due to the enhanced features since release 5, repartitioning the console's
hard drive is required. USB Recovery Drive ID# 680480-04 includes an option for
resizing the control’s hard drive partitions. This can only be performed on consoles
ID#1113777-NN that are running software release 4 service pack 4 (R4 SP4) or R5.
Please insure the console is updated to one of these releases prior to restructuring the
drive and installing release 6 (R6).
R5 cannot be installed unless you have R4SP4 installed first. If you have previous
version of software such as R1, R2, or R3 SPx (release 1, release 2, or release 3 with
any service pack) download and install R4 SP4 then proceed to update to R5.
Recovery Drive Kit ID# 1127022-01 can be purchased from your local ACU-RITE
distributor.
If a special PLC for AMI functions was created for your MILLPWR system. The PLC for R6 may
need to be modified in the same manner. Any OEM/User customizations to the PLC will need to
be reintegrated into the new PLC project.
All users can verify your software version from the DRO screen by pressing SETUP. If one of
your soft keys is labeled More Commands, you have release 1 (R1) software. If one of your soft
keys is labeled Install Setup, press this key. Enter the password 8891 and press Enter. The
installed software version will be displayed at the bottom left of your screen.
If any issues are encountered, please contact your service representative for assistance.
You can download the software release update free of charge from our web site at www.acu-
rite.com. If you wish to purchase the software and operation manual from ACU-RITE, contact
your authorized dealer to place an order.
Installing the software onto your MILLPWRG2 system:
Use a blank USB memory stick (1 GB or larger) to update the software. Do not use any memory
stick with a smaller storage capacity. The software installation files are required for updating the
software. When a USB memory device in placed in a USB port prior to boot up with the update
files setup.zip, and setup.ini located within a folder named “install”, at boot up your G2 control
will detect the upgrade software files and proceed to install.
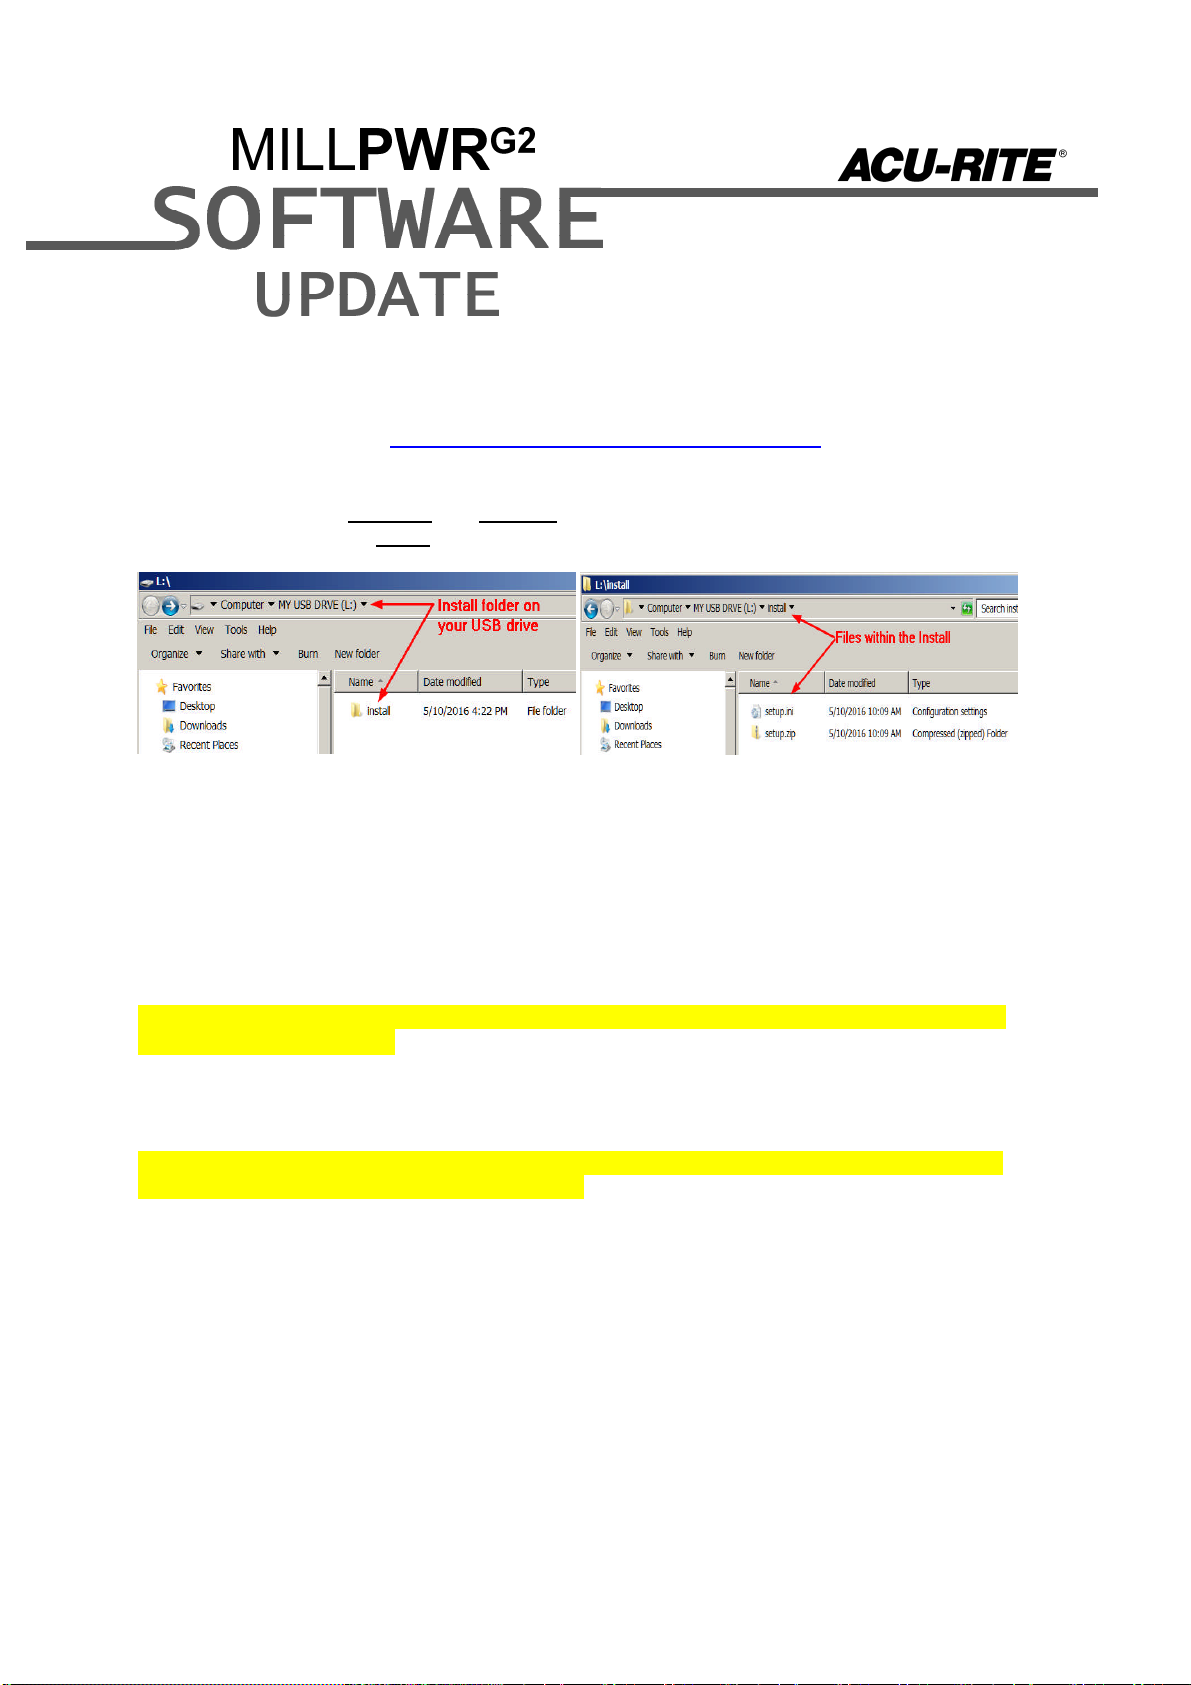
Procedure for downloading the update files and placing them on a USB drive.
Download the update from http://www.acu-rite.com/software-updates.html found under the
Controls Tab.
Unzip the downloaded archive insuring the target is the root level of your USB drive.
Insure the files setup.zip and setup.ini are transferred to a folder at the root level of your
USB drive named install, //MY USB DRIVE/install/
Procedure for updating the software
Shut down the control software using the normal method of pressing the Shutdown soft
key and then confirming the shutdown by pressing Yes.
Wait for the screen message which indicates that it is safe to switch off power, or restart.
Insert the USB memory device containing the folder named “install” on the USB memory
device.
Press ENTER to restart the system.
The software update will now be done automatically, taking approximately 10 - 20
minutes.
! A confirmation box will appear. If necessary, use the LEFT or RIGHT ARROW keys to select
Yes and then press ENTER.
When the update is complete, it will prompt you to remove the USB drive and restart. At this
time, remove the USB drive and press ENTER to restart. If the USB memory stick used for
installation is not removed, then the prompt to install the software will continue to appear on
subsequent power cycles.
! After installation and upon restart, you may receive a message prompt to confirm a firmware
update, accept the changes and RUN UPDATE.
-(Note: This particular NC startup screen can take several minutes to display. Please be
patient. Do not shutdown control and reboot.)
After the system has restarted, it will start up normally to the control software.
-Confirm that your count directions are correct. (These values should not change when
upgrading software.)
- If special machine functions were active, Press the SETUP hard key, then the “Install
Setup” soft key, enter passcode 8891, press ENTER
- In the “Installation” dialogue, arrow down to the last option “Machine Functions” and
press ENTER
- Configure the dialog to match your machine Note:(only required if special machine
function options are installed like demo, AMI, guards, etc.)
- Press the USE hard key, then press the “Save Changes” soft key
- After a moment, you will get a reboot prompt
- Acknowledge the reboot and you are all done at the next startup.
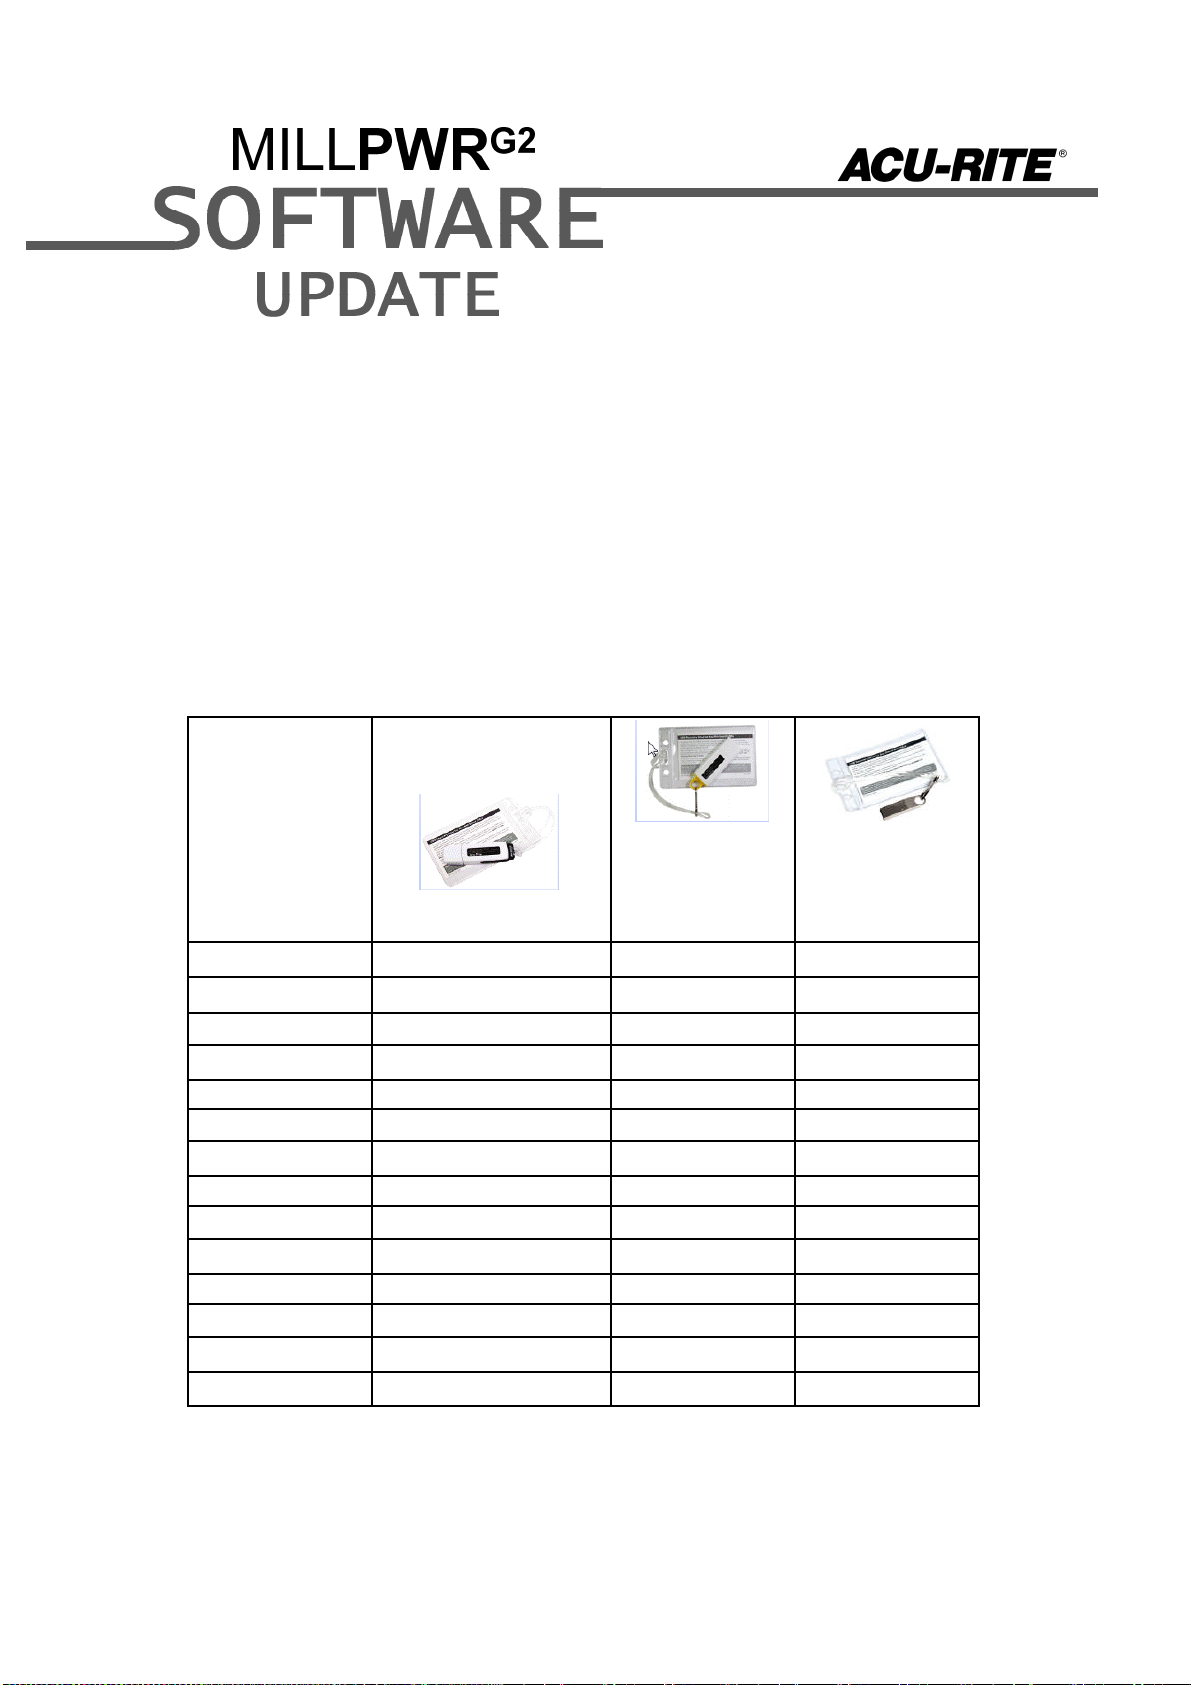
MILLPWRG2 Recovery Drive Compatibility
Due to hardware differences the original MILLPWRG2 console and the current console
require different software upgrade paths.
Consoles can easily be identified by the color of the front bezel. The current design has
a darker grey color than the original design.
The current G2 console will proceed to release 6 (R6) and all its service packs.
The original G2 console will remain with release 4 (R4) and all of its service
packs.
Console ID#
and Software
Revision Recovery Drive
ID# 1114023-01
Recovery Drive
Kit ID# 1201909-
01
USB ID#
680480-03
Recovery Drive
Kit ID# 1127022-
01
USB ID#
680480-04
745604-NN Yes Yes No
R1 Yes Yes No
R2 Yes Yes No
R3 Yes Yes No
R4 Yes Yes No
R4 SP6 Yes Yes No
1113777-NN No Yes Yes
R1 No Yes Yes
R2 No Yes Yes
R3 No Yes Yes
R4 No Yes Yes
R4 SP4 No Yes Yes
R5 No No Yes
Post R5 No No Yes

Console ID # 745604-NN Console ID # 1113777-NN
G2 consoles (ID#745604-NN)
These consoles cannot be upgraded to R6 or service packs within R6. and
will continue to receive service packs under the R4 release. Please do not
attempt to install release 5 (R5) or R6 onto these consoles.
System drive restructuring on this original design consoles will cause the console
to become un-operational and require in house service to correct the issue. Do
not restructure the drive on these consoles.
Not all software enhancements will be included in future R4 releases. We
will continue to support console ID# 745604-NN with service packs through the
R4 released software that will mainly include minor enhancements or fixes.
USB Recovery Drive Kit 1201909-01 includes a compatible USB Recovery Drive
ID# 680480-03 for original G2 consoles (ID#745604-NN) and should be ordered
when replacing a recovery drive for these consoles. This drive does not include
the repartitioning option, so the unit cannot be repartitioning accidentally.
G2 consoles (ID#1113777-NN)
R6 and its associated service packs R6SPX cannot be installed unless you have
R5SP1 installed first. If you have previous version of software such as R1, R2, or R3
SPx (release 1, release 2, or release 3 with any service pack) download and install R4
SP4 prior to updating to R5.
Due to the enhanced features of release 5, it has become necessary to repartition the
console's hard drive. USB Recovery Drive ID# 680480-04 is now included in Recovery
Drive Kit ID# 1127022-01 which supports all G2 consoles and all software versions to
date or planned for the near future. This new recovery drive includes an option for
resizing the control’s hard drive partitions. This must only be performed on current
consoles (ID#1113777-NN) that are running software release 4 service pack 4 (R4 SP4).
Please insure the console is updated to this release prior to restructuring the drive and
installing release 5 (R5). Hard drive repartitioning is required on these consoles prior to
the upgrade to release 5 (R5).
These enhancements/changes were made:
The default timeout for the screensaver on new systems was extended from 10 minutes to 75
minutes. This can be manually adjusted by the user as desired. The system screensaver now
more intelligently prevents activation while axes are moving, and resets when STOP, GO, or
EMERGENCY STOP buttons are pressed (previously all other keys reset it but not these).
The base NcKernel platform was updated to Milestone 11 Service Pack 5.
The Helix step now defaults to CW to represent a more common right-handed thread.
The NC now monitors the axes servo states in the PLC, in an attempt to ensure commanded
states are actually achieved, and notifies the user if not.
The POSITION / DRILL Step has been improved for convenience. The DRILL step now defaults
the Z-Depth field to THRU, which can then be overridden with a value if an actual target depth is
known. The POSITION step now allows no Z-Axis data, supporting a simple X/Y-only position
move. The form now inherits (pre-fills) the X and Y position data from previous POSITION /
DRILL steps only (not for example, a MILL LINE step).
These corrections are solved:
Programs created and/or modified in R5 software versions, which contained certain pocket steps,
fail to load successfully in R6. The specific pockets were the SLOT POCKET, RADIAL SLOT
POCKET, and RING POCKET.
Fixed an issue where the file text preview was not updated when a modified program was saved.
Fixed an issue where the Helix function was available in the two axis mode.
When changing the Z-Axis encoder type in Installation Setup, the system would automatically
generate Service Files and go into an undesired state, requiring the user to manually restart the
control.
Fixed an issue in Program Functions where the file view location was not automatically switched
to the USB drive when inserted.
Corrected an issue in the OSCI application and Analog Wizard in which the scope plots displayed
“false noise” riding on top of the act and nom signals of axes while moving.
Corrected an issue in which attempting to run a program when severe errors were active would
result in an empty softkey menu and no way to get back to normal operation.
Fixed an issue where the program step popup was not automatically closing when switching from
PGM to DRO mode.
Fixed an issue where the blend fails to calculate in certain scenarios when a rotated, repeated or
mirrored geometry was exploded.
Fixed an issue where the graphics softkeys (2D/3D, Model, Toolpath) were not properly
checked/unchecked during a program run.
Corrected some cases where the graphics would highlight the incorrect lines when advancing the
cursor down the program list.
Fixed an issue where the blockform calculation is off when an offset is active.
Fixed a blockform issue where the values needed adjusting when there are Repeat, Rotate,
Mirror steps and the tool is in metric.
Z-retract error message is now updated to be at least 0.01” (or 0.2mm) higher than the
programmed values for consistency.
Corrected an issue in which the Shares dialog was non-functional when launched via the
Installation Setup area.
Fixed an issue where the Circle Center key was not appearing in Probe soft key set.
Improved the scenario in which a network share drive is lost when it is the current location in
Program Functions. The chances of the system becoming unresponsive for a few minutes have
been reduced.
The previously set tool parameters (dia, length, etc.) are restored on power-up. This corrects an
error in which the wrong tool parameters may be loaded after a power cycle.
Corrected an issue in the PLC in which the spindle could momentarily start after pressing the
STOP key after opening and then closing the guards.
If any issues are encountered, please contact your service representative for assistance or
contact technical support at millpwrservice@heidenhain.com if you have any questions.
Autres manuels pour MILLPWR G2
5
Ce manuel convient aux modèles suivants
2
Table des matières
Autres manuels ACU-RITE Mixeur musical

ACU-RITE
ACU-RITE MILLPWR G2 Manuel technique

ACU-RITE
ACU-RITE Mill PWR G2 Manuel technique

ACU-RITE
ACU-RITE MILL PWR G2 Manuel technique

ACU-RITE
ACU-RITE MILLPWR G2 Manuel technique

ACU-RITE
ACU-RITE MILL PWR G2 Manuel technique

ACU-RITE
ACU-RITE MILL PWR G2 Manuel technique

ACU-RITE
ACU-RITE MILL PWR G2 Manuel technique

ACU-RITE
ACU-RITE MILLPWR G2 Manuel technique

ACU-RITE
ACU-RITE MILL PWR G2 Manuel technique

ACU-RITE
ACU-RITE MILL PWR G2 Manuel technique


