AceProAV CE30 Manuel utilisateur

HDMI 2.0 4x4 Matrix
with
Amazon Echo Control Enabled
User Manual

2
Safety and Notice
The HDMI 2.0 4x4 Matrix has been tested for conformance to safety
regulations and requirements, and has been certified for international
use. However, like all electronic equipment, the HDMI 2.0 4x4 Matrix
should be used with care. Please read and follow the safety instructions
to protect yourself from possible injury and to minimize the risk of
damage to the unit.
• Follow all instructions and warnings marked on this unit.
• Do not attempt to service this unit yourself, except where
explained in this manual.
• Provide proper ventilation and air circulation and do not use near
water.
• Keep objects that might damage the device and assure that the
placement of this unit is on a stable surface.
• Use only the power adapter and power cords and connection
cables designed for this unit.
• Do not use liquid or aerosol cleaners to clean this unit.
• Always unplug the power to the device before cleaning.

3
Features
• HDMI2.0a compliant
• Supports 4K2K@60 4:4:4 8bits
• Supports HDR*, which is 4K2K@60 4:2:0 10bits
• HDCP1.4/HDCP 2.2 compliant
• Single-link 594MHz [18Gbps]
• Human body model — ±15kV [air-gap discharge] &
±8kV [contact discharge]
• Allows any source to be displayed on multiple displays
at the same time
• Allows any HDMI display to view any HDMI source at any time
• Supports 7.1 channel digital audio
• Supports default HDMI EDID and learns the EDID of
displays to matrix switcher
• The matrix switcher can switch every output channels
from any HDMI inputs by Push button, IR remote
control, RS-232, IP control and cloud control.
• Easy installation with rack-mounting
• Fast response time – 2~3 seconds for channel switch
Package contents
• HDMI 2.0 4x4 Matrix
• Power adapter DC 12V / 2A
• IR Receiver
• IR Remote control
• Rack-mounting ear set
• User Manual
Thank You
for your pruches!
4
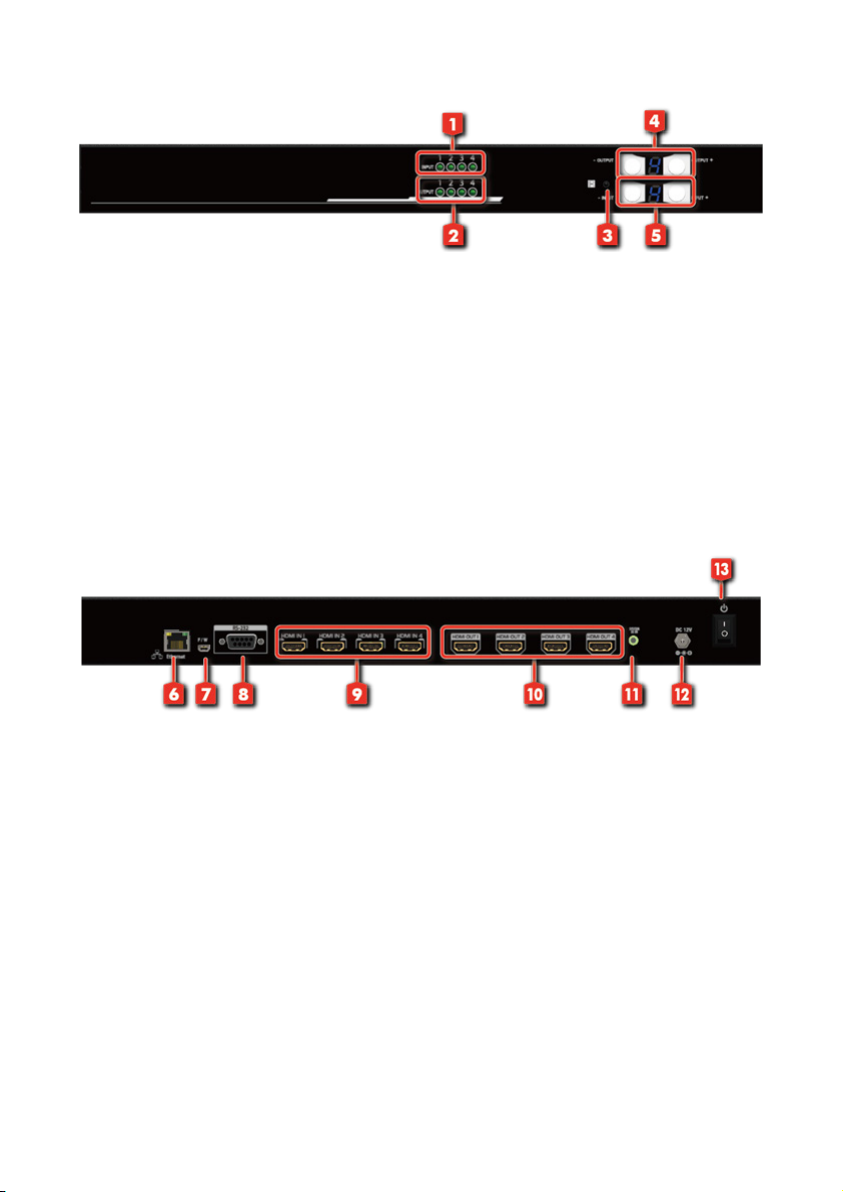
Layout
Front Panel
1. Source Status: Input source detection LED
2. Display Status: Output display detection LED
3. IR SENSOR: IR sensor for receiving the IR commands from IR remote
4. Output Push Button & 7-segment LED: Front panel push buttons
used to select the number of display channel &LED display for output ports
5. Input Push Button & 7-segment LED:
Front panel push buttons
used to select the number of input source & LED display for input channels
Rear Panel
6. Ethernet: Ethernet control port
7. USB:
8. RS-232:
9. INPUT 1-4: HDMI inputs
10. OUTPUT 1-4: HDMI outputs
11. System IR Receiver: Ext. IR receiver
12. +12V DC: 12V DC power jack
13. Power Switch
* USB and RS-232 port cannot be used at the same time.
Amazon Alexa Echo Control Enabled

5
Application
Operation Approach
Method A: Push-in Button
• Use the “+”or “-“ output push button to select the number of display
• Use the “+”or “-“ input push button to select the number of input source
• After you select the desired input/output port, the LED will blink
Amazon Alexa Echo Control Enabled

6
Method B: IR Remote Control
Button Function
OFF Standby mode
ON Power on the matrix switcher
MUTE Turn o output’s video and audio
STATUS Preset output status
SAVE Save current mapping mode
PRESET Preset mapping mode
DEFAULT EDID Begin default EDID selection
LEARN EDID Begin EDID learning from one output
CLEAR Clear the previous IR operation procedure
TAKE Trigger the previous setting
F1 F2 Reserved
• IN/OUT Switch
Operation Procedure 7-Segment LED
IN/OUT Switch Push the button on the checkerboard
to select input & output port
Ex: Input 2
To Output 3
Push the red circle button as right pic to
select input 2 to output 3
3
2

7
• Example of function key
Operation Procedure 7-Segment LED
Mute Output Mute + A~D(Output 1~4) + Take
Ex: Mute Output 3
1. Press “MUTE” button -
0
2. Press number key “C” to select Output 3 3
0
3.Press “TAKE” button 3
0
Output Status Status + A~D(Output 1~4) + Take
Ex: Output 4
(Input 2)
1.Press “STATUS” button -
-
2.Press number key “D” to select Output 4 4
3.Press “TAKE” button
-
4
2
Save Current Mapping
Save + A~H(1-8 storage site) + Take
Ex: Save current
mapping to 5
1.Press “SAVE” button d
-
2.Press number key “E” to select the storage site 5 d
5
3.Press “TAKE” button
Preset Mapping Preset + A~H(1-8 storage site) + Take
Ex: Preset saved mapping
from 5
1.Press “PRESET” button P
-
2.Press number key “E” to select the storage site 5 P
5
3.Press “TAKE” button
Learn default EDID
Default EDID + A~H(1-8 default EDID) + I~IV(input 1~4) + Take
Ex: Default EDID 2
Input 3
1.Press “DEFAULT EDID” button E
d
2.Press number key “B” to select default EDID 2 2
d
3.Press number key “III” to select Input 3 2
3
4.Press “TAKE” button 0 (success) F (fail)
Learn Output EDID Learn + A~B(Output 1~2) + I~IV(input 1~4) + Take
Ex: Learn Output 4
Input 3
1.Press “LEARN” button E
L
2.Press number key “D” to select Output 4 4
L
3. Press number key “III” to select Input 3 4
3
4.Press “TAKE” button 0 (success) F (fail)
Mute Output Mute + A~B(Output 1~2) + Take
Ex: Mute Output 3
1. Press “MUTE” button -
0
2. Press number key “C” to select Output 3 3
0
3.Press “TAKE” button 3
0

8
Method C: Software control through RS-232 port
1 2
64 5 7 8
3
1Power ON/ Standby mode
2Control SW via RS-232
3COM Port Selection
4I/O Routing Button
5EDID Button
6Rename I/O Button
7Network Setting & Default Reset Button
8Firmware Update Button
1. Mapping page
• I/O Mapping: Switch the input for each output
• Recall Mapping:
• Save Mapping:

9
2. EDID page
• Learn EDID from Default to Input
• Learn EDID from Display to Input
• Load EDID File to Input
• View EDID

10
3. Rename page
• Rename I/O:
• Rename Mapping:
Table des matières


