Acclaim Lighting Canvas Manuel utilisateur

www.acclaimlighting.com Canvas
User guide
canvas
by
Start
canvas
by
Start


1
www.acclaimlighting.com
CONTENTS
INTRODUCTION ......................................................2
Welcome 2
INSTALLATION.........................................................3
Connections 3
Control outputs 3
Contact inputs 3
Power 4
Mounting 4
Removing and replacing the Micro SD card 5
CONFIGURATION ....................................................6
The setup wizard 6
OPERATION .............................................................8
Presets 8
Creating new presets 9
Dimmers 11
Timers 12
Mobile device control 14
Settings 16
Passcode 17
Date and time 18
Bluetooth 19
Aria DMX wireless 19
Screen brightness 20
Preset fade 20
Idle Activity Dimmer/Timer 21
Contact triggers 22
Voltage out 23
Restart Canvas 24
Factory reset 24
FURTHER INFORMATION ......................................25
Optimizing signal strength via channel selection 25
Choosing the right location 26
Specifications 27
Dimensions 28
Limited product warranty 29

2www.acclaimlighting.com
INTRODUCTION
WELCOME
Welcome to the Canvas controller from Acclaim Lighting. This neat and compact wall panel
orchestrates your lighting fixtures using a combination of touch screen user selections,
automated timers, triggers from externals sensors and remote control from mobile devices.
The Canvas controller outputs two hardwired DMX universes with the option of also
sending the first universe via wireless link to one or more remote Acclaim Lighting Aria
receivers. Two analog 0-10V control lines are also made available for legacy fixtures and
these can be tied to any of the 1024 control channels.
The Canvas controller is designed to fit perfectly within a standard 3-gang North American
wallbox (2.75”depth minimum) and operates from any AC supply, ranging from 110-277VAC.
DMX 1
Contact
inputs
(x8) DMX 2
0-10V A
0-10V B
All Off All On
Preset 3 Preset 4
1/10
Preset 5Preset 6
Preset 7 Preset 8
PRESETS DIMMERS DEVICES
All Off All On
PRESETS DIMMERS TIMERSSETTINGS
Preset 3 Preset 4
Preset 5Preset 6
Create
Preset
Delete
Preset
Preset 7 Preset 8
DMX 1
iOS or Android
Canvas controller

3
www.acclaimlighting.com
INSTALLATION
CONNECTIONS
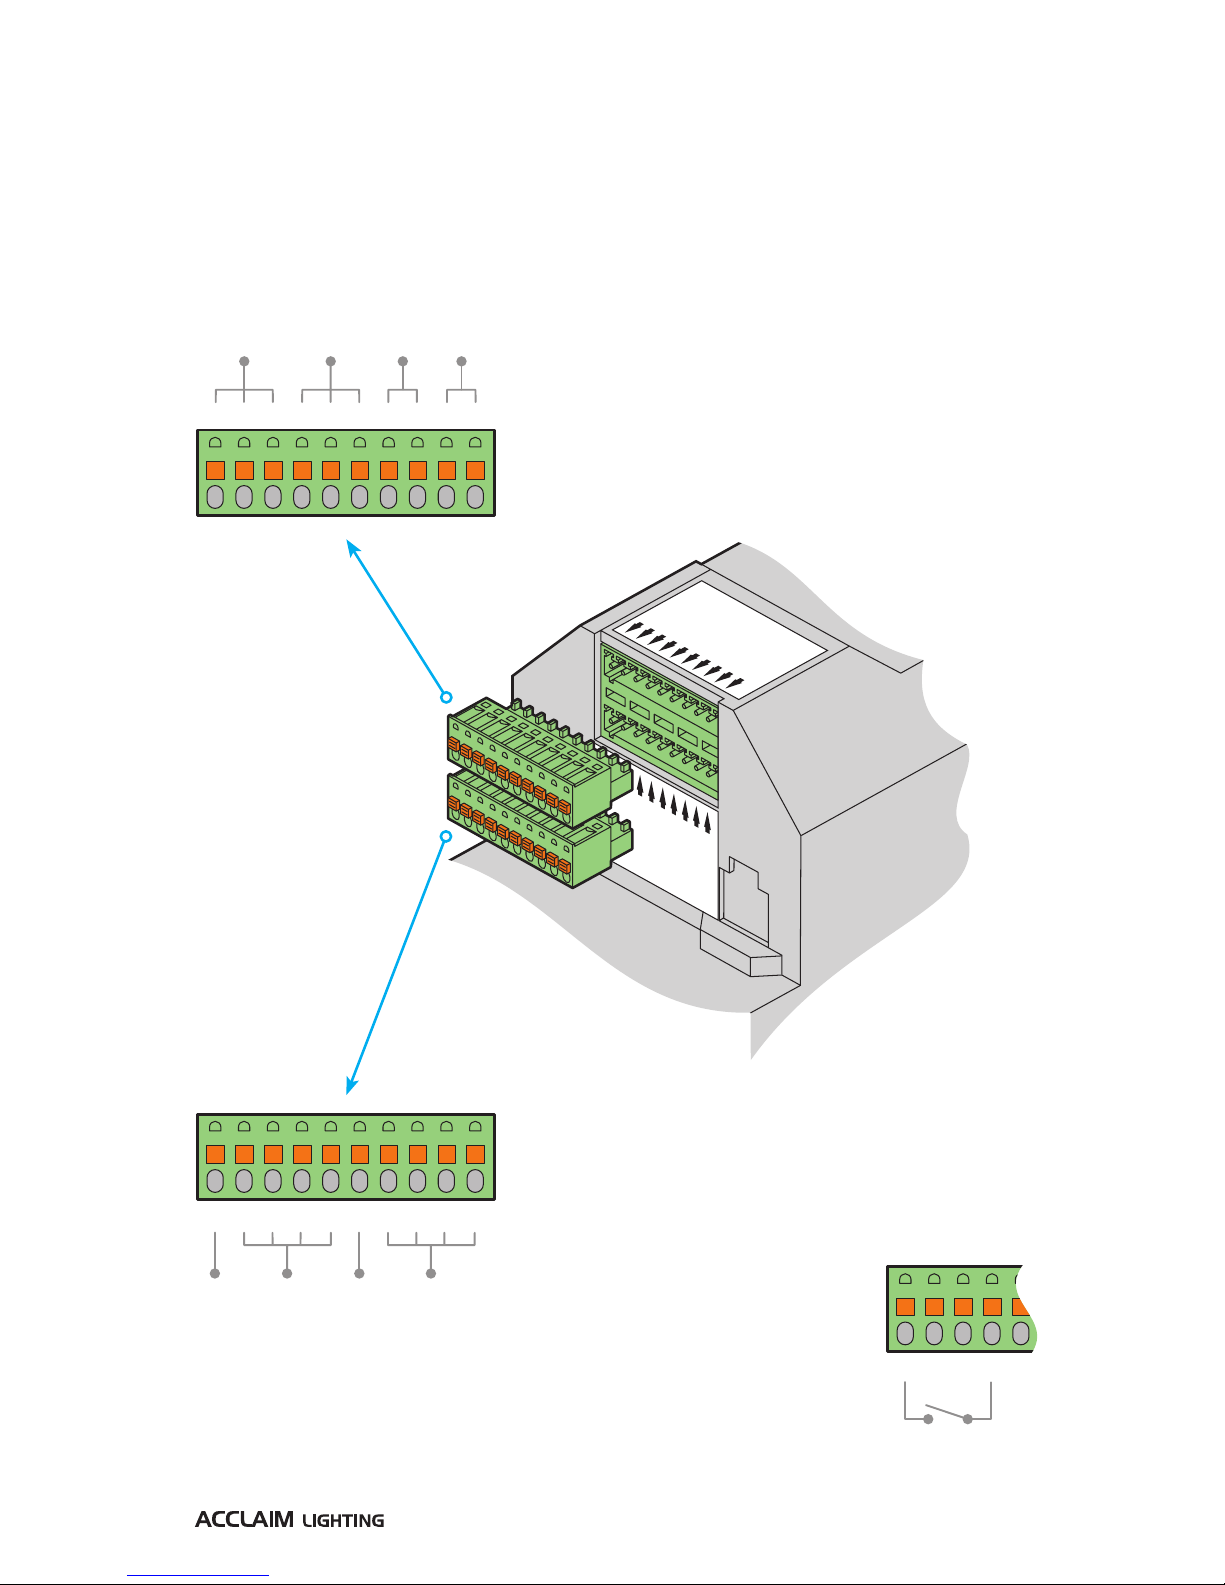
The Canvas controller uses two 10-way (Phoenix Contact® FK-MC) push-lock terminal blocks
to provide quick linking to the various input and output lines. Both terminal blocks can be
populated without the need to remove them from the controller, but detach easily when
necessary.
Ground
Contact 1
Contact 2
Contact 3
Contact 4
Ground
Contact 5
Contact 6
Contact 7
Contact 8
DMX -
DMX +
DMX G
DMX -
DMX +
DMX G
0-10V +
0-10V -
0-10V +
0-10V -
(2)
(2)
(2)
(1)
(1)
(1)
(2)
(2)
(1)
(1)
DMX
2
DMX
1
0-10V
2
0-10V
1
––
––
++
++
GG
G1234G5
678
Contacts ContactsGndGnd
G1234
CONTROL OUTPUTS
Both DMX universes and both 0-10V analog output
connections are made on a single 10-way terminal
block. The behavior of the 0-10V outputs can be
determined within the Settings section, see page 23.
The Aria wireless transmission of the first DMX
universe is determined within page 2 of the Settings
menu - see page 19.
CONTACT INPUTS
Eight dry-contact trigger inputs allow connection
to real-world sensors and can be configured to call
particular presets in response to both their closed
and re-opened states - see page 22.
Each input is maintained in a
normally open-contact state and
will register a closed-contact state
when linked to either of the two
ground terminals.
Note: No external voltages should
be introduced to the input lines.

4www.acclaimlighting.com
POWER
The Canvas controller operates
from any AC supply ranging from
110-277VAC, 50/60Hz. The line
and neutral connections are made
via push-lock terminals. An earth
connection should be made to
the metal wallbox (if used) but
otherwise there is no earthing
contact on the controller itself.
Tip: A useful wire strip gauge is
located next to the connector to
show the ideal length for each
exposed conductor.
MOUNTING
The Canvas controller is designed to fit into a standard 3-gang North American wallbox
(2.75” depth minimum). Various different colored front plates are provided and these snap
into place.
Wire strip guide
N
L
Standard 3-gang
North American
wallbox (2.75”
depth minimum)

5
www.acclaimlighting.com
REMOVING AND REPLACING THE MICRO SD CARD
The Canvas controller uses a standard Micro SD memory card (4GB minimum) to store its
configuration data. On occasions it may be advantageous to remove the card so that it may
be copied as a backup or moved to another installation.
TO REMOVE THE MICRO SD MEMORY CARD
1 Ensure that power is removed
from the Canvas controller.
2 Gain access to the left hand
end of the controller back box.
3 Use a small flat bladed
screwdriver to engage with the
raised lip on the underside of
the Micro SD card and carefully
lever the card outwards from
the controller.
TO REPLACE THE SD MICRO MEMORY CARD
1 Ensure that power is removed
from the Canvas controller.
2 Orientate the Micro SD card
so that its contacts are facing
upwards and in towards the
slot.
3 Take great care to align the
card correctly with the narrow
holder that lies within the
outer casing.
Note: It is very easy to miss the
slot, with the result that the card
will fall into the casing. If this
should happen, you will need to
open the casing to retrieve it.
4 Gently push the Micro SD
card into the slot until it fully
engages.

6www.acclaimlighting.com
CONFIGURATION
The Canvas controller is fully configurable to suit your installation; it includes a setup wizard
to help guide you through the initial configuration.
THE SETUP WIZARD
The primary functions of the setup wizard are to help you set the date, time and determine
the type of lighting fixtures to be controlled. Please follow the prompts given on each page
and tap the controls shown on the touch screen.
TO USE THE SETUP WIZARD
1 Display the Canvas START
page. This will be shown:
•When power is first
applied and the controller
has not previously been
configured,
or
•After you choose the
Factory Reset option from
the Settings menu - see
page 24.
2 Tap the START button.
canvas
by
Start
3 Set the current date and time.
For each of the six entries,
tap the respective left and/or
right arrows until the correct
settings are shown.
4 Tap Next to continue.
Back Next
Please set the date and time
Hour Minute
April
10
5
10
2018
PM
Back Finish
Please select the number
of channels your fixture has
Varying
5 Choose the number of
control channels required:
•If your fixtures will all
use the same number of
channels, tap the right
arrow to set the option
between 1and 7 Channels,
as appropriate.
•If your various fixtures
require differing numbers
of channels, leave the
option as Varying.
6 Tap Next/Finish to continue.

7
www.acclaimlighting.com
Back Next
Please select the colors
to represent each channel
Red
Blue
None
Green
White
1:
3:
5:
2:
4:
Other5:
Back Next
Please explain what each channel is used for
Light
Light
Light
Light
1:
3:
2:
4:
8 Confirm the colors which
will be controlled by each
channel on your fixtures.
If your fixtures have are any
non-color attributes, such
as master intensity or zoom,
choose the None option
against those channels.
9 Tap Next to continue.
7 What happens next will be determined by the choice you made in the last step:
•If you chose the Varying option, the wizard will terminate at this point as it has received
all the information it needs. You can now jump to using presets, see page 8.
•If you chose any option between 1 Channel and 7 Channels, the next two screens will
allow you to optionally define what each channel does. If you take a moment to define
these, it will help when you are programming fixtures and will also ensure that the color
representations shown for the stored presets are more accurately portrayed.
Back Finish
Please select how you
would like to use your fixtures
Fixtures Individually Controlled
10 Confirm which channels will
be directly controlling color
(Light) output and which will
be performing Other duties,
such as master intensity or
zoom. Generally, if you chose
None against any channels
in the previous step, you
should choose Other against
those same channels in this
step.
11 Tap Next to continue.
12 Choose how you wish
to program your fixtures;
individually or grouped:
•Choose Fixtures
Individually Controlled to
program them separately.
•Choose Fixtures Group
Controlled to program
them collectively using
one set of controls (your
fixtures will all show the
same output).
13 Tap Finish to complete the
configuration and exit the
wizard.

8www.acclaimlighting.com
OPERATION
Everyday operation of the Canvas controller can be influenced by numerous sources:
•Local (creation and) selection of presets see below
•Automated timers see page 12
•Contact triggers from external sensors see page 22
•Remote control by mobile device see page 14
PRESETS
This section provides access to a maximum of 80 presets, arranged over ten pages:
For details about how to create new presets, see page 9.
EXTRA CONTROLS
•Screen brightness - You can determine the overall brightness of the Canvas screen. This is set
within page 3 of the Settings menu - see page 20.
•Preset fade times - You can determine the speed at which one preset fades into the next. This is
set within page 3 of the Settings menu - see page 20.
•Dimming values or percentages - You can choose whether the individual dimming levels are
shown as DMX values (0 to 255) or percentages, or both - see page 11.
All Off All On
PRESETS DIMMERS TIMERS SETTINGS
Preset
3P
reset 4
Preset 5 (Show) Preset 6 (Show)
Preset 7 Preset 8
Create
Preset
Delete
Preset
1/10
Tap a preset entry to output
its color mix(es) to the xtures
being controlled
Tap the and buttons
to change between ten
preset pages
Tap the Create Preset button
to create a new color mix
Tap the headings to change
to other sections
The thicker outline
denotes the currently
selected preset
Table des matières
Autres manuels Acclaim Lighting Contrôleurs