AccessECU WRX 2002 Manuel utilisateur

AccessPORT
User’s Guide
2002-2005 Subaru WRX
Accessecu


Contents
PP
PP
Package Includesackage Includes
ackage Includesackage Includes
ackage Includes
Quick StartQuick Start
Quick StartQuick Start
Quick Start
Overview
Features
Maps - Base vs Realtime
Setup – Initializing your AccessPORT
Using AccessPORTUsing AccessPORT
Using AccessPORTUsing AccessPORT
Using AccessPORT
Using the Controls
Connecting to your car
Navigating the Menus
Using the Map Management SoftwareUsing the Map Management Software
Using the Map Management SoftwareUsing the Map Management Software
Using the Map Management Software
Installation
Getting Started
Software Features
Tips and TTips and T
Tips and TTips and T
Tips and Troubleshootingroubleshooting
roubleshootingroubleshooting
roubleshooting
Service and SupportService and Support
Service and SupportService and Support
Service and Support
Safety and CleaningSafety and Cleaning
Safety and CleaningSafety and Cleaning
Safety and Cleaning
WRX Diagnostic TWRX Diagnostic T
WRX Diagnostic TWRX Diagnostic T
WRX Diagnostic Trouble Codesrouble Codes
rouble Codesrouble Codes
rouble Codes
5
6
7
8
14
15
16
28
31
38
46
56
60
64

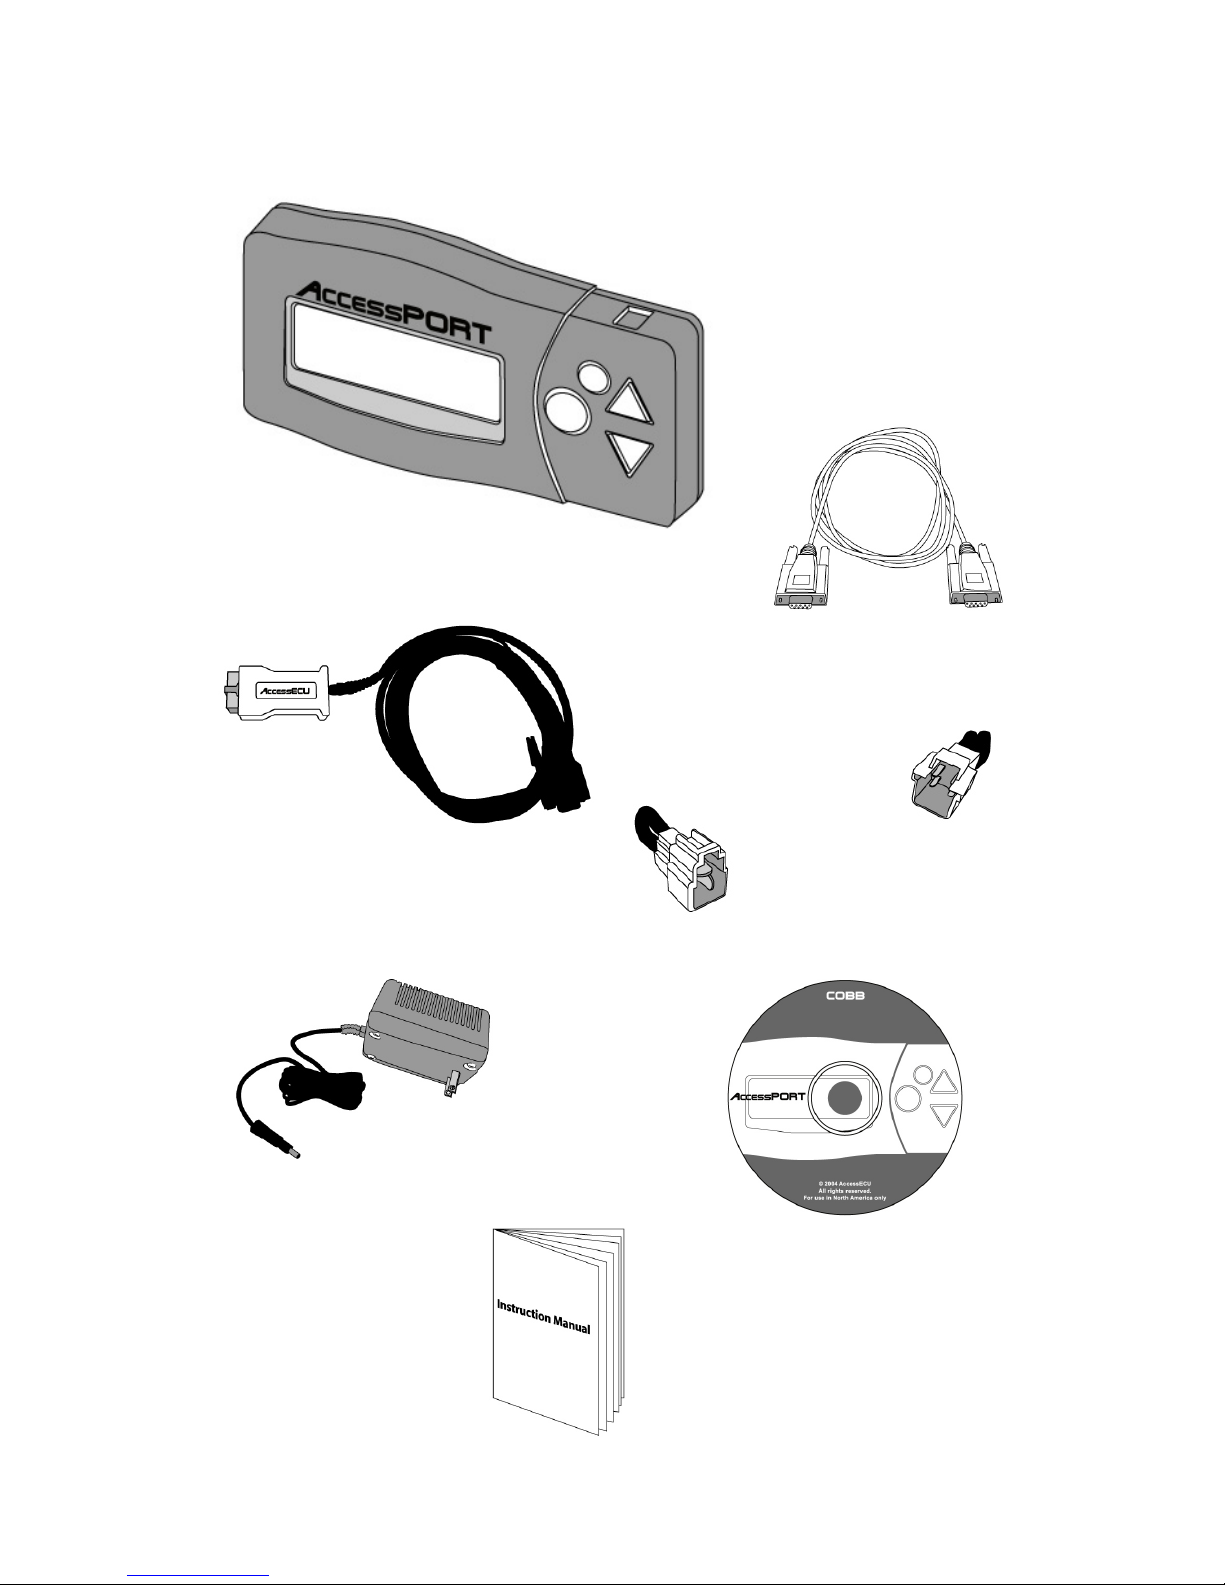
Package Includes:
AccessPORTAccessPORT
AccessPORTAccessPORT
AccessPORT
DiagPORT CableDiagPORT Cable
DiagPORT CableDiagPORT Cable
DiagPORT Cable
PC Interface CablePC Interface Cable
PC Interface CablePC Interface Cable
PC Interface Cable
PP
PP
Power Adapterower Adapter
ower Adapterower Adapter
ower Adapter
Map Manager SoftwareMap Manager Software
Map Manager SoftwareMap Manager Software
Map Manager Software
CDCD
CDCD
CD-ROM-ROM
-ROM-ROM
-ROM
2002 Init.2002 Init.
2002 Init.2002 Init.
2002 Init.
ConnectorConnector
ConnectorConnector
Connector
2003-20052003-2005
2003-20052003-2005
2003-2005
Init. ConnectorInit. Connector
Init. ConnectorInit. Connector
Init. Connector
5
User’s GuideUser’s Guide
User’s GuideUser’s Guide
User’s Guide

Quick Start
Congratulations on your purchase of the AccessPORT. Please read this section to
get started using your AccessPORT quickly.
The AccessPORT is a handheld device used to reprogram your vehicle’s Engine
computer (ECU) through the diagnostic (OBD-II) port. The AccessPORT handheld
programmer comes pre-loaded with performance and convenience mapping.
In addition, the included Map Manager software for your PC allows you to
organize and transfer maps to the AccessPORT.
AccessPORT Features
With the AccessPORT handheld programmer, you can:
•Program (Flash) your ECU with improved Maps
•Instantly switch between up to 10 different Realtime Maps for
different modes of operation.
•Store up to 6 Base Maps
•Check to see which Base Map is currently in use
•Display Trouble Codes (CELs)
•Clear Trouble Codes (CELs)
•Reset ECU’s learned memory
•Return the vehicle to 100% stock programming
•Display Turbo boost values (in psi)
What is a Map?
A map is a special program designed specifically for your factory Engine
computer (ECU). By transferring different maps to your ECU, you can take
advantage of particular modifications or even enhance the performance of a
stock vehicle. Additional maps can also be used to allow the engine to operate
in Valet mode, Anti-Theft Mode, and modes for specific fuel quality, etc.
Your AccessPORT is capable of storing up to ten (10) Realtime Maps and up to
six (6) Base Maps. With the Map Management software, you can store and
organize the maps on your home PC and load them on your AccessPORT for use
on your vehicle.
6

Maps – Base vs. RealtimeMaps – Base vs. Realtime
Maps – Base vs. RealtimeMaps – Base vs. Realtime
Maps – Base vs. Realtime
Your AccessPORT utilizes proprietary technology to provide the ability of instantly
switching between ECU maps. This map switching can be performed without
actually writing new information into the ECU’s embedded flash memory. The
advantage of this technology is the convenience of switching ECU programming
quickly and easily, without reducing the finite life-span of the ECU’s flash memory.
There are two map types that are utilized by the AccessPORT, Base and Realtime.
Realtime MapsRealtime Maps
Realtime MapsRealtime Maps
Realtime Maps
Realtime maps are loaded instantly and are used by your ECU without being
programmed into your ECU’s flash memory. This enables the AccessPORT user
the ability to alter the way in which the ECU functions without diminishing the
ECU’s Flash Memory life-span.
Realtime maps have the ability to instantly change fuel curves, ignition timing,
boost mapping, rev limits, etc. This means you can easily and quickly switch
between various performance and convenience maps as your needs change.
Realtime maps are selected through the [SWITCH MAP] selection on your
AccessPORT’s Main Menu.
In the event that your ECU is reset by disconnecting the battery or performing
what is known as a “hard reset”, the Realtime map loaded will no longer be in
use. The ECU will revert back to the Base Map.
Base MapsBase Maps
Base MapsBase Maps
Base Maps
Base maps store the core features that will remain constant regardless of what
different modes of operations you select. These maps have the ability to change
ALL the data in the ECU.
Base maps are selected through the [CHANGE BASE MAP] selection on your
AccessPORT’s Main Menu.
Base maps are programmed into the ECU’s Flash Memory and will constitute the
use of a flash when selecting. When your ECU is reset by disconnecting the
battery, it will automatically revert back to the last base map used.
You should only need to change your base map when you need to alter a core
feature within your ECU or Check Engine Light activity.
Base Maps contain both Real Time and Base Map information.
7

SETUP
Initializing your AccessPORTInitializing your AccessPORT
Initializing your AccessPORTInitializing your AccessPORT
Initializing your AccessPORT
To begin using your AccessPORT, you must first perform the following steps that
will enable your factory ECU with the proprietary AccessECU technology. You
cannot access the Main Menu or other features of the AccessPORT until it has
been installed on your ECU using the following steps.
The AccessPORT comes pre-loaded with Maps. In the event you wish to change
the Maps prior to installing your AccessPORT, please refer to page 47 before
performing these steps.
Step 1:Step 1:
Step 1:Step 1:
Step 1:
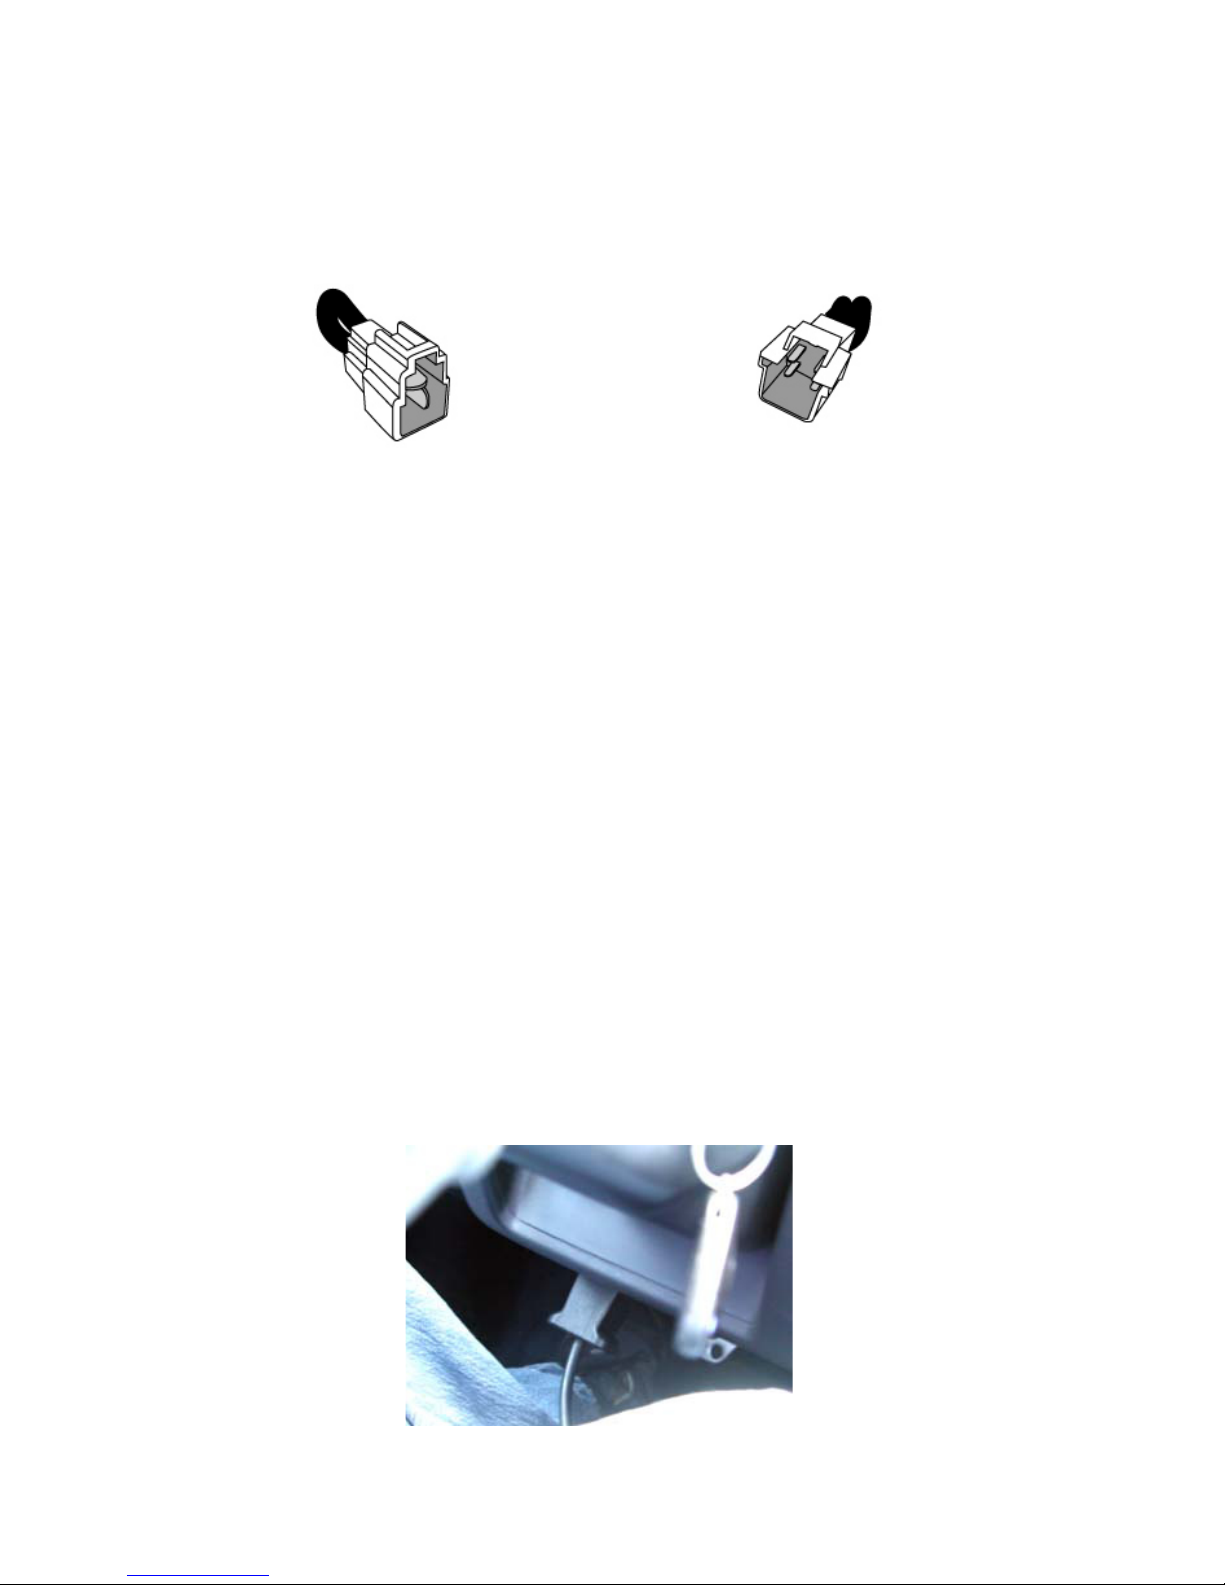
Put your key in the ignition and leave it in the ‘OFF’ position. Connect the two
green Test Mode connectors located under the driver’s side dash, left of the Steering
Column. To connect the Test Mode connectors, you simply need to plug them
into each other. Please refer to the diagram below:
WW
WW
WARNINGARNING
ARNINGARNING
ARNING:
Before beginning, please verify your vehicle is in proper working order
and is properly maintained. It is also imperative that the battery be
fully charged and in good condition. If the battery voltage drops
below an acceptable amount during the reprogramming process,
the ECU will be damaged and cannot be recovered. Your vehicle will
not run if this occurs. Avoid all electrical noise that may interfere
with the sensitive communication between the AccessPORT and the
ECU. Any interference may result in a programming failure and
damage to your ECU.
Steering
Column
Driver’s Side
Door
TT
TT
Test Mode Connectors (A)est Mode Connectors (A)
est Mode Connectors (A)est Mode Connectors (A)
est Mode Connectors (A)
8
(NOTENOTE
NOTENOTE
NOTE: In the event your Test Mode connectors are already connected, refer to
page 47 for additional steps before continuing)
Step 2:Step 2:
Step 2:Step 2:
Step 2:
Use the supplied Initialization Connector (BLUE for 2002 vehicles, WHITE for 2003-
2005 vehicles). Attach the Initialization Connector to the complementary whitish
(semi-clear) factory connector located in close proximity to the green Test Mode
connectors. It may be difficult to find but this connection is required, please use
patience.
Step 3:Step 3:
Step 3:Step 3:
Step 3:
Turn the ignition key to the ‘ON’ position but DO NOT start the engine. Verify the
Check Engine light on your dash is blinking. You may also hear the radiator fans
cycling on/off as well as the fuel pump cycling, etc. THIS IS A NORMAL FUNCTION
OF TEST MODE. If your vehicle is not displaying a flashing Check Engine Light,
please refer to page 47 for additional steps before continuing.
Step 4:Step 4:
Step 4:Step 4:
Step 4:
Connect the DiagPORT cable (D-sub 9-pin) to the complementary connector on
the AccessPORT.
Step 5:Step 5:
Step 5:Step 5:
Step 5:
Connect the red end of the supplied DiagPORT cable to the diagnosis port con-
nector located in the lower portion of the dash (below the steering wheel). The
AccessECU logo will be facing you (up). Make sure connection is firm and secure.
2002 Initialization2002 Initialization
2002 Initialization2002 Initialization
2002 Initialization
Connector (BLConnector (BL
Connector (BLConnector (BL
Connector (BLUE)UE)
UE)UE)
UE)
2003-2005 Initialization2003-2005 Initialization
2003-2005 Initialization2003-2005 Initialization
2003-2005 Initialization
Connector (WHITE)Connector (WHITE)
Connector (WHITE)Connector (WHITE)
Connector (WHITE)
9
10
At this point, your AccessPORT should turn on and present you with the
initialization screen. (If your AccessPORT does not turn on, please verify all your
connections and refer to “Tips and Troubleshooting” on page 46.
Step 6:Step 6:
Step 6:Step 6:
Step 6:
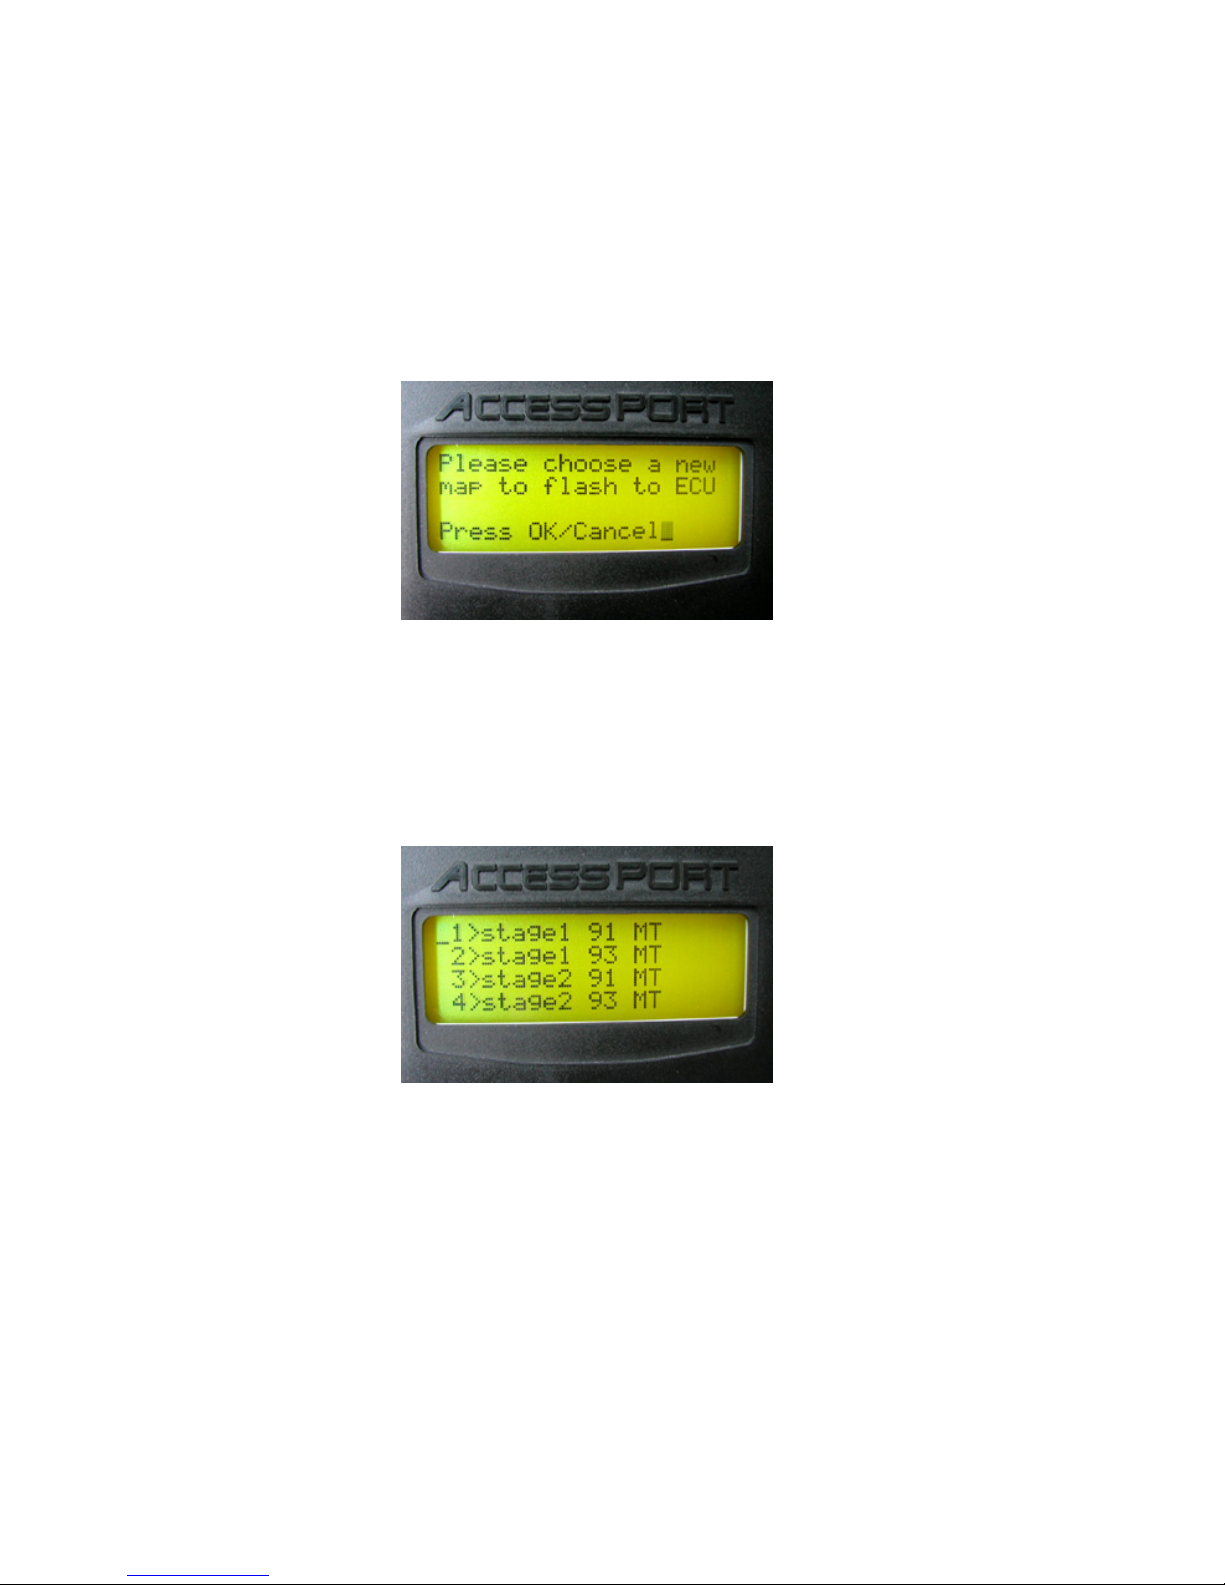
The AccessPORT will automatically prompt you to select a Map that will be
programmed (flashed) to your ECU. Pressing the large round button (OK) will
display a list of available maps pre-loaded on your AccessPORT.
Using the AccessPORT arrow keys, select the map that you wish to program
into your ECU. This map will be your “base” map that replaces the original
factory map on the ECU and will not be erased when the battery is
disconnected or ECU reset. Once you have chosen your map, press the large
round OK button.
Step 7:Step 7:
Step 7:Step 7:
Step 7:
The AccessPORT will then prompt you to ‘Turn the car fully off and back on’. THISTHIS
THISTHIS
THIS
STEP CAN BE IGNORED BSTEP CAN BE IGNORED B
STEP CAN BE IGNORED BSTEP CAN BE IGNORED B
STEP CAN BE IGNORED BY 2004-2005 WRX OWNERS.Y 2004-2005 WRX OWNERS.
Y 2004-2005 WRX OWNERS.Y 2004-2005 WRX OWNERS.
Y 2004-2005 WRX OWNERS.
2004-2005 WRX Owners2004-2005 WRX Owners
2004-2005 WRX Owners2004-2005 WRX Owners
2004-2005 WRX Owners
Leave the ignition key in the ON position and press OK. Proceed to Step 8.
Map list on your AccessPORT may differMap list on your AccessPORT may differ
Map list on your AccessPORT may differMap list on your AccessPORT may differ
Map list on your AccessPORT may differ
from above.from above.
from above.from above.
from above.
Ce manuel convient aux modèles suivants
2
Table des matières


