3M 42-03 Manuel utilisateur

3
3M™2-Quart Cup Owner’s Manual
Manual del Usuario de la Copa de 2
Cuartos de 3M™
Read Warnings and Instructions
Lea las Instrucciones y Advertencias
This Manual Covers Cup Models
42-03, 42-130, 42-137, 42-330, 42-337, 42-437, 42-530, and 42-537
Este Manual cubre los modelos de copas
42-03, 42-130, 42-137, 42-330, 42-337, 42-437, 42-530, y 42-537

1
2
Table of Contents
Topic Page Number
Safety Statements ..................................................................................... 2
Cup Installation, Cleaning and Maintenance............................................... 5
42-03 Parts Identification .......................................................................... 7
42-130 Parts Identification ........................................................................ 9
42-137 Parts Identification ........................................................................ 10
42-330 Parts Identification ........................................................................ 11
42-337 Parts Identification ........................................................................ 13
42-437 Parts Identification ........................................................................ 14
42-530 Parts Identification ........................................................................ 17
42-537 Parts Identification ........................................................................ 18
Índice
Tema Número de Página
Medidas de seguridad................................................................................ 20
Instalación, limpieza y mantenimiento de la copa....................................... 23
Identificación de piezas del modelo 42-03 ................................................. 25
Identificación de piezas del modelo 42-130 ............................................... 27
Identificación de piezas del modelo 42-137 ............................................... 28
Identificación de piezas del modelo 42-330 ............................................... 29
Identificación de piezas del modelo 42-337 ............................................... 31
Identificación de piezas del modelo 42-437 ............................................... 33
Identificación de piezas del modelo 42-530 ............................................... 36
Identificación de piezas del modelo 42-537 .............................................. 37
Explanation of Signal Word Consequences
Indicates a hazardous situation, which, if not avoided,
could result in death or serious injury.
Indicates a hazardous situation, which, if not avoided, could result
in minor or moderate injury.
Explanation of Product Safety Label Symbols
Attention: Read accompanying documentation
3M™ 2-Quart Cup Safety Statements
Read, understand and follow all safety information contained in these
instructions prior to set up and operation of any 3M™ 2-Quart Cup. Retain these
instructions for future reference. Refer to the applicable Material Safety Data
Sheet and material container label for each material to be sprayed before using
this 3M equipment.
Intended Use:
Each 3M™ 2-Quart Cup is intended for professional use only. They are intended to deliver
the desired quality, and rate of application for large production needs.
The spray cups must be installed as specified in the 3M™ 2-Quart Cup Owner’s
Manual. They have not been evaluated for other uses.
CAUTION:
WARNING:

3
4
WARNING
To reduce the risks associated with all residual hazards:
• Read,understand,followandretainforfuturereferenceallsafetystatementsin
each applicable equipment owner’s manual and refer to the applicable Material
Safety Data Sheet and material container label for each material to be sprayed
before using your 3M equipment.
• Thisequipmentistobeusedonlybyprofessionalsfamiliarwiththepossible
applicable safety hazards.
• Donotusethisproductaroundunsupervisedchildren.
• Nevermodifyanypartofthisproduct.
• Alwayscomplywithlocal,state,andnationalcodesgoverningventilation,re
protection, operation, maintenance, housekeeping and disposal plus all safety
statements in applicable owner manuals, MSDS and material container labels.
To reduce the risks associated with chemical exposure:
• Neverpointaspraygunatanyoneelseorplaceanypartofyourbodyinfrontof
a spray nozzle.
• Beforeuse,checksprayequipmentfordamageandproperfunctionandrepair/
replace worn, damaged or malfunctioning components.
• Alwayswearappropriate,approvedpersonalprotectiveequipmentforeye,
skin, respiratory and hearing protection per the applicable MSDS and material
container labels at all times when spraying.
To reduce the risks associated with fire and explosion:
• MustmaintainadequateventilationperapplicableMSDSandmaterialcontainer
labels for each material being sprayed in the work area.
• Allignitionsources,suchassmoking,mustbekeptoutofthesprayarea.
• Alwaysmaintainareadilyavailable,approvedfireextinguisherorotherapprovedfire
fighting equipment in the spray area.
• Alwayslocateturbineunit/compressorasfarawayfromsprayareaastheair
supply hoses allow.
• NeverusesolventscontainingMethyleneChloride,Trichloromethaneor
other halogenated solvents for any reason to avoid a possible violent,
explosivechemicalreactionwhenexposedtoaluminumorzinc(refertothe
manufacturer’s MSDS or contact material supplier if there is any doubt to
confirm compatibility).
WARNING
To reduce the risks associated with hazardous Pressure:
•2-QuartCupmustnotexceed50psi.
•The2-QuartCupcomeswithafactoryinstalledreliefvalve.Donotattemptto
replace relief valve with a plug. Pull on relief valve ring to insure that it is working
properly.Replaceafaultyreliefvalveimmediately.
•Beforeopeningpressurizedcontainers,disconnectallsupplyairandrelieve
pressure by opening relief valve or screw.
CAUTION
To reduce the risks associated with lifting and handling:
• Alwaysfollowproperliftingandhandlingpracticeswhenmovingsystem
components.
To reduce the risks associated with hazardous air pressure:
• Maintainsprayequipmentper3Mcareandcleaninginstructionsintheapplicable
owner's manual.
• Ensureairinputpressureandallapplicatorsystemregulatorsareproperly
adjusted prior to each use.
• Alwaysfollowrequiredairpressurereliefproceduresforrelievingairpressure
from the unit.
To reduce the risks associated with environmental contamination:
• Spraymaterials,solvents,othercleaningmaterialsandelectroniccomponents
must be disposed of per federal, state and local regulations.

5
6
Note: Your cup is made from
aluminum. Certain solvents
containing Methylene Chloride and
Trichloromethane are not chemically
compatible with aluminum.
Read, understand and follow all
safety statements as well as wear
appropriate, approved personal
protective equipment per the
applicable MSDS and material
container labels for cleaning solutions.
Set Up Instructions:
With material in your cup, tighten the lid
andpressurereliefscrew.Attachyour
incoming high-pressure air to the 1/4”
quick disconnect fitting on the regulator.
Attachoneendofyourfluidhosetothe
fluid inlet fitting on the spray gun with
a 3/4” open-end wrench. Use a 11/16”
open-end wrench to apply counter force
tothefluidinletfitting.Attachtheother
end of your fluid hose to the cup with
a 3/4” open-end wrench. Use an 11/16”
open-end wrench to apply counterforce
to the 2-Quart fitting.
Installation Notes:
YourgunwrenchPN91-145or
PN97-047canbeusedinplaceofall
3/4” wrench references in this booklet.
Note: Spray solvent through the spray
gun and 2-Quart cup before using it for
the first time.
Note: RefertoyourSprayGunOwner’s
Manual for component references and
additional set up instructions. Pressure in
thecupshouldnotexceed50psi
(3.5BAR).
Fluid Pressure Range:
Using fluid pressures over 20 psi may
create heavy center effects in the spray
patterns. Changing the fluid nozzle to the
nextlargersize,thenreducingthefluid
pressure will reduce the heavy center
effects in the spray patterns.
Note: Relievethepressurefromthe
2-Quart cup before servicing.
Cup Care and Cleaning
It is important to clean your cup after
every use.
Before removing the cup lid from
the cup, be sure to relieve the cup
pressure through the relief valve.
Unscrew the cup lid and remove the
remaining material from the cup. To
prevent damage to the pressure cup,
never place cup lid in a gun washer
without removing the regulator, gauge
and safety valve. The cup may be
placed in a gun washer, or pour out the
contents, then flush the cup with clean
solvents and wipe it dry.
If not using a gun washer, unscrew
the cup lid and remove the remaining
material from the cup and then rinse
with a suitable solvent.
Note: Gunwashersaredesignedfor
cleaning, not storage of spray equipment.
Cup Installation, Cleaning and Maintenance
Gasket Notes
These cups are pressure cups, therefore
the gasket must be in good condition.
The lid must be firmly seated on the cup
to prevent air and fluid leakage. Inspect
the gasket, lube the gasket channel, and
pay attention to the fit with each use.
Replacethegasketwhennecessary.
Toextendthelifethegasket:Cleanand
dry gasket surface and store with cup
when not using.
To replace gasket:
1) Pull out the old gasket. Thoroughly
clean surface inside lid.
2) Inspect and clean lid of cup for dried
paint and burrs. Clean with solvent
or ultra-fine steel wool.
3) Place a small amount of petroleum
jelly on finger and lightly rub over
gasket channel inside lid. Carefully
install new gasket. Make sure that
the gasket is seated flat.
4) Tighten lid securely onto cup. Wait a
few minutes, then retighten. This will
ensure positive positioning of gasket
onto lid for optimum seal.
Cup Installation, Cleaning and Maintenance cont.

7
8
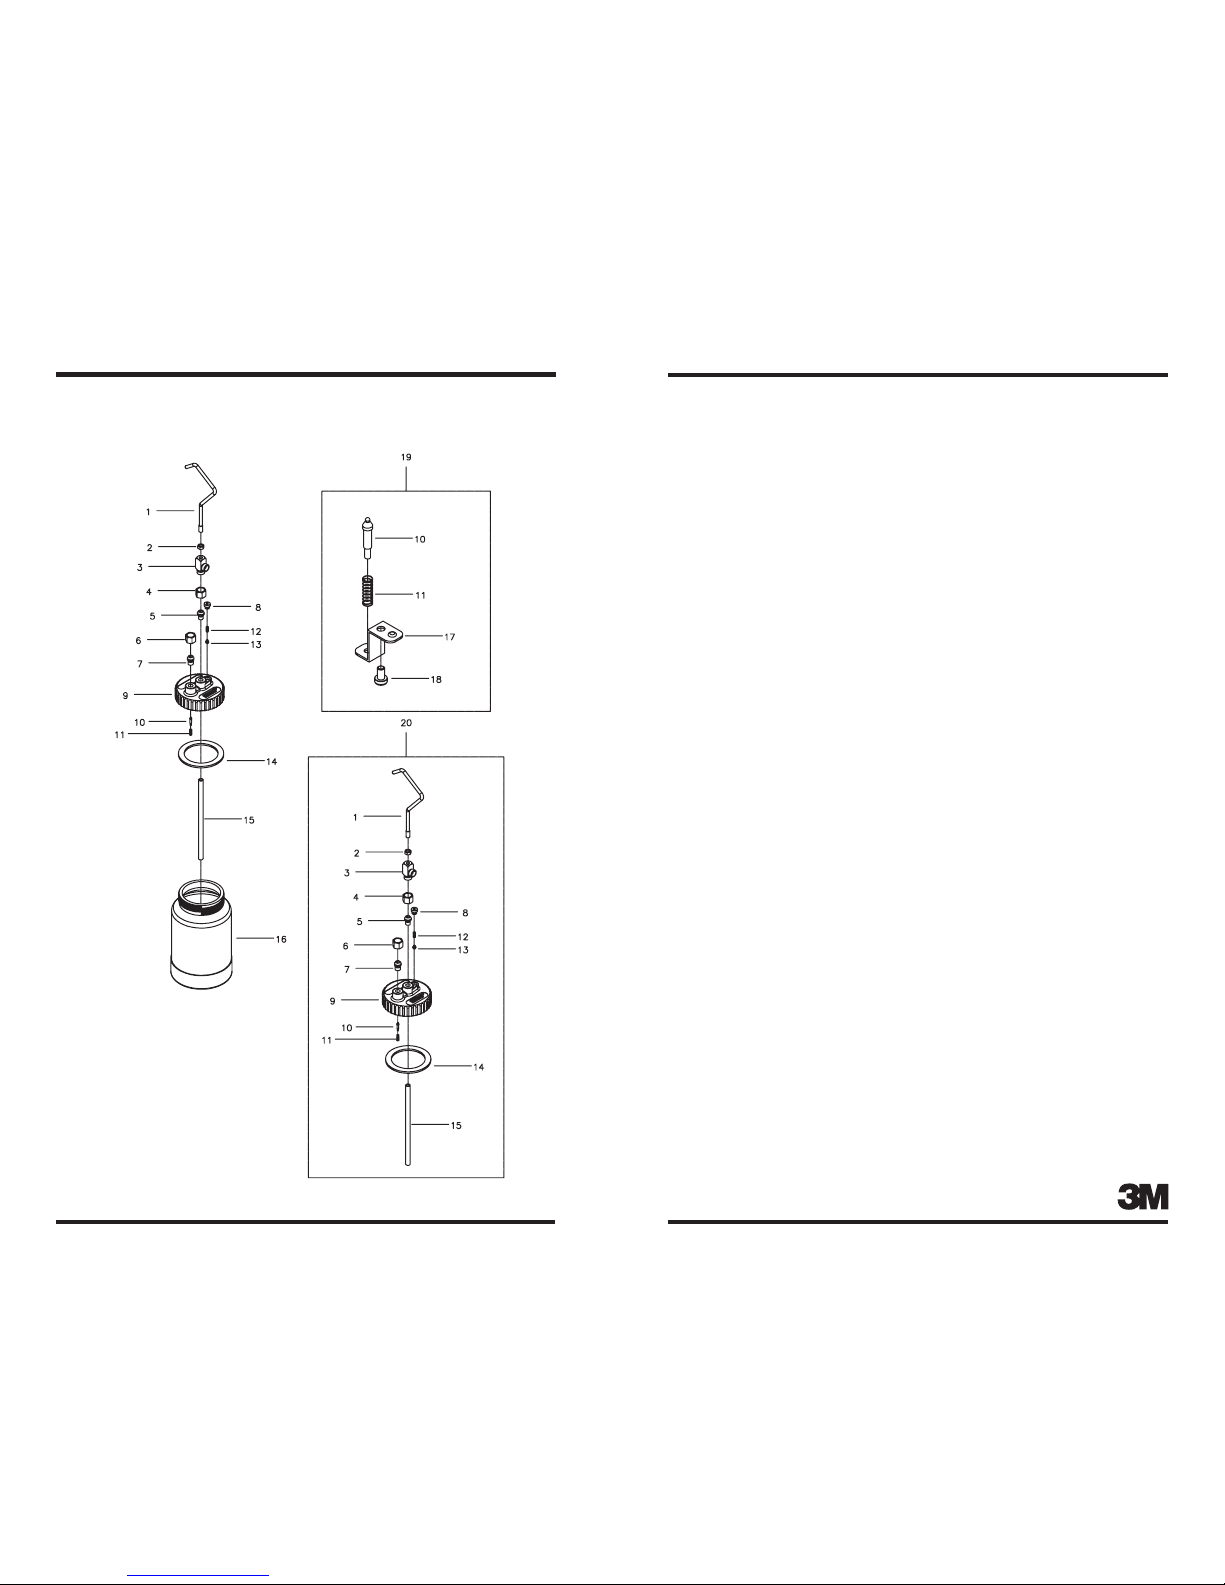
2-Quart Cup (42-03) Parts Identification
Item Description Replacement PN
Handle 94-3951
HexJamNut2
FluidOutletFitting 94-3933
SwivelNut 94-3544
Flareless Fitting 94-3555
SwivelNut 94-3906
Flareless Fitting 94-3917
ReliefValveStem 94-0898
Lid9
CheckValve10
CheckValveSpring11
ReliefValveSpring 94-09012
ReliefValveSeal 94-09113
Gasket 94-12214
Fluid Tube 94-26415
CupBottom 94-12116
CheckValveBracket17
Screw18
CheckValveReplacementKit 94-28619
CupLidAssembly 94-13320
2-Quart Cup (42-03) Parts Identification cont.

9
10
2-Quart Cup with Low Pressure Fluid Regulator (42-130)
Parts Identification
Item Description Replacement PN
2-QuartCupAssembly1
Gauge 93-0882
Q.D. Male Plug 80-9363
Regulator 93-087 4
SafetyValve 94-0975
Fluid Fitting 80-9576
LowPressureFluidRegulatorAssembly 93-0657
2-Quart Cup with Low Pressure Fluid Regulator and Hose (42-137)
Parts Identification
Item Description Replacement PN
2-QuartCupAssembly1
Gauge 93-0882
Q.D. Male Plug 80-9363
Regulator 93-0874
SafetyValve 94-0975
Fluid Fitting 80-9576
¼”I.D.FluidHose(Black)7
¼”Hosex8 3/8” Swivel
Connector 80-703
LowPressureFluidRegulator9
Assembly 93-065
FluidHoseAssembly 61-1344006.610

11
12
2-Quart Cup with Flow-Through Regulator (42-330)
Parts Identification
2-Quart Cup with Flow-Through Regulator (42-330)
Parts Identification cont.
Item Description Replacement PN
2-QuartCupAssembly1
Gauge 93-0882
SafetyValve 94-0973
Regulator 93-0554
AdjustmentSpring 93-0275
Q.D. Male Plug 80-9366
Fluid Fitting 80-9577
BonnetRepairKit 93-0268
Flow-ThroughPressureRegulatorwithGauge 93-077 9
Flow-ThroughPressureRegulatorAssembly 93-07910

13
14
2-Quart Cup with Flow-Through Regulator and Hoses (42-337)
Parts Identification
Item Description Replacement PN
2-QuartCupAssembly1
Gauge 93-0882
SafetyValve 94-097 3
Regulator 93-0554
AdjustmentSpring 93-0275
Q.D. Male Plug 80-9366
Fluid Fitting 80-9577
¼”I.D.AirHoseAssembly(Red) 60-14330068
¼”I.D.FluidHose(Black)9
¼”Hosex10 3/8” Swivel Connector 80-703
Flow-ThroughPressureRegulatorwithGauge 93-07711
Flow-ThroughPressureRegulatorAssembly 93-07912
¼”I.D.FluidHoseAssembly 61-1344006.6 13
2-Quart Cup with Low Pressure Regulator and Hoses (42-437)
Parts Identification

15
16
2-Quart Cup with Low Pressure Regulator and Hoses (42-437)
Parts Identification cont.
2-Quart Cup with Low Pressure Regulator and Hoses (42-437)
Parts Identification cont.
Item Description Replacement PN
2-QuartCupAssembly1
Gauge 93-088 2
Regulator 93-087 3
Q.D. Male Plug 80-9364
SafetyValve 94-097 5
Fluid Fitting 80-9576
¼”I.D.FluidHose(Black)7
¼”Hosex8 3/8” Swivel Connector 80-703
Split Lock Washer9
Hose Clamp10
Fitting–Q.D.withGardenHoseThd. 94-24611
Fitting–Female(GardenHose) 80-87712
Cylindrical Clamp13
¾”I.D.FlexHose14
Fitting – Male 80-83615
FlatWasher 80-981/3 (Packof3)16
Shut-OffValve 80-982/3 (Packof3)17
O-Ring UH-840/3 (Packof3)18
Q.D.BodywithS.S.Balls19
Q.D. Spring20
RetainingRing21
Q.D. Sleeve22
QuickDisconnectAssembly 80-98323
LowPressureRegulatorAssembly 93-06524
¼”I.D.FluidHoseAssembly 61-1344006.6 25
WhipHoseAssemblywithQ.D.andShut-Off 60-401800626

17
18
2-Quart Cup with Dual Pressure Regulator (42-530)
Parts Identification
Item Description Replacement PN
2-QuartCupAssembly1
Gauge(0-60psi)2
Bushing3
SafetyValve 94-0974
Regulator(0-50psi) 95-0305
Inlet Fitting 80-9576
Elbow7
Q.D. Male Plug 80-9368
Tee Fitting9
Gauge(0-120psi) 93-10210
Regulator(0-125psi) 93-06311
HexFitting12
Plug13
2-Quart Cup with Dual Pressure Regulator and Hoses (42-537)
Parts Identification
Item Description Replacement PN
2-QuartCupAssembly1
Gauge(0-60psi)2
Bushing3
SafetyValve 94-0974
Regulator(0-50psi) 93-0305
Inlet Fitting 80-9576
Elbow7
Q.D. Male Plug 80-9368
¼”I.D.FluidHose(Black)9
¼”Hosex10 3/8”SwivelNut
Connector 80-703
Tee Fitting11
Gauge(0-120psi) 93-10212
Regulator(0-125psi) 93-06313
Plug14
HexFitting15
¼”I.D.AirHose(Red) 60-143300616
¼”I.D.FluidHoseAssembly 61-1344006.617
Ce manuel convient aux modèles suivants
7
Table des matières
Langues :
Autres manuels 3M Outils