39 HUNTER HAWK Manuel utilisateur

infrared wildlife camera
fototrappola
USER GUIDE
MANUALE D’ISTRUZIONE
HAWK

2
CONTENTS
Quick Start Guide 3
Introduction 3
Application 3
Battery 3
SD Card 4
USB Function 6
Attention 6
Camera Overview 7
Camera Front Structure 7
Camera Internal Structure 8
Quickly use the camera 9
How to start the camera quickly 9
Menu Function Table 10
Main Features and Parameters 13
Main Features 13
Technical Parameters 14
Others 16
Replay 16
Details of Partial Function 17
Timer 17
Language 17
Firmware Upgrades 17
FAQ 18
Factory Default Setting 18
Warranty Policy 19
Appendix I Standard Packing List 19
Statements 20

3
QUICK START GUIDE
Introduction
39 Hunter Hawk wildlife game camera (also called hunting
camera/trail camera) is a scouting device. It can be triggered by
sudden change of ambient temperature caused by moving game
in a region of interest, which is detected by a highly sensitive
Passive Infra-Red (PIR) sensor, and then take pictures or video
clips automatically. The camera can achieve more applications
through Timer,
Interval, PIR Sleep and other function settings.
APPLICATION
• Camera trap for hunting, animal or incident observation
• Indoor/outdoor surveillance for domestic, ofce, warehouse,
farm or public use
• Observing wild animals/plants growth process
• For forestry bureau and forest public security to surveil and
take evidence of poaching etc.
• Other evidence-taking works
Warning:
Please read the user guide carefully before using this product to
avoid unnecessary loss!
Do not attempt to disassemble the camera, non-product quality
problems and man-made damages will not be covered under
warranty!
BATTERY
This product can be powered by battery or an external power
adapter.

4
A) Battery-powered
Please use high-quality alkaline batteries, nickel-metal hydride
batteries or rechargeable batteries. The camera supports two
groups of battery-powered, each group of four batteries, it’s
better to use 8 batteries for improving performance.
Note: The battery should be purchased by users. Make sure the
polarity matches the sign on the cover. If you are not using the
camera for an extended period of time, please remove batteries
from the camera to avoid possible acid leak that may damage the
camera.
B) External power supply
This product supports 6V / 2A DC power adapter, solar power and
so on.
Note: When the battery is low, in the “TEST” mode, the display
shows a low battery prompt (the battery icon in the lower right cor-
ner is empty and “low battery” appears in the center of the screen).
SD Card
The camera uses SD card to store images, the maximum capacity
can support 32GB. To ensure optimum performance of the came-
ra, use an SD card with a speed of 10x or higher. Please do not
remove the SD memory card, battery, and plug the power when
the camera is turned on!
Note: Before inserting an SD memory card, it is recommended to
format the SD card, turn off the SD card lock protection, and insert
the SD memory card correctly by the logo.
The following table lists the different capacity of the SD card
can shoot the number of pictures and video length (the value is
for reference only), you can choose to purchase the appropriate
capacity of the SD card.
Different capacity SD cards can store the number of images.

5

6
USB Function
This product can be connected via USB to a computer or TV.
The camera is connected to the USB port of the computer via the
USB data cable, turn the switch to “TEST” then “MSDC” will be
displayed on the screen, and the operation keys are disabled.
Find the removable disk from “My Computer”, then users can do
write operations to SD card via computer.
The camera is connected to the RCA of the TV via the TV cable and
the camera function switch to the “TEST” test preview mode. Select
“REPLAY” to view the image le in the camera.
Note: After connecting the TV, the camera display automatically turns
off!
ATTENTION
• On “TEST” mode, camera will be auto power off while no
keypad controlling. Please switch to “TEST” mode again if you
want to continue to use.
• Please keep power on during upgrade process. After nishes
upgrade, it needs to keep at least 5 seconds before you can
shut down or cut off power, otherwise it may causes upgrade
failure.
• When install camera please make sure there are not moving
objects in 3m area in front of lens such as branches, leaves,
weeds, strings, color ribbon and other objects which may utte-
red in the wind to avoid potential false triggers.
• Please do not aim the camera at a heat source such as boiler,
exhaust vents and light, etc. Avoid mistaking photos or videos
and shortening stand-by time.
• Please do not use the voltage and current does not meet or
exceed the requirements of the product of the external power
supply, so as not to cause damage to the camera.
• The battery inside the camera keeps the clock, the date and
time settings will remain until the battery runs out. After the
battery is disabled, the date and time settings will be reset to
the factory settings after power failure, and need to be reset
after each power.

7
CAMERA OVERVIEW
CAMERA FRONT STRUCTURE

8
CAMERA INTERNAL STRUCTURE

9
QUICKLY USE THE CAMERA
Switch:
1. Turn the switch to “ON” then camera enters working mode ( be-
fore in working mode the indicator will ash red and blue lights 8
times, display then appears countdown, in normal working mode
the display will be closed.
2. Switch to TEST; the camera into the test mode, users can set
parameters manually, take pictures or video, playback photos and
video.3. Switch to OFF, the camera stops working.
HOW TO START THE CAMERA QUICKLY
10
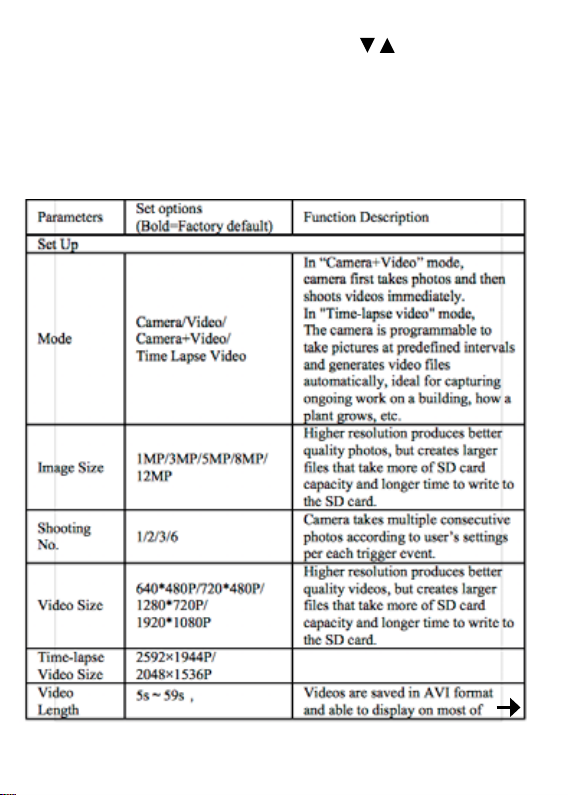
MENU FUNCTION TABLE
Press “MENU” key to enter the menu, press , key to move the
cursor to select various function options, “OK” key to conrm. Press
“REPLAY” to enter playback mode. Press the “EXIT” key to return to
the previous menu or exit the menu.
Menu function is related, part of the menu option will not appear
because of the relevant function and display as gray.
The bold text in the table is the default.
Table des matières
Langues :


