360 Vision Predator Hybrid PREDHYB-PSU-SM Feuille d'instructions

Predator Hybrid Installation Manual V2.1.25 Page 1
© 360 Vision Technology Ltd.
Predator Hybrid
(Analogue & HD/IP)
Installation/Conguration Manual
The Predator Hybrid camera is shipped from 360 Vision Technology in analogue mode.
When in analogue mode. Please note: No IP Video.

Predator Hybrid Installation Manual V2.1.25 Page 2
© 360 Vision Technology Ltd.
Table of Contents
1 Safety and Precautions .............................................................................................................................. 3
2 Housing Dimensional Drawing ................................................................................................................... 3
3 Bracket Dimensional Drawing .................................................................................................................... 4
4 Connections ............................................................................................................................................... 6
5 Connections to Predators with HMA........................................................................................................... 8
6 Basic Twisted Pair/RS485 Data Wiring .................................................................................................... 13
7 Predator Protocol/Address setup. ............................................................................................................ 13
8 Predator OSD .......................................................................................................................................... 14
8.1 PIN Number ..................................................................................................................................... 14
9 OSD Operation/Navigation....................................................................................................................... 15
10 Locating the Predator Hybrid on your Network ...................................................................................... 20
11 Connecting to the Predator Hybrid ......................................................................................................... 20
11.1 Live View ........................................................................................................................................ 22
11.1.1 Live Video............................................................................................................................... 22
11.1.2 Status ..................................................................................................................................... 23
11.1.3 Recording Browser................................................................................................................. 24
11.2 Settings .......................................................................................................................................... 25
11.2.1 Video ...................................................................................................................................... 25
11.2.2 Video Advanced ..................................................................................................................... 27
11.2.3 Advanced Features ................................................................................................................ 28
11.2.4 Camera................................................................................................................................... 31
11.2.5 PTZ Zones.............................................................................................................................. 34
11.2.6 Date/Time............................................................................................................................... 35
11.2.7 Network .................................................................................................................................. 36
11.2.8 Interfaces................................................................................................................................ 37
11.2.9 Recording ............................................................................................................................... 39
11.2.10 Audio .................................................................................................................................... 40
11.3 Add/Edit Users................................................................................................................................ 41
11.4 Maintenance................................................................................................................................... 42
11.5 Browser .......................................................................................................................................... 43
12 Network Settings Recovery.................................................................................................................... 44
13 Special Presets ...................................................................................................................................... 45
14 Important - Care of Painted Surfaces..................................................................................................... 46
15 Storage and Handling............................................................................................................................. 46
16 Warranty................................................................................................................................................. 46
17 PSU Enclosure....................................................................................................................................... 47
18 1080p Stream Resolutions & RTSP Links.............................................................................................. 47
19 720p Stream Resolutions & RTSP Links................................................................................................ 48
20 White Balance and Fast Shutter options................................................................................................ 49

Predator Hybrid Installation Manual V2.1.25 Page 3
© 360 Vision Technology Ltd.
1 Safety and Precautions
1. Please read these notes before attempting to operate the 360 Vision Predator Hybrid, and keep for future
reference.
2. DO NOT disassemble or remove covers. This will break the water seals and invalidate the warranty.
3. All servicing and repairs must be handled by 360 Vision Technology.
4. Avoid pointing the camera directly towards a bright light source (sunlight), or expose the camera to intensive
light situations as this may damage the camera pick-up device.
5. Installation should be carried out by suitably qualied personnel, in accordance with local codes of practice
and regulations.
6. 360 Vision Technology Limited accept no liability for any damage caused by incorrect or improper installation.
7. To prevent risk of injury caused by the Predator Hybrid or mounting options becoming detached, t a suitable
safety chain or lanyard.
8. Connection of data signals and power should only be made using a pre-made Predator Composite cables.
9. Use only 360 Vision Predator Hybrid power supplies. These have suitable terminals for all the wires in the
Predator composite cable.
10. Please handle the Predator Hybrid with care, as improper handling may cause damage within this unit.
2 Housing Dimensional Drawing
Weight 9.5kg
HMA Predator No Lamps (shown)
All versions of the Predator Hybrid are built with the integral HMA (Hinged Mount Adapter). The HMA is tted
during manufacture and is NOT available as an option for the installer to add to an existing Predator.

Predator Hybrid Installation Manual V2.1.25 Page 4
© 360 Vision Technology Ltd.
3 Bracket Dimensional Drawing
Stainless Steel Weight 3kg
MUST NOT BE REPRODUCED OR SHOWN TO
DO NOT SCALE
ALL DIMENSIONS IN MM
REMOVE ALL SHARP EDGES
SHEET:
D
C
B
A
D
C
B
A
4
3
2
1
4
3
2
1
A3
DESCRIPTION SCALE:
PERMISSION OF THE AUTHOR.
ANY THIRD PARTY WITHOUT THE DIRECT WRITTEN
C COPYRIGHT PROTECTED AND
THIS DRAWING AND ALL COPIES ARE
PART NUMBER:
0.125 7 OF 9
TOLERANCES:-
X = 0.5
X.X = 0.1
X.XX = 0.05
A3
3rd ANGLE PROJECTION
360 Vision Technology Ltd.
Unit 7, Seymour Court,
Manor Park, Runcorn, Cheshire,
WA7 1SY. United Kingdom.
www.360visiontechnology.com
250
TILT
SWEEP
433 PAN SWEEP
441
386
9.0 (x4) ON
101.6 (4 INCH) PCD
125
MOUNTING BASE
249
NAME:
M5350-A
PREDATOR ASSEMBLY
STAINLESS STEEL
ISS DATE REFERENCE
A 290216 FIRST ISSUE
290216
DATE :
K.CRAIK
RELEASED:
APPROVED:
ENGINEER:
--
MATERIAL: FINISH:
SCALE 0.3
SCALE 0.3
STAINLESS STEEL PREDATOR
NO LIGHTS, NO PMA.
MOUNTING
BASE
Weight 14kg
Predator Stainless Steel no lamps.
Predator Wall Bracket
MUST NOT BE REPRODUCED OR SHOWN TO
DO NOT SCALE
ALL DIMENSIONS IN MM
REMOVE ALL SHARP EDGES
SHEET:
D
C
B
A
D
C
B
A
4
3
2
1
4
3
2
1
A3
DESCRIPTION SCALE:
PERMISSION OF THE AUTHOR.
ANY THIRD PARTY WITHOUT THE DIRECT WRITTEN
C COPYRIGHT PROTECTED AND
THIS DRAWING AND ALL COPIES ARE
PART NUMBER:
0.333 4 OF 4
TOLERANCES:-
X = 0.5
X.X = 0.1
X.XX = 0.05
A3
3rd ANGLE PROJECTION
360 Vision Technology Ltd.
Unit 7, Seymour Court,
Manor Park, Runcorn, Cheshire,
WA7 1SY. United Kingdom.
www.360visiontechnology.com
9.5 (x4)
ON 101.6 (4") PCD
10
238
M8 (x8) x 15 DEEP
ON 101.6 (4") PCD
125
MOUNTING BASE
125
CAMERA BASE
45°
65
128
(65)
(40)
165
M5x10 DEEP
(LANYARD)
33
12
NAME:
M5635-B
WALL BRACKET DETAIL
VANDAL - ALUMINUM
ISS DATE REFERENCE
A -
FIRST ISSUE
B 240717
SHEET 4 ADDED
240717
DATE :
K.CRAIK
RELEASED:
APPROVED:
ENGINEER:
- -
MATERIAL: FINISH:
SCALE 0.4
PRODUCT DATA SHEET
Weight 1kg

Predator Hybrid Installation Manual V2.1.25 Page 5
© 360 Vision Technology Ltd.
Weight 2.5kg
Predator PMB Bracket
Weight 2.2kg
Predator Corner Bracket
Predator PMA Bracket
Weight 1kg
Stainless Steel Weight 3.6kg
MUST NOT BE REPRODUCED OR SHOWN TO
DO NOT SCALE
ALL DIMENSIONS IN MM
REMOVE ALL SHARP EDGES
SHEET:
D
C
B
A
D
C
B
A
4
3
2
1
4
3
2
1
A3
DESCRIPTION SCALE:
PERMISSION OF THE AUTHOR.
ANY THIRD PARTY WITHOUT THE DIRECT WRITTEN
C COPYRIGHT PROTECTED AND
THIS DRAWING AND ALL COPIES ARE
PART NUMBER:
0.125 9 OF 9
TOLERANCES:-
X = 0.5
X.X = 0.1
X.XX = 0.05
A3
3rd ANGLE PROJECTION
360 Vision Technology Ltd.
Unit 7, Seymour Court,
Manor Park, Runcorn, Cheshire,
WA7 1SY. United Kingdom.
www.360visiontechnology.com
125
OUTSIDE
DIAMETER
9 (x4) ON
101.6 (4 INCH) PCD
USE M8 BOLT FOR
FIXING TO POLE
60
M8 (x4) ON 101.6
(4 INCH) PCD.
FIX PREDATOR USING:
M8x30 HEX-HEAD BOLTS (x4)
- STAINLESS STEEL.
M8 SPRING LOCK WASHER (x4)
- STAINLESS STEEL.
73
M20x1.5P
M20x1.5P
73
M20x1.5P
8.0 (x4) ON 101.6
(4 INCH) PCD.
FIX PREDATOR USING:
M8x30 HEX-HEAD BOLTS (x4)
- STAINLESS STEEL.
M8 SPRING LOCK WASHER (x4)
- STAINLESS STEEL.
53.0
125
OUTSIDE
DIAMETER
M20x1.5P
10 (x4) ON
101.6 (4 INCH) PCD
USE M8 BOLT FOR
FIXING TO POLE
NAME:
M5350-A
PREDATOR ASSEMBLY
STAINLESS STEEL
ISS DATE REFERENCE
A 290216 FIRST ISSUE
290216
DATE :
K.CRAIK
RELEASED:
APPROVED:
ENGINEER:
--
MATERIAL: FINISH:
MOUNT PREDATOR
TO THIS FACE.
MOUNT POLE
TO THIS FACE.
MOUNT PREDATOR
TO THIS FACE.
MOUNT POLE
TO THIS FACE.
MATERIAL:
STAINLESS STEEL
MASS = 3.6 Kg PMA = STAINLESS STEEL
SCALE 0.5
SCALE 0.5
PMA = ALUMINIUM
MATERIAL:
ALUMINIUM
MASS = 0.93Kg
SCALE 0.5 SCALE 0.5

Predator Hybrid Installation Manual V2.1.25 Page 6
© 360 Vision Technology Ltd.
4 Connections
Predator Composite Cable
This pre-made Predator Composite Cable is available in 3m, 10m, 25m and 40m lengths. It contains video
coax, power and data cables. One end is tted with the IP68 12-way connector for direct connection to the
Predator, the other is supplied with all cables stripped and tinned ready to be connected to the two-part
connectors which are supplied with the Predator Hybrid power supply.
Connecting the composite cable to the Predator Hybrid
Route the cable through the brackets and cable glands before connecting it to the Predator Hybrid. Ensure
that the pins and sockets are lined up correctly, insert the connector and tighten the locking ring to make the
connector water tight.
It is important that the water should not be allowed to pool around the connector, as this will increase the risk of
contamination and corrosion which may cause poor connections.
The connector on the base of the Predator Hybrid is rated IP68, when it is correctly connected and the locking
ring is tight.
Predator Hybrid 12-way connector pin-out.
Socket 12-pin socket (solder side view)
fitted by 360 Vision to the composite cable
Coax Screen (B)
Grey (C)
White (D)
Blue (E)
Violet (F)
Pink (G)
Green (H)
Orange (J)
Red (K)
Black (M)
Brown (L)
Coax Core (A)
A
B
L C
D
E
F
G
MH
K
J
Cables for Ethernet Connection to Predator Hybrid IP Power Supply
Use CAT5, CAT5e or CAT6 cable for Ethernet Connections to Predator Hybrid power supply
(PREDHYB-PSU-SM).
Maximum Distance from Network Switch/Router to PREDHYB-PSU-SM
Using
PRED-40m
Using
PRED-25m
Using
PRED-10m
Using
PRED-3m
3m50m80m90m
When using PRED-25M or PRED-40M the distance can be increased to 100m if a Network Switch is tted local
to the Predator Hybrid Power Supply.

Predator Hybrid Installation Manual V2.1.25 Page 7
© 360 Vision Technology Ltd.
MAINS FUSE
PREDHYB-PSU-SM
MAINS FUSE 3 = 2AF
OUTPUT FUSE
PREDHYB-PSU-SM
FUSE 1 = 6.3AT
FUSE 2 = 1AT
FUSE 4 = N/A
MAINS input
100 - 240Vac
Io Vo
Adj Adj
Model Number: PREDHYB-PSU-SM
Serial Number: yymmndd-xxxx
Input Voltage:100-240VAC 50/60Hz
Input current: 2.1A
Output Voltage: 30V DC
Output Current: 6.2A
Coax Core
Coax Screen
RED
ORANGE
30Vdc(-)
30Vdc(+)
30Vdc(-)
30Vdc(+)
Tx-
Use pre-made cable PRED-3M,
PRED-10m, PRED-25m or
PRED-40m to connect to
Predator.
NOTE -All wires in composite
cable must be connected.
VIOLET
BLUE
Rx-
Rx+
PREDHYB-PSU-SM
WHITE
GREY
GREEN
PINK
255 x 180 x 100mm
Enclosure Dimensions
BROWN
BLACK
D+
D-
DO NOT USE
Tx+
360
USE
Camera Network/
Ethernet connection
To Analogue
Controller

Predator Hybrid Installation Manual V2.1.25 Page 8
© 360 Vision Technology Ltd.
5 Connections to Predators with HMA
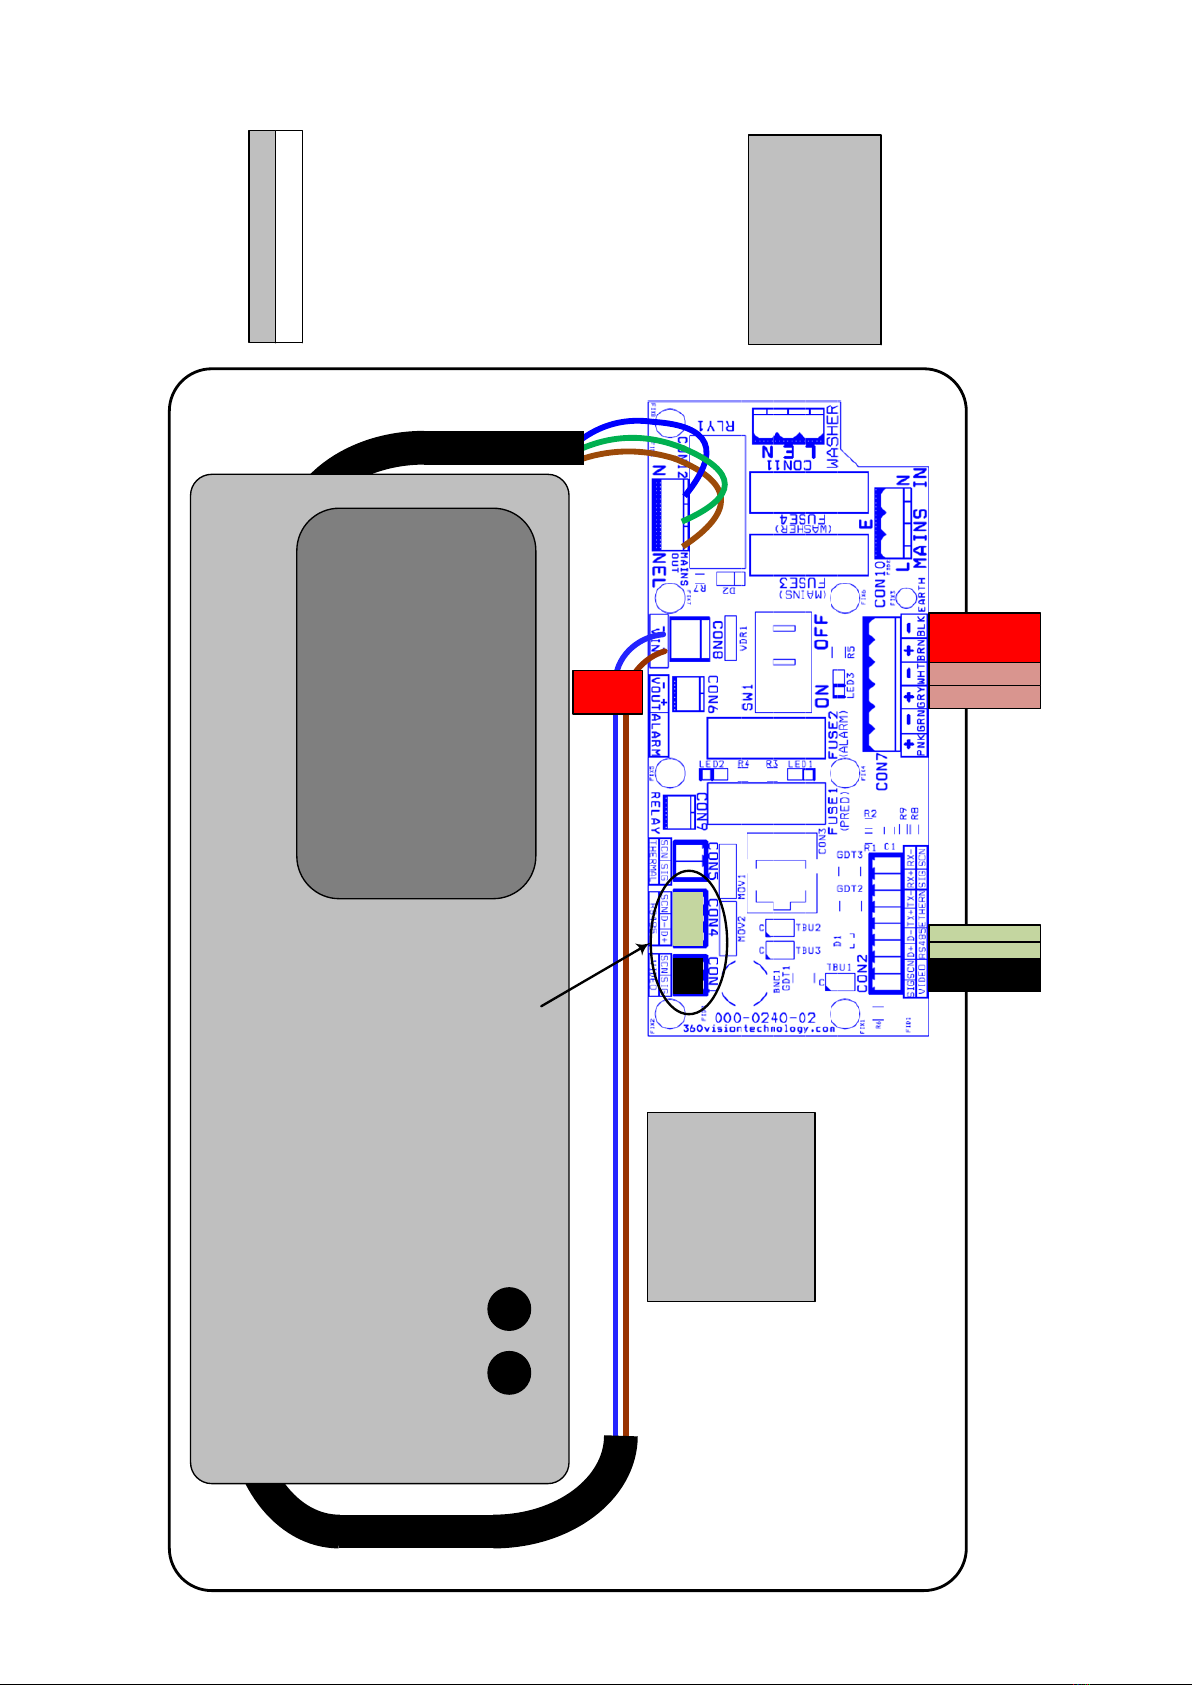
When the HMA (Hinged Mount Adaptor) is tted to the Predator Hybrid, the ‘Predator Composite Cable’ is not
used. Connections between the power supply and Predator use conventional cables as detailed below.
30Vdc Power connections between Predator PSU and Predator that is tted with HMA
Cable Size No IR SIR110 SIR140WL
0.75mm² 85m 32m 32m
1.00mm² 113m 43m 43m
1.25mm² 141m 54m 54m
1.50mm² 170m 65m 65m
2.50mm² 283m 108m 108m
3.00mm² 340m 130m 130m
4.00mm² 450m 173m 173m
Camera current draw table.
No Lamps IR80/
SIR110
IR110WL/
SIR140WL
Power Up 1.2A 1.2A 1.2A
Idle
(No Lamps) 0.83A 0.83A 0.83A
PTZ/Wiper
(No Lamps) 1.45A 1.45A 1.45A
Idle
(IR Lamps) N/A 2.3A 2.3A
PTZ/Wiper
(IR Lamps) N/A 3.1A 3.1A
Idle
(White Lamps) N/A N/A 2A
PTZ/Wiper
(White Lamps) N/A N/A 2.7A
Voltage at PSU 30Vdc 30Vdc 30Vdc
Voltage at Camera
(PTZ/IR Fast tour)
28.5Vdc
(No Lamps) 27Vdc 27Vdc
Current/Voltage test at
cable length (1.5mm²) 40m 40m 40m
Ethernet connections between Predator PSU and Predator that is tted with HMA.
The Ethernet connection uses standard CAT5, CAT5e or CAT6 cables tted with RJ45 connectors.
RJ45 CAT5, CAT5e, CAT6 Cable Signal
Pin 1 White with Orange Band Tx+
Pin 2 Orange Tx-
Pin 3 White with Green Band Rx+
Pin 4 Blue
Pin 5 White with Blue Band
Pin 6 Green Rx-
Pin 7 White with Brown Band
Pin 8 Brown

Predator Hybrid Installation Manual V2.1.25 Page 9
© 360 Vision Technology Ltd.
Analogue Camera output
Use BNC 1 for analogue video output.
Power Connections
Connect 24Vac/30Vdc to CON5.
Ethernet Connections
Connect Ethernet cable to HMA Predator connection board
using a RJ45 connector (CON4).
RS485 Connection
Use CON7 to connect the RS485 twisted pair data to the
Predator Hybrid.
Please make sure there is adequate spare cable (20cm) for when the camera is resting on the lanyard, failure
to do this could damage the connector circuit board.
Analogue Camera output
Use BNC 1 for analogue video output.
POE/Ethernet Connections
Connect Ethernet cable to HD HMA Predator connection
board using a RJ45 connector (CON3).
RS485 Connection
Use CON5 to connect the RS485 twisted pair data to the
Predator Hybrid.
Please make sure there is adequate spare cable (20cm) for when the camera is resting on the lanyard, failure
to do this could damage the connector circuit board.
Gain access to connectors in the HMA
• Ensure that the xed part of the HMA is securely bolted to the top of the pole.
• The hinged part of the HMA (Hinged Mount Adapter) is fastened to the xed part using three M8x25
long hex head bolts. Use a spanner (13mm) to remove the three bolts. Each bolt is tted with a
split spring lock washer, a plain metal washer (which prevents the split washer from damaging the
bre washer) and a bre washer (which prevents the paint on the hinged part from being damaged
unnecessarily.
• Open the hinge taking care that the gasket is not damaged and support the weight of the Predator.
Gently open the HMA until the lanyard is able to take the weight. If the lanyard appears to support the
weight of the Predator, there is no need to continue to support the Predator. The connection circuit
board can now be seen.

Predator Hybrid Installation Manual V2.1.25 Page 10
© 360 Vision Technology Ltd.
MAINS FUSE
PREDHYB-PSU-SM
MAINS FUSE 3 = 2AF
OUTPUT FUSE
PREDHYB-PSU-SM
FUSE 1 = 6.3AT
FUSE 2 = 1AT
FUSE 4 = N/A
MAINS input
100 - 240Vac
Io Vo
Adj Adj
Model Number: PREDHYB-PSU-SM
Serial Number: yymmndd-xxxx
Input Voltage:100-240VAC 50/60Hz
Input current: 2.1A
Output Voltage: 30V DC
Output Current: 6.2A
30Vdc(-)
30Vdc(+)
PREDHYB-PSU-SM
255 x 180 x 100mm
Enclosure Dimensions
N/A
From Camera
(Optional)
To Analogue
Controller
(Optional)
360
USE
Coax Core
Coax Screen
RS485 D+
RS485 D-
To Camera
Table des matières